×
- Hello
- Login or Register
- Quick Links
- Live Chat
- Track Order
- Parts Availability
- RMA
- Help Center
- Contact Us
- Shop for
- Acura Parts
- Acura Accessories
My Garage
My Account
Cart
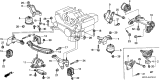
Genuine Acura Legend Engine Mount
Engine Motor Mount- Select Vehicle by Model
- Select Vehicle by VIN
Select Vehicle by Model
orMake
Model
Year
Select Vehicle by VIN
For the most accurate results, select vehicle by your VIN (Vehicle Identification Number).
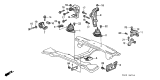
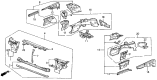
61 Engine Mounts found

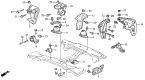
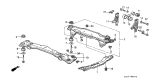
Acura Legend Bracket, Transmission Stopper (At)
Part Number: 50827-SP0-981$105.72 MSRP: $148.32You Save: $42.60 (29%)Ships in 1-2 Business Days
Acura Legend Bracket, Transmission Stopper (AT)
Part Number: 50827-SP0-980$105.72 MSRP: $148.32You Save: $42.60 (29%)Ships in 1-3 Business Days
Acura Legend Bracket, Engine Support
Part Number: 60831-SD4-300ZZ$42.30 MSRP: $59.02You Save: $16.72 (29%)Ships in 1-3 Business Days


| Page 1 of 4 |Next >
1-20 of 61 Results
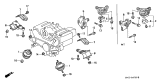
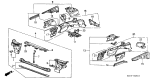
Acura Legend Engine Mount
The Acura Legend Engine Mount holds the powerplant in place and absorbs shakes, providing drivers with quiet confidence. Throughout the years, Acura relied first on a classic rubber and steel Engine Mount that sandwiches an elastic pad between two metal plates that block harsh vibrations and hold the engine and transaxle in the correct spot. Later Legend models adopted fluid-filled hydraulic Engine Mount designs, called hydromounts, whose internal liquid allows the mount to absorb finer tremors without allowing the engine to wander under load. At the top of the range, some Acura sedan trims have been introduced that feature electronically managed active Engine Mount units that remain soft when the car is idling and automatically stiffen at higher rpm to provide a balance between comfort and control. For each Acura driver, the health of the mount is vital because excess motion may cause hoses and shafts to crack, and Legend owners can often detect failure by clunks or additional vibration during startup. Ignoring a worn Engine Mount is an invitation to increased and expensive noise and damage.
We provide a broad range of OEM Acura Legend Engine Mount at unbeatable prices on our website. For your OEM parts, You can count on the guaranteed quality, manufacturer's warranty, outstanding customer service, and prompt delivery. We look forward to your visit.
Acura Legend Engine Mount Parts Questions & Experts Answers
- Q: How to Inspect, Maintain, and Replace Engine Mount and Engine Mount Torque Strut on Acura Legend?A:But engine mounts are usually something that doesn't need any attention, unless they are broken or worn, at which point they should be replaced immediately to protect driveline components. To check the mounts, jack the engine slightly and take weight off of the mounts; make sure the vehicle is supported on jackstands with a jack centered under the oil pan and protected with a block of wood if the block will be damaged. Look for cracks in the mounts or in hardened rubber, or separation between the mounts and the engine or frame; if movement exists between the mount plates and engine or frame, this may need to be tightened down with fasteners. Rubber preservative can slow deterioration by applying it. If you're not already already, disconnect the negative battery cable, set the parking brake, block the rear wheels and raise the front of the vehicle securely on jackstands. The weight bearing mounts and the torque rod make up the engine mounting system, with the upper mount fastened near the timing belt, and the lower mount between the crossmember and the engine. Most of the engine weight-supported by the front and rear mounts which are bolted on to the crossmembers and which are positioned relatively low, between the engine and firewall and between the engine and radiator-is bolted to the cross members. The torque rod reduces twisting forces on the mounts and, with automatic transaxle models, an additional upper transaxle mount. During final tightening, it should be level with the engine weight on the mounts, to prevent bushings from twisting or being offset too much for optimal bushing life, and to minimize noise and vibration. If you are replacing mounts, raise the engine up using a floor jack and set a block of wood over the oil pan so you protect it. Remove retaining bolts, and slide out the lower mount, then install new mount, and tighten fasteners securely. Remove the mount to bracket nut, then unbolt the mount from the bracket and lift it out, lift the engine to do so, for the front and rear mounts. Drop the engine on the new mount, tighten the nut and install the new mount on the crossmember. The upper mount carries little weight and almost never fails, however when the engine is removed you should inspect and replace it, much like you would change a car muffler; remove the through bolt and pull the mount from its bracket reinstalling it in reverse order and tighten bolts securely. Unbolt the torque rod from both the engine and frame brackets, lift it out and re-bolt it back into the same order, ensured that all bolts are tight.


