×
- Hello
- Login or Register
- Quick Links
- Live Chat
- Track Order
- Parts Availability
- RMA
- Help Center
- Contact Us
- Shop for
- Acura Parts
- Acura Accessories
My Garage
My Account
Cart
Genuine Acura Legend Trailing Arm
Trailing Control Arm- Select Vehicle by Model
- Select Vehicle by VIN
Select Vehicle by Model
orMake
Model
Year
Select Vehicle by VIN
For the most accurate results, select vehicle by your VIN (Vehicle Identification Number).
7 Trailing Arms found


Acura Legend Trailing Arm
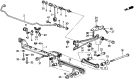
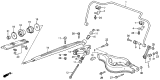
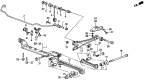
The Acura Legend Trailing Arm connects the rear axle to the chassis, allowing the vehicle to corner smoothly while maintaining proper wheel alignment. This Trailing Arm attaches the hub to a forward pivot point, so bumps push the wheel up instead of letting it wander, protecting alignment, tire wear, and ride comfort, contributing to predictable handling in the Acura suspension. In the beginning, Legend models applied a single pivot Trailing Arm with a Panhard rod controlling side motion. Later Legend models adopted a semi Trailing Arm setup whose dual pivots deliver more independent wheel travel and sharper response. The chassis eye and bushing or ball joint at the hub of both assemblies feature durable bushings that help absorb vibrations and allow free swing. Each Trailing Arm is made from stamped steel. You would not be surprised to learn that these parts can rust or bend if you hit a curb. Moreover, worn bushings will clunk until new parts restore geometry. The modern design of the Trailing Arm also keeps unsprung weight low, which is an advantage Acura has touted in marketing. It also allows Acura drivers to feel secure while maintaining the refined balance that makes the Legend comfortable on highways and confident in turns.
We provide a broad range of OEM Acura Legend Trailing Arm at unbeatable prices on our website. For your OEM parts, You can count on the guaranteed quality, manufacturer's warranty, outstanding customer service, and prompt delivery. We look forward to your visit.
Acura Legend Trailing Arm Parts Questions & Experts Answers
- Q: How to remove and inspect the upper and lower arms, as well as the Trailing Arm on Acura Legend sedans and coupes?A:Loosen the rear wheel lug nuts, raise the vehicle, place it securely on jackstands, and remove the wheel. To disconnect the outer end of the upper arm from the knuckle, remove the nut from the balljoint stud at the knuckle, use a two-jaw puller to separate the balljoint stud from the knuckle, and remove the two mounting bolts from the inner end of the arm before removing the upper arm. Inspect the bushing at the inner end of the arm for cracks and check the balljoint at the outer end for excessive freeplay; if either is worn, have a dealer replace it. Installation is the reverse of removal, ensuring all fasteners are tightened to the specified torque values. For the lower arms, remove the through bolt that attaches them to the knuckle, disconnect any brake hoses or cables, and remove the pivot bolts that attach the inner ends to the chassis before removing the lower arms. Inspect the lower arm bushings for cracks and deterioration, and replace any worn components through a dealer. Installation follows the reverse order of removal, with all fasteners tightened to the specified torque values. For the trailing arm, disconnect the brake hose and parking brake cable brackets, remove the stabilizer bar link, and take out the four bolts that attach the trailing arm bracket to the knuckle, followed by the pivot bolt that attaches the forward end to the chassis before removing the trailing arm. Inspect the bushings at both ends of the arm for cracks or deterioration and have them replaced by a dealer if necessary. Installation is the reverse of removal, ensuring all fasteners are tightened to the specified torque.

