×
- Hello
- Login or Register
- Quick Links
- Live Chat
- Track Order
- Parts Availability
- RMA
- Help Center
- Contact Us
- Shop for
- Acura Parts
- Acura Accessories
My Garage
My Account
Cart
Genuine Acura Legend Trunk Lids
Deck Lids- Select Vehicle by Model
- Select Vehicle by VIN
Select Vehicle by Model
orMake
Model
Year
Select Vehicle by VIN
For the most accurate results, select vehicle by your VIN (Vehicle Identification Number).
16 Trunk Lids found

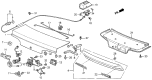


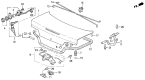
Acura Legend Trunk Lids
Acura Legend Trunk Lids protect the rear cargo area with their ability to seal valuables from weather, flying grit, and thieves. Built from strong sheet metal, these Trunk Lids swing up on rear hinges for easy loading and then latch firmly with weatherstrippings to secure gear in place. Through the sedan and coupe years, the Acura Legend maintained the same basic panel, though later styling rounded the outer skin for a sleeker profile. When bumps from bumper taps or rust from the salty roads emerge, it is better to replace the lid when it is compromised than to try to restore the metal. Because Trunk Lids are a victim of stones, gravel, and rain on every mile, fresh paint and clean drain channels help them reach their designed vehicle lifespan. Two common builds exist, the heavier all-steel version and a lighter rust-resistant blend, but both bolt to stock hinges on all Acuras and use the familiar central latch. With well-fitted Trunk Lids, whether you are riding an Acura first-generation Legend or its successor, every journey will be worry-free. Take good care of these Trunk Lids and they will last.
We provide a broad range of OEM Acura Legend Trunk Lids at unbeatable prices on our website. For your OEM parts, You can count on the guaranteed quality, manufacturer's warranty, outstanding customer service, and prompt delivery. We look forward to your visit.
Acura Legend Trunk Lids Parts Questions & Experts Answers
- Q: How to properly remove and install trunk lids while ensuring alignment and avoiding damage on an Acura Legend?A:Pull up your car's trunk lid and put soft cloth or padding around the lid's edges to stop paint damage when you take it off. Unplug all the trunk wire connections that keep getting in the way. To help you reposition the trunk lid, draw or trace marks along bolt heads connecting it to the trunk's hinges. Have an assistant help you as you take out both hinge-to-trunk lid bolts from each side, then take off the trunk lid. Changing the trunk lid's position is like going backward during the take-apart process: you place the hinge bolt flanges at the alignment points made earlier. Once mounted, lift the lid and verify that it fits evenly with the sides of the car. Moving the hinge bolts along different slots allows you to change how the lid tilts left and right and moves forward and backward. In order to adjust the settings, simply loosen the hinge bolts, move the lid to your desired position, and secure everything by tightening the bolts again. Moving the rear of the lid up and down will change how it sits against the car panels. Removing and putting back in adjusting shims between the lock and the body, then tightening the lock bolts, lets you do that adjustment. On Legend style vehicles, install the final height adjustment by tightening or loosening the rubber bumpers.


