×
- Hello
- Login or Register
- Quick Links
- Live Chat
- Track Order
- Parts Availability
- RMA
- Help Center
- Contact Us
- Shop for
- Acura Parts
- Acura Accessories
My Garage
My Account
Cart
Genuine Acura TL Consoles
- Select Vehicle by Model
- Select Vehicle by VIN
Select Vehicle by Model
orMake
Model
Year
Select Vehicle by VIN
For the most accurate results, select vehicle by your VIN (Vehicle Identification Number).
15 Consoles found

Acura TL Rear Console (Mild Beige)
Part Number: 83401-S0K-A01ZC$90.49 MSRP: $126.95You Save: $36.46 (29%)Ships in 1-2 Business Days
Acura TL Box Assembly, Console (Gray)
Part Number: 83402-SEP-A02ZE$51.95 MSRP: $418.47You Save: $366.52 (88%)Ships in 1-2 Business DaysAcura TL Box Assembly, Console (Light Cream Ivory)
Part Number: 83402-SEP-A02ZD$45.24 MSRP: $397.58You Save: $352.34 (89%)Ships in 1-2 Business Days


Acura TL Consoles
Acura TL Consoles are the command center of the cabin, providing drivers with organized storage and quick access to important controls. Across four TL generations, their goal remains the same: have money, phones, and keys handy while holding the gear shifter plus audio and climate buttons. Early Acura sedans utilized a low profile console with a simple bin and ashtray. Later Acura TL models had a taller wraparound case stretching from dash to armrest with layered cubbies, twin cupholders, and soft lids. These Consoles are dependent on robust plastic and rubber finishes that deal with regular opening, but hinges and latches can become fatigued. Thus, fresh parts prevent rattling. Color selection is important because the console is the dominant feature on sightlines, and using a smart shade can help brighten an aging TL interior. Design choices range from basic trays to units with removable cupholder doors, but all Consoles share a molded center tunnel to anchor switches and create a comfy armrest. Regular cleaning of rubber panels with mild soap gives a new shine to the Acura cabin. Modern Consoles may even have rear vents and outlets, proving that Consoles have grown into multi-function hubs.
We provide a broad range of OEM Acura TL Consoles at unbeatable prices on our website. For your OEM parts, You can count on the guaranteed quality, manufacturer's warranty, outstanding customer service, and prompt delivery. We look forward to your visit.
Acura TL Consoles Parts Questions & Experts Answers
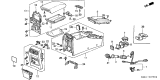
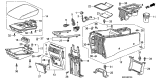
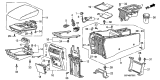
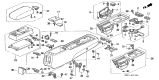
- Q: How to remove the center consoles on an Acura TL?A:For 2003 and earlier models, carefully pry off the console trim pieces from each side, which are secured by five clips each. Remove the two mounting screws from the front corners of the rear console, then open the lid, take out the mat, and remove the two rear console mounting screws. Pull up the rear console, disconnect the electrical connector for the accessory socket, and remove it. Next, remove the driver's side dashboard lower cover, then take out the screws and clips to remove the left and right front console covers. Remove the shift indicator trim ring and the seat heater switches from the console panel tray, then pry out the console panel tray and release the hooks and tabs. Remove the screws and tabs to take off the console panel, with installation being the reverse of removal. For 2004 and later models, lower the shift lever boot and unscrew the shift lever knob. Use a trim tool to disengage the clips securing the narrow trim pieces, then remove the screws from the front corners of the rear console section. Open the console box lid, remove the storage box mat, and take out the rear console section mounting screws. Slide the rear console section back to disengage the hooks, lift it up, detach the harness clip, and disconnect the electrical connectors for the accessory power socket and light bulb socket. Move the seats back, remove the driver's side dashboard lower cover and glove box, then take off the shift indicator trim ring. For manual transmission models, remove the insert panel secured by tabs, then remove fasteners from each console side cover and disengage the clips. Remove the screws securing the upper part of the center console panel, pull back to release the locator pins, lift the rear end of the panel to disconnect the electrical connectors from the seat heater switches and accessory power socket, and then remove the center console panel, with installation being the reverse of removal.
")


