×
- Hello
- Login or Register
- Quick Links
- Live Chat
- Track Order
- Parts Availability
- RMA
- Help Center
- Contact Us
- Shop for
- Acura Parts
- Acura Accessories
My Garage
My Account
Cart
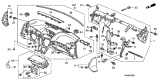
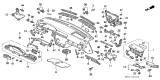
Genuine Acura TL Instrument Panel
- Select Vehicle by Model
- Select Vehicle by VIN
Select Vehicle by Model
orMake
Model
Year
Select Vehicle by VIN
For the most accurate results, select vehicle by your VIN (Vehicle Identification Number).
11 Instrument Panels found

Acura TL Panel Assembly, Instrument (Type C) (Ivory)
Part Number: 77100-TK4-A01ZC$1177.79 MSRP: $1682.08You Save: $504.29 (30%)Ships in 1-3 Business Days
Acura TL Panel Assembly (Premium Black)
Part Number: 77100-TK4-A02ZC$1361.41 MSRP: $1944.32You Save: $582.91 (30%)Ships in 1-3 Business DaysAcura TL Panel Assembly*Type B*
Part Number: 77100-TK4-A02ZB$1368.26 MSRP: $1954.09You Save: $585.83 (30%)Ships in 1-3 Business DaysAcura TL Panel Assembly, Instrument (Type B) (Grayge)
Part Number: 77100-TK4-A01ZB$1368.26 MSRP: $1954.09You Save: $585.83 (30%)Ships in 1-3 Business Days


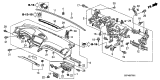

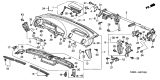
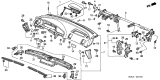

Acura TL Instrument Panel
The Acura TL Instrument Panel is the primary control panel for the driver that displays and regulates essential information right in front of the wheel. The Instrument Panel is situated in the dash area you view on every trip. This area holds gauges for speed and controls to monitor the condition of the engine and other essentials. This setup has been consistent in Acura's history with each TL generation. The constant contact, the sun, and the small items people put on the dashboard can crack or dull this surface, so many owners add a fitted Instrument Panel cover that prevents dirt, sharp objects, and damaging rays from making contact to keep this part clear and readable. The car has featured two broad styles, the classic analog gauge layout and the newer digital Instrument Panel format described above. In the case of your car, both of these styles follow the same goal: to group the highly important data in one glanceable spot. No matter the styling, it is important to preserve the look with regular use. An unmarred Instrument Panel maintains cabin appearance and reinforces the refined feel expected of Acura and its popular TL line.
We provide a broad range of OEM Acura TL Instrument Panel at unbeatable prices on our website. For your OEM parts, You can count on the guaranteed quality, manufacturer's warranty, outstanding customer service, and prompt delivery. We look forward to your visit.
Acura TL Instrument Panel Parts Questions & Experts Answers
- Q: How Can the Instrument Panel Be Removed and Reinstalled on an Acura TL?A:This procedure is challenging for home mechanics due to hidden fasteners, difficult angles, and numerous electrical connectors that need to be tagged and disconnected. It is advisable for only experienced do-it-yourselfers to attempt it. When removing the instrument panel, carefully note how each piece is removed, its placement, and how it is secured, as this will facilitate reassembly. Begin by ensuring you have the anti-theft code for the radio and record the preset frequencies. Disconnect the negative battery terminal cable. For 2003 and earlier models, remove the front seats and center console, followed by all dashboard trim panels, the ground bolt at the center console's forward end, and detach the clips and wire harness clip. For models from 1999 to 2002, remove the two mounting bolts for the Data Link Connector bracket and the DLC itself. Release the tabs to remove the rear vent duct and disconnect all electrical connectors in the dash area, noting that lowering the steering column may be necessary for access. Remove the trim caps for the instrument panel mounting bolts, followed by the bolts themselves, and then proceed with reinstallation in reverse order. For 2004 and later models, follow similar initial steps by removing the front seats, center console, and dashboard trim panels. Remove the rear vent duct by pulling the clips from the brackets, detach the carpet from the vertical stanchions, and remove the two rear joint vent ducts. Disconnect the electrical connector from the yaw rate/lateral acceleration sensor, being cautious as it is sensitive, and remove the sensor and its mounting bracket. Disconnect all electrical connectors in the dash area, remove the brake pedal support bracket bolts, and detach the parking brake handle assembly without disconnecting the cables. Remove the center bracket mounting bolts and the instrument panel mounting bolts, including trim caps, and finally remove the instrument panel, completing the process by reinstalling in reverse order.
")
Related Acura TL Parts
 Acura TL Instrument Cluster
 Acura TL Steering Column Cover
 Acura TL Tachometer
 Acura TL Seat Heater Switch
 Acura TL Air Bag
 Acura TL Ashtray
 Acura TL Cigarette Lighter
 Acura TL Cup Holder
 Acura TL Dome Light
 Acura TL Gauge Trim
 Acura TL Glove Box
 Acura TL Speedometer
Browse by Year
2014 Instrument Panel 2013 Instrument Panel 2012 Instrument Panel 2011 Instrument Panel 2010 Instrument Panel 2009 Instrument Panel 2008 Instrument Panel 2007 Instrument Panel 2006 Instrument Panel 2005 Instrument Panel 2004 Instrument Panel 2003 Instrument Panel 2002 Instrument Panel 2001 Instrument Panel 2000 Instrument Panel 1999 Instrument Panel 1998 Instrument Panel 1997 Instrument Panel 1996 Instrument Panel 1995 Instrument Panel