My Garage
Cart
Make sure this part fits

Acura 14400-P72-014 Timing Belt (126Ru26)

1994-2001 Acura Integra 14400P72014

Customer Questions & Expert Answers (3)
14400-P72-014 Acura Timing Belt (126Ru26) Product Photo 1 of 2
  • Part Description
    Belt, Timing (126Ru26)
  • Replaces
    14400-P72-004
  • Manufacturer
    Acura
Make sure this part fits
$98.57 MSRP: $138.28
You Save: $39.71 (29%)
Ships in 1-3 Business Days
1
ADD TO CART
  • Related Parts
  • Product Specifications
  • Vehicle Fitment
  • Customer Questions & Expert Answers
  • Product Specifications

    BrandGenuine Acura
    Manufacturer Part Number14400-P72-014
    Part DescriptionBelt, Timing (126Ru26)
    Other NamesTiming Belt
    Item Dimensions12.2 x 6.1 x 6.1 inches
    Item Weight0.70 Pounds
    ConditionNew
    Fitment TypeDirect Replacement
    Replaces14400-P72-004
    ManufacturerAcura
    SKU14400-P72-014
    WarrantyThis genuine Acura part is guaranteed by Acura's factory warranty.
    Shipping & ReturnShipping Policy Return Policy
    Warning: California's Proposition 65
  • Vehicle Fitment

    Year Make Model Body & Trim Emission & Transmission
    2001 Acura Integra3 Door GS-R, 3 Door Type-R, 4 Door GS-RKA 5MT
    2000 Acura Integra3 Door GS-R, 3 Door Type-R, 4 Door GS-RKA 5MT
    1999 Acura Integra3 Door GS-R, 4 Door GS-RKA 5MT
    1998 Acura Integra3 Door GS-R, 3 Door Type-R, 4 Door GS-RKA 5MT
    1997 Acura Integra3 Door GS-R, 3 Door Type-R, 4 Door GS-RKA 5MT
    1996 Acura Integra3 Door GS-R, 4 Door GS-RKA 5MT
    1995 Acura Integra3 Door GS-R, 4 Door GS-RKA 5MT
    1994 Acura Integra3 Door GS-R, 4 Door GS-RKA 5MT
  • Customer Questions & Expert Answers

    Q:
    Please Check fit Posted by AcuraPartsWarehouse Specialist
    A:
    You can Select Your Vehicle to check if 14400-P72-014 fits your vehicle.
    Posted by AcuraPartsWarehouse Specialist
    Q:
    What are the steps involved in replacing the Timing Belt and Variable Timing Sprocket on an Acura Integra SOHC engine? Posted by Customer
    A:
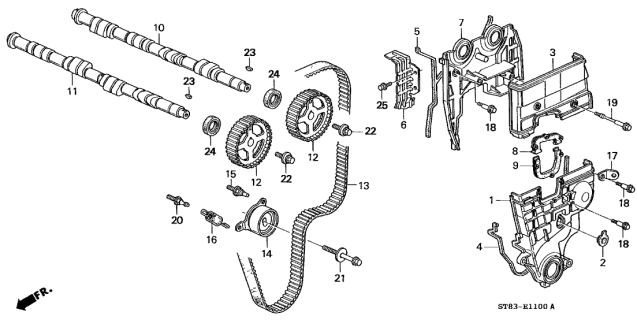
    The timing system is complex, and severe engine damage can occur if mistakes are made, so only highly experienced individuals should attempt this procedure. Begin by disconnecting the cable from the negative terminal of the battery, ensuring you have the correct activation code for the radio if it has an anti-theft system. Place blocks behind the rear wheels and set the parking brake, then loosen the lug nuts on the left front wheel and raise the front of the vehicle, supporting it securely on jack stands. Remove the left front wheel and the splash shield from under the engine, then support the engine with a floor jack using a wood block to avoid damaging the oil pan. Remove the upper left engine mount bracket, spark plugs, and engine drivebelts, then unbolt the power steering pump without disconnecting the hoses and set it aside. Remove the engine oil dipstick and position the number one piston at Top Dead Center, rotating the crankshaft counterclockwise to avoid incorrect timing belt adjustment. Remove the upper timing belt cover, drivebelt idler pulley and bracket, and loosen the crankshaft pulley bolt while holding the crankshaft pulley stationary. Slip the pulley off, remove the dipstick tube, and the lower timing belt cover. If reusing the timing belt, make match marks for alignment and indicate the direction of rotation. Loosen the timing belt tensioner bolt, release the tension, and remove the crankshaft fluctuation sensor before slipping off the belt. If replacing the camshaft or camshaft oil seal, use a large screwdriver to prevent rotation while removing the bolt and sprocket. Inspect the belt tensioner pulley for rough operation and play, replacing it if necessary, and check the timing belt for wear, cracks, or oil contamination, replacing it if any issues are found. Before starting the engine, rotate the crankshaft by hand through at least two full revolutions, stopping if any resistance is felt, indicating a potential issue. Reinstall the sprockets, ensuring the Woodruff key and inner belt guide are in place, and tighten the camshaft sprocket bolt. Before installing the timing belt, ensure the camshaft sprocket's dot or "UP" mark is at the top and the index marks align with the cylinder head surface. Temporarily reinstall the crankshaft pulley and bolt, turning the crankshaft until the timing mark on the crankshaft sprocket aligns with the pointer on the oil pump. Install the timing belt around the crankshaft sprocket, tensioner pulley, water pump pulley, and camshaft sprocket in sequence, then loosen the tensioner bolt to allow it to tension the belt before temporarily tightening it. Turn the crankshaft counterclockwise six revolutions and recheck the timing marks for proper alignment, ensuring no binding occurs. To properly tension the timing belt, loosen the tensioner bolt half a turn, rotate the crankshaft until the camshaft pulley is three teeth past TDC, and tighten the tensioner bolt. Reinstall the remaining parts in reverse order, adjust the drive belts, and run the engine to check for proper operation.
    Posted by AcuraPartsWarehouse Specialist
    Q:
    How to replace the Timing Belt and Variable Timing Sprocket in a DOHC engine on an Acura Integra? Posted by Customer
    A:
    Because the timing system is demanding and can hurt the engine badly if you make mistakes, only pros should try it themselves. To start, remove the cable from the bottom of the battery, and have the radio activation code ready in case your car has a theft system. Place blocks behind your car's rear wheels and engage the parking brake. To work under the vehicle, carefully lift the car on jack stands while removing the nuts from the left front wheel. Move the engine by lifting it with a floor jack while keeping your engine block protected below and a chunk of wood between the jack and the motor. Unhook the splash shield underneath the engine and take off the left front wheel. Begin by removing the upper left engine mount on a lntegra model, then work your way through removing the spark plugs and drivebelts, and finally, the valve cover. Untighten and take out the power steering pump, still linked to its hoses, and put it to the side. Next, remove the cruise control actuator. Turn the crankshaft counterclockwise until Top Dead Center of the number one piston is reached, to prevent mistakes when adjusting the timing belt. Using a strap or chain wrench, keep the crankshaft pulley from turning while you undo its bolt, and pull the pulley off. Unbolt and remove the idler pulley and bracket holding the belt. If you use the timing belt again, play a little game to line up the marking and add an A for correct turning direction. Take apart the timing belt cover, loosen the tensioner bolt by hand, and slide the belt away from its grooves on the sprockets. While taking out the sprocket bolt for cams or oil seals, keep the camshaft from turning with a large screwdriver. Spin the belt tensioner pulley gently by hand, checking if it has any movement or hardness issues. Replace both parts if needed. Also look for damage, cracks, or oil on the timing belt - fix or purchase a new one if you find any problems with it. Slowly turn the crankshaft by hand two full times before starting the engine, watching for any resistance that shows when pistons hit valves. Reattach and tighten the camshaft sprocket bolts when you put the sprockets back in. Before you put on the timing belt, turn the camshaft sprocket s so their "UP" labels face up and line up the timing indicators with the rear cover pointer. Insert just the crankshaft pulley and bolt again, turn the crankshaft until the timing mark on the crankshaft sprocket lines up with the oil pump housing pointer. Stop when you feel resistance. Put the timing belt on tightly and follow the right order. Then, just tighten the tensioner bolt for now. Before installing the belt, crank the engine six full turns while again checking all marks to be in their correct spot. If pullback is found, undo the belt and start over. To make the timing belt just right, loose the tensioner bolt first, turn your crankshaft in the counterclockwise direction until your camshaft pulley passes three teeth past the top dead center position, and then tighten the tensioner bolt back. Fit the rest of the parts in the opposite order. Put on the drivebelts, then start the engine to make sure everything works as it should.
    Posted by AcuraPartsWarehouse Specialist
    If you have any questions about this product, please don't hesitate to ask us. We will be happy to help you!

Genuine Acura Part 14400-P72-014, the Right Choice

For dependable performance, buy part # 14400-P72-014 Timing Belt (126Ru26). Also known as Timing Belt. In terms of quality and durability, OEM components set the standard. They are produced at the Acura factory and subjected to a quality assurance routine. This part fits 1994-2001 Integra.

AcuraPartsWarehouse.com is a major online store of original Acura parts and accessories, including 14400P72014 Timing Belt (126Ru26). At our site, we are offering you brand new OEM Acura equipment. We stock a broad selection of genuine parts at competitive prices. When you are in need of quality, reliability, and durability, and want something cost-effective in combination, this is the part you need. Our components are all warranted by the manufacturer for your peace of mind.

Why choose Acura Parts Warehouse

  • Dedicated Service

    Your complete satisfaction is our #1 goal

  • Lowest Prices

    Best deals on genuine OE parts from dealerships

  • Fast Delivery

    Orders are processed and delivered promptly