My Garage
Cart
Make sure this part fits

Acura 12100-P73-J00 Cylinder Head Assembly

1997-2001 Acura Integra 12100P73J00

Customer Questions & Expert Answers (4)
12100-P73-J00 Acura Cylinder Head Assembly Product Photo 1 of 3
  • Part Description
    Cylinder Head Assembly
  • Manufacturer
    Acura
  • Manufacturer's Notes
    This part is discontinued.
Make sure this part fits
  • Related Parts
  • Product Specifications
  • Vehicle Fitment
  • Customer Questions & Expert Answers
  • Product Specifications

    BrandGenuine Acura
    Manufacturer Part Number12100-P73-J00
    Part DescriptionCylinder Head Assembly
    Other NamesCylinder Head
    Item Dimensions21.4 x 13.5 x 11.1 inches
    Item Weight39.90 Pounds
    ConditionNew
    Fitment TypeDirect Replacement
    ManufacturerAcura
    SKU12100-P73-J00
    WarrantyThis genuine Acura part is guaranteed by Acura's factory warranty.
    Shipping & ReturnShipping Policy Return Policy
    Warning: California's Proposition 65
  • Vehicle Fitment

    Year Make Model Body & Trim Emission & Transmission
    2001 Acura Integra3 Door Type-RKA 5MT
    2000 Acura Integra3 Door Type-RKA 5MT
    1998 Acura Integra3 Door Type-RKA 5MT
    1997 Acura Integra3 Door Type-RKA 5MT
  • Customer Questions & Expert Answers

    Q:
    Please Check fit Posted by AcuraPartsWarehouse Specialist
    A:
    You can Select Your Vehicle to check if 12100-P73-J00 fits your vehicle.
    Posted by AcuraPartsWarehouse Specialist
    Q:
    How to remove and reinstall the Cylinder Head in a SOHC engine on an Acura Integra? Posted by Customer
    A:
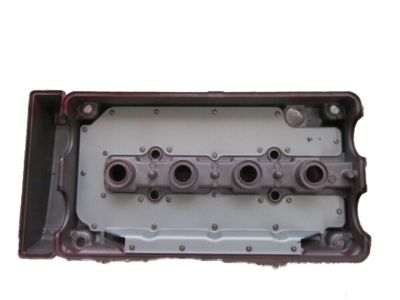
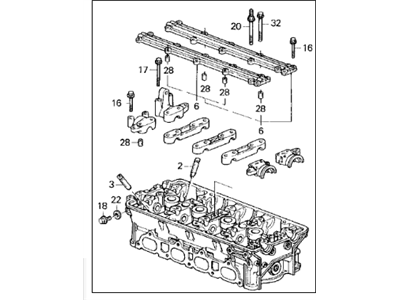
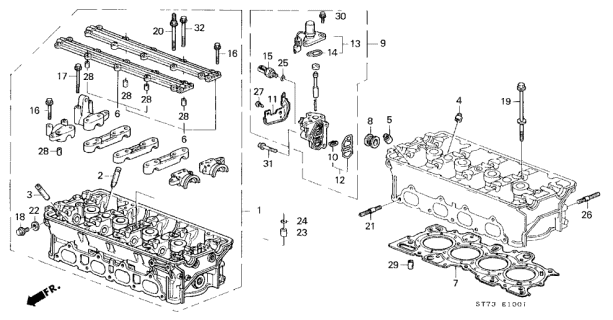
    Allow the engine to cool completely before beginning this procedure. Position the number one piston at Top Dead Center. Disconnect the cable from the negative terminal of the battery, ensuring you have the correct activation code for the radio if it has an anti-theft system. Drain the cooling system and remove the spark plugs. Remove the air cleaner duct and housing, followed by the drivebelts. Unbolt the power steering pump and set it aside without disconnecting any hoses, then remove the power steering pump bracket. Disconnect the throttle cable from the throttle body and relieve the fuel system pressure. Disconnect the fuel feed hose, evaporative emission control hose, breather hose, and PCV hose. Disconnect the coolant bypass hose, heater hose, and upper radiator hose. Disconnect the electrical connectors for the fuel injectors, engine coolant temperature sensor, engine coolant temperature switch, temperature sender, throttle position sensor, manifold absolute pressure sensor, oxygen sensor, EGR valve lift sensor, VTEC solenoid, VTEC pressure switch, and idle air control valve. Support the engine with a floor jack, placing a wood block between the jack pad and the oil pan to avoid damage. Remove the left engine mount bracket, then remove the intake manifold brace and exhaust manifold flange bolts. You may wish to detach the intake manifold or exhaust manifold to make handling the cylinder head easier. Remove the valve cover and the distributor, including the cap and wires. Remove the timing belt, rocker arm assembly, and camshaft. Loosen the cylinder head bolts in 1/4-turn increments until they can be removed by hand, working in a reverse pattern of the tightening sequence to avoid warping the cylinder head. Lift the cylinder head off the engine, prying between the power steering pump bracket and the engine block if resistance is felt, and set the head on blocks of wood to prevent damage to the gasket sealing surfaces. Check the cylinder head for warpage. The mating surfaces of the cylinder head and block must be perfectly clean when the head is installed. Use a gasket scraper to remove all traces of carbon and old gasket material, then clean the mating surfaces with lacquer thinner or acetone. Ensure there is no oil on the mating surfaces to prevent gasket sealing issues. Stuff the cylinders with clean shop rags to keep out debris and use a vacuum cleaner to remove any material that falls into the cylinders. Check the block and cylinder head mating surfaces for nicks, deep scratches, and other damage, using a file for slight damage and considering machining for excessive damage. Use a tap of the correct size to chase the threads in the cylinder head bolt holes and a wire brush to remove corrosion and clean the bolt threads. Place a new gasket on the engine block, ensuring any markings face UP, and apply sealant to the edges of the timing chain cover where it mates with the engine block. Set the cylinder head in position, lubricate the threads and seats of the cylinder head bolts with clean engine oil, then install and tighten them in the recommended sequence, in four stages, to the specified torque. A beam-type or dial-type torque wrench is preferable, and if a bolt makes any sound while tightening, loosen it completely and retighten in the specified steps. Attach the camshaft sprocket to the camshaft and install the timing belt. Rotate the crankshaft counterclockwise slowly by hand through two complete revolutions and recheck the alignment marks on the sprockets, stopping to recheck the camshaft timing if any resistance is felt. Reinstall the remaining parts in the reverse order of removal, refill the cooling system, and check all fluid levels. Start the engine and check the ignition timing, then run the engine until normal operating temperature is reached, checking for leaks and proper operation.
    Posted by AcuraPartsWarehouse Specialist
    Q:
    Are New and Rebuilt Cylinder Heads Commonly Available for Most Engines at Dealer Parts Departments and Auto Parts Stores on Acura Integra? Posted by Customer
    A:
    New and rebuilt cylinder heads are commonly available for most engines at dealer parts departments and auto parts stores. Due to the necessity of specialized tools for disassembly and inspection procedures, along with the potential unavailability of replacement parts, it may be more practical and economical for the home mechanic to purchase replacement heads instead of disassembling, inspecting, and reconditioning the originals. Cylinder head disassembly involves removing the intake and exhaust valves and related components, with the rocker arm assemblies and camshaft(s) needing to be removed first. It is important to label the parts or store them separately for reinstallation in their original locations. Before removing the valves, label and store them along with their components to keep them organized. Use a spring compressor to compress the springs on the first valve and remove the keepers, then carefully release the compressor and take out the retainer, spring, and spring seat if applicable. If the valve binds in the guide, push it back into the head and deburr the area around the stem and keeper groove. Repeat this process for the remaining valves, ensuring all parts for each valve are kept together for reinstallation. After removing and organizing the valves and components, thoroughly clean and inspect the head, completing any engine disassembly procedures if a complete overhaul is being performed before starting the cleaning and inspection of the cylinder head.
    Posted by AcuraPartsWarehouse Specialist
    Q:
    What is the procedure for installing the first valve for the 2000 Acura Integra? Posted by Customer
    A:
    Starting at one end of the head, lubricate and install the first valve by applying clean engine oil to the valve stem.
    Posted by AcuraPartsWarehouse Specialist
    See expert answers on similar Cylinder Head
    If you have any questions about this product, please don't hesitate to ask us. We will be happy to help you!

Genuine Acura Part 12100-P73-J00, the Right Choice

For dependable performance, buy part # 12100-P73-J00 Cylinder Head Assembly. Also known as Cylinder Head. In terms of quality and durability, OEM components set the standard. They are produced at the Acura factory and subjected to a quality assurance routine. This part fits 1997-2001 Integra.

AcuraPartsWarehouse.com is a major online store of original Acura parts and accessories, including 12100P73J00 Cylinder Head Assembly. At our site, we are offering you brand new OEM Acura equipment. We stock a broad selection of genuine parts at competitive prices. When you are in need of quality, reliability, and durability, and want something cost-effective in combination, this is the part you need. Our components are all warranted by the manufacturer for your peace of mind.

Why choose Acura Parts Warehouse

  • Dedicated Service

    Your complete satisfaction is our #1 goal

  • Lowest Prices

    Best deals on genuine OE parts from dealerships

  • Fast Delivery

    Orders are processed and delivered promptly