×
- Hello
- Login or Register
- Quick Links
- Live Chat
- Track Order
- Parts Availability
- RMA
- Help Center
- Contact Us
- Shop for
- Acura Parts
- Acura Accessories
My Garage
My Account
Cart
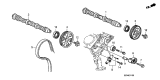
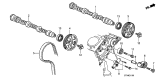
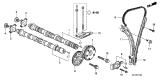
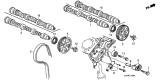
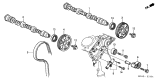
Genuine Acura Camshaft
Cam- Select Vehicle by Model
- Select Vehicle by VIN
Select Vehicle by Model
orMake
Model
Year
Select Vehicle by VIN
For the most accurate results, select vehicle by your VIN (Vehicle Identification Number).
125 Camshafts found


Acura Rear Camshaft Complete
Part Number: 14200-RYE-A10$302.95 MSRP: $432.67You Save: $129.72 (30%)Ships in 1-3 Business DaysProduct Specifications- Other Name: Camshaft Complete , Rear; Camshaft
- Position: Rear


Acura Engine Camshaft Rear
Part Number: 14200-RKG-A00$686.45 MSRP: $980.36You Save: $293.91 (30%)Ships in 1-3 Business DaysProduct Specifications- Other Name: Camshaft, Rear
- Position: Rear


Acura Front Camshaft Complete
Part Number: 14100-RYE-A10$303.44 MSRP: $433.37You Save: $129.93 (30%)Ships in 1-3 Business DaysProduct Specifications- Other Name: Camshaft Complete , Front; Camshaft
- Position: Front

Acura Camshaft, Front
Part Number: 14100-RYE-A00$449.89 MSRP: $642.52You Save: $192.63 (30%)Ships in 1-3 Business DaysProduct Specifications- Other Name: Camshaft
- Position: Front


Acura Exhaust Camshaft
Part Number: 14120-RWC-A00$874.02 MSRP: $1248.25You Save: $374.23 (30%)Ships in 1-3 Business DaysProduct Specifications- Other Name: Camshaft, Exhaust

Acura Rear Camshaft
Part Number: 14200-RKG-010$686.45 MSRP: $980.36You Save: $293.91 (30%)Ships in 1-3 Business DaysProduct Specifications- Other Name: Camshaft, Rear; Camshaft
- Position: Rear

Acura Front Camshaft Complete
Part Number: 14100-RGL-A00$299.78 MSRP: $428.13You Save: $128.35 (30%)Ships in 1-3 Business DaysProduct Specifications- Other Name: Camshaft Complete , Front; Camshaft
- Position: Front
- Replaces: 14100-RCA-A10, 14100-RCA-A00

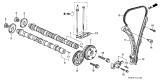
Acura Camshaft, In.
Part Number: 14110-PPA-010$850.29 MSRP: $1214.35You Save: $364.06 (30%)Ships in 1-3 Business DaysProduct Specifications- Other Name: Camshaft
- Replaces: 14110-PPA-000, 14110-RAH-H00, 14110-PNE-000, 14110-PNE-010


Acura Camshaft, Rear
Part Number: 14200-5J6-A00$302.01 MSRP: $431.32You Save: $129.31 (30%)Ships in 1-3 Business DaysProduct Specifications- Other Name: Camshaft
- Position: Rear

Acura Camshaft, Exhaust
Part Number: 14120-PPA-010$840.12 MSRP: $1199.83You Save: $359.71 (30%)Ships in 1-3 Business DaysProduct Specifications- Other Name: Exhaust Camshaft; Camshaft
- Replaces: 14120-RAH-H00, 14120-PNA-010, 14120-PNA-020, 14120-PPA-000

Acura Camshaft, Front
Part Number: 14100-5MR-A00$302.01 MSRP: $431.32You Save: $129.31 (30%)Ships in 1-3 Business DaysProduct Specifications- Other Name: Camshaft
- Position: Front

Acura Camshaft, Front
Part Number: 14100-5J6-A00$302.01 MSRP: $431.32You Save: $129.31 (30%)Ships in 1-3 Business DaysProduct Specifications- Other Name: Camshaft
- Position: Front

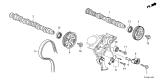
Acura Camshaft, Intake
Part Number: 14110-6S9-A00$120.38 MSRP: $170.03You Save: $49.65 (30%)Ships in 1-3 Business DaysProduct Specifications- Other Name: CAMSHAFT, IN.; Camshaft
Acura Camshaft, Exhaust
Part Number: 14120-6S9-A00$120.44 MSRP: $170.12You Save: $49.68 (30%)Ships in 1-3 Business DaysProduct Specifications- Other Name: CAMSHAFT, EX.; Camshaft
Acura Camshaft, Rear
Part Number: 14200-RLV-A00$306.21 MSRP: $437.32You Save: $131.11 (30%)Ships in 1-3 Business DaysProduct Specifications- Other Name: Camshaft
- Position: Rear
- Replaces: 14200-5J6-A20

Acura Camshaft, Front
Part Number: 14100-R9P-A00$647.78 MSRP: $925.13You Save: $277.35 (30%)Ships in 1-3 Business DaysProduct Specifications- Other Name: Camshaft
- Position: Front

Acura Camshaft, Rear In.
Part Number: 14211-PR7-A00$1057.59 MSRP: $1510.42You Save: $452.83 (30%)Ships in 1-3 Business DaysProduct Specifications- Other Name: Camshaft
- Position: Rear
Acura Camshaft, Front
Part Number: 14100-RLV-A00$302.01 MSRP: $431.32You Save: $129.31 (30%)Ships in 1-3 Business DaysProduct Specifications- Other Name: Camshaft
- Position: Front
- Replaces: 14100-5J6-A20


 Product Specifications
- Other Name: Camshaft, In.
 Product Specifications
- Other Name: Exhaust Camshaft
| Page 1 of 7 |Next >
1-20 of 125 Results
Acura Camshaft Parts Questions & Experts Answers
- Q: How to check camshaft endplay and runout, and how to remove and install a camshaft in a SOHC engine on an Acura Integra?A:To check camshaft endplay, install the camshaft and secure it with the caps, then mount a dial indicator on the cylinder head with the pointer resting on the camshaft nose. Use a large screwdriver as a lever to move the camshaft forward and backward, noting the dial indicator reading, and compare it with the endplay specifications. If the reading is excessive, replace the worn parts. For camshaft runout, support the camshaft with V-blocks and set up a dial indicator against the center bearing journal, rotating the camshaft to note the indicated runout and comparing it to specifications; replace the camshaft if the runout exceeds limits. To remove the camshaft, take off the valve cover, set the engine at TDC for cylinder number one, and remove the timing belt and distributor. If necessary, separate the sprocket from the camshaft by removing the sprocket bolt while preventing the camshaft from turning. Remove the rocker arm assembly, numbering the camshaft bearing caps if they lack numbers, and lift out the camshaft, wiping it clean and removing the camshaft seal. Inspect the camshaft bearing journals and caps for scoring and wear, replacing the cylinder head if worn, and check oil clearance with Plastigage, replacing the camshaft if any journal is out of specification. Examine the cam lobes for wear, checking for score marks and uneven wear, and measure the cam lobe height with a micrometer, replacing the camshaft if wear is indicated. Inspect the rocker arms for wear and ensure proper lubrication to prevent future issues. For installation, clean all components thoroughly, lubricate the camshaft bearing surfaces and lobes with assembly lubricant, and carefully lower the camshaft into position, installing a new camshaft seal with the spring side facing in. Install the rocker arm assembly, rotate the camshaft as needed, and install the camshaft sprocket with the "UP" mark at the twelve o'clock position. Install the timing belt and related components, ensuring the crankshaft position is realigned if disturbed, then rotate the crankshaft counterclockwise through two complete revolutions to recheck alignment marks on the sprockets, adjusting as necessary. The remainder of the installation follows the reverse order of removal.


