×
- Hello
- Login or Register
- Quick Links
- Live Chat
- Track Order
- Parts Availability
- RMA
- Help Center
- Contact Us
- Shop for
- Acura Parts
- Acura Accessories
My Garage
My Account
Cart
Genuine Acura Legend Brake Booster
Brake Power Booster- Select Vehicle by Model
- Select Vehicle by VIN
Select Vehicle by Model
orMake
Model
Year
Select Vehicle by VIN
For the most accurate results, select vehicle by your VIN (Vehicle Identification Number).
6 Brake Boosters found

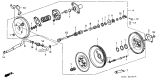

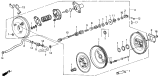

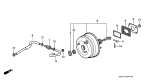

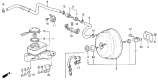

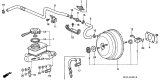
Acura Legend Brake Booster
Acura Legend Brake Booster adds the final push to allow drivers to brake the car with the greatly light pressure on the pedal. Positioned between the pedal and master cylinder, the original Acura vacuum setup utilizes this Brake Booster in most Legend models in an effort to route engine vacuum to both sides of an internal diaphragm until braking is initiated. Pressing the pedal opens a valve and atmospheric air fills the rear chamber. The pressure difference causes a power piston to move forward to increase hydraulic pressure, an example of how the Brake Booster multiplies pedal force. Some later Acura sedans in the Legend line also employed a hydraulic Brake Booster which taps high-pressure fluid from the power steering pump or a dedicated electric pump to provide reliable assist when engine vacuum runs low. The vacuum style remains simple, lightweight, and quiet, whereas the hydraulic type provides steady power during turbo or low idle conditions, so drivers can count on the uniform stopping response. Every Acura Legend benefits because its Brake Booster reduces effort, reduces stopping distance, and maintains pedal feel.
We provide a broad range of OEM Acura Legend Brake Booster at unbeatable prices on our website. For your OEM parts, You can count on the guaranteed quality, manufacturer's warranty, outstanding customer service, and prompt delivery. We look forward to your visit.
Acura Legend Brake Booster Parts Questions & Experts Answers
- Q: How to remove and install a Brake Booster on an Acura Legend?A:To perform an operating check, depress the brake pedal several times with the engine off to ensure there is no change in the pedal reserve distance, then start the engine and depress the pedal; a slight drop indicates normal operation. For the airtightness check, start the engine and turn it off after one or two minutes, then slowly depress the brake pedal several times; if the pedal drops initially but rises after subsequent depressions, the booster is airtight. While the engine is running, depress the brake pedal and stop the engine with the pedal held down; if there is no change in pedal reserve travel after holding for 30 seconds, the booster is airtight. When removing the power brake booster, which requires special tools, first remove the Brake Master Cylinder, then locate and remove the pushrod clevis pin connecting the booster to the brake pedal, disconnect the hose from the engine to the booster, and remove the four nuts and washers securing the brake booster to the firewall. Slide the booster straight out from the firewall. For installation, follow the reverse procedures of removal, ensuring to tighten the booster mounting nuts to the specified torque and use a new cotter pin on the clevis pin. If replacing the power booster unit, measure the clearance between the master cylinder piston and the pushrod in the vacuum booster, applying a vacuum to the booster and measuring the distance from the pushrod to the mounting face. Adjust the pushrod length as necessary to achieve the specified clearance, then tighten the locknut. After final installation of the master cylinder and brake hoses, bleed the brakes.
 (Nissin)")

