×
- Hello
- Login or Register
- Quick Links
- Live Chat
- Track Order
- Parts Availability
- RMA
- Help Center
- Contact Us
- Shop for
- Acura Parts
- Acura Accessories
My Garage
My Account
Cart
Genuine Acura Legend Hood
Engine Hood- Select Vehicle by Model
- Select Vehicle by VIN
Select Vehicle by Model
orMake
Model
Year
Select Vehicle by VIN
For the most accurate results, select vehicle by your VIN (Vehicle Identification Number).
11 Hoods found

Acura Legend Hood (Dot)
Part Number: 06601-SD4-316ZZ$69.44 MSRP: $573.43You Save: $503.99 (88%)Ships in 1-2 Business Days


Acura Legend Hood
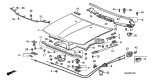
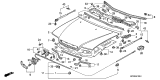
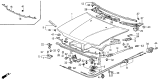
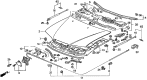
The Acura Legend Hood is the front-facing external cover of the vehicle that protects delicate engine components, enhancing aerodynamic efficiency and providing the car with a smooth, upscale look. This hinged panel latches firmly while on the go. A simple pull causes it to pop free, allowing owners easy access to the belts, fluids, and the muscular V6. Manufactured primarily from corrosion-resistant steel in early years and later runs in lighter aluminum, the Hood also contains engineered crumple zones that absorb the front-end impact and preserve the sturdy passenger cell. The Acura sedan and coupe versions of the Legend had subtle styling differences. Each Hood changed in length and contour to fit the body line and grille treatment of the version with which it was displayed, but every version performed the same function of protection and access. Exposure to the elements and physical collisions can create dents, scratch the paint, or bend the surface of a Hood. When damage surpasses basic touch-ups, replacement of the Hood is the optimal way to ensure that your Acura keeps looking confident and clean. The Hood gives the impression that the car is pristine. This is important as the body panel will maintain the luxury impression that signifies what Legend heritage is.
We provide a broad range of OEM Acura Legend Hood at unbeatable prices on our website. For your OEM parts, You can count on the guaranteed quality, manufacturer's warranty, outstanding customer service, and prompt delivery. We look forward to your visit.
Acura Legend Hood Parts Questions & Experts Answers
- Q: How can the Hood be safely and correctly removed and installed on an Acura Legend?A:It takes two people to undo the hood due to its heavyweight and shape. Put blankets or pads on both fenders and cowl before lifting the hood off, to keep dust from touching the shell and paint. Mark around bolt heads with something that will show up during reinstall, then remove any cable or wire hangers that get in the way. Help keep the hood balanced while your helper removes clips and weakens the support strut with pliers, eases out hinge-to-hood bolts or nuts, and fixes the shims before lifting the hood off. Just like taking the hood off, reinstalling includes putting any plastic spacers precisely where they used to be. To fix the hood's forward and back position, take off the hinge-to-body bolts and put a line around the entire hinge plate to measure how far you move it. As you loosen the bolts, move the hood into its right position, and be careful while lowering the hood to test if it aligns correctly. You can adjust the entire Hood Latch assembly to slide up-and-down and sideways on the hood strikers if needed, moving it around until the hood closes tightly and matches the shape of the fenders. Mark the latch bolt locations with a line, then free up the bolts and reinstall the components into the right position before tightening down the bolts again. To make sure the hood is perfectly square with the fenders, move the hood cushions on the adjusting screws until they are even, and put shims under the rear hinge plates when you need to. Before long, coat the hood latch mechanism and hinges with white lithium grease to keep them from freezing or wearing out.
")


