×
- Hello
- Login or Register
- Quick Links
- Live Chat
- Track Order
- Parts Availability
- RMA
- Help Center
- Contact Us
- Shop for
- Acura Parts
- Acura Accessories
My Garage
My Account
Cart
Genuine Acura TL Brake Master Cylinder
- Select Vehicle by Model
- Select Vehicle by VIN
Select Vehicle by Model
orMake
Model
Year
Select Vehicle by VIN
For the most accurate results, select vehicle by your VIN (Vehicle Identification Number).
15 Brake Master Cylinders found


Acura TL Power Brake Booster
Part Number: 01469-TK5-A00$111.55 MSRP: $157.55You Save: $46.00 (30%)Ships in 1-3 Business Days


Acura TL Power Brake Booster
Part Number: 01469-SEP-A00$131.13 MSRP: $185.22You Save: $54.09 (30%)Ships in 1-2 Business Days
Acura TL Power Set, Master (10")
Part Number: 01469-TK4-A00$111.55 MSRP: $157.55You Save: $46.00 (30%)Ships in 1-3 Business Days
Acura TL Master Cylinder Assembly
Part Number: 46100-SDB-A02$239.19 MSRP: $341.60You Save: $102.41 (30%)Ships in 1-3 Business Days
Acura TL Brake Master Cylinder Assembly
Part Number: 46100-TK4-A01$456.74 MSRP: $652.30You Save: $195.56 (30%)Ships in 1-3 Business Days
Acura TL Master Cylinder Assembly
Part Number: 46100-S0K-A02$164.23 MSRP: $231.97You Save: $67.74 (30%)Ships in 1-3 Business Days


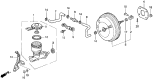

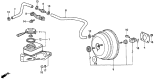
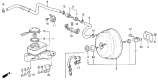

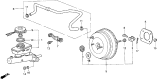
Acura TL Brake Master Cylinder
The Acura TL Brake Master Cylinder provides sure stops with its braking parts that convert pedal effort into hydraulic pressure. Each Brake Master Cylinder employs two pistons arranged within separate circuits in order to comply with safety regulations. In particular, the intent of having such an arrangement is that if there is a leak in one loop, braking power will still remain. The earlier versions of TLs employed a cast-iron Brake Master Cylinder with a built-in reservoir held by a single bail cap. The later versions of the Acura took to using aluminum units with a plastic reservoir sealed by O-rings or screw caps. Whether in disc or drum braking systems, the Brake Master Cylinder draws fresh fluid from the reservoir as the pedal returns. It does this proactively to keep air out of the braking system. It achieves the proactive drawing of fluid by means of port openings and cup deflection. Corrosion, worn seals, or moisture can make the Brake Master Cylinder leak inwards or drip on the booster. As a result, the driver will experience a low pedal and longer stops, causing any TL owner to service the system. Inspection of the fluids in your Acura should be performed regularly to detect leaks early and keep all hydraulic systems strong. With simple hydraulics channeling the force, the Acura TL gets confident, balanced stopping, day after day.
We provide a broad range of OEM Acura TL Brake Master Cylinder at unbeatable prices on our website. For your OEM parts, You can count on the guaranteed quality, manufacturer's warranty, outstanding customer service, and prompt delivery. We look forward to your visit.
Acura TL Brake Master Cylinder Parts Questions & Experts Answers
- Q: How to remove and install a Brake Master Cylinder on an Acura TL?A:To remove the brake master cylinder, start by taking off all engine and cowl covers as equipped, followed by the strut brace. For models from 2004 and later, remove the mounting bolts for the fuse/relay box in the engine compartment and set it aside. Disconnect the electrical connector for the fluid level sensor and use a syringe to extract as much fluid as possible from the reservoir. Place rags under the fluid fittings and prepare caps or plastic bags to cover the ends of the lines after disconnection, taking care to avoid spilling brake fluid, which can damage paint. Use a flare nut wrench to loosen the fittings at the ends of the Brake Lines where they enter the brake master cylinder, then pull the brake lines slightly away and plug the ends. Remove the brake master cylinder mounting nuts and carefully pull the brake master cylinder off the studs, ensuring no fluid spills. If installing a new brake master cylinder, transfer the reservoir from the old one, using new seals as needed. Before installation, bench bleed the new brake master cylinder by clamping it in a vise and attaching bleeder tubes to the outlet ports, filling the reservoir with the recommended brake fluid. Slowly push the pistons into the brake master cylinder to expel air, repeating until no bubbles are present. After removing the bleed tubes, install plugs in the open ports and the reservoir cap. Install a new rod seal onto the brake master cylinder, applying silicone grease, and then mount the brake master cylinder over the studs on the power brake booster, tightening the nuts only finger tight initially. For older models, measure the distance from the piston pocket to the end of the brake master cylinder on both the old and new units. Thread the brake line fittings into the brake master cylinder, ensuring they are tightened without stripping the threads. Fully tighten the mounting nuts and brake line fittings, then fill the reservoir with fluid and bleed the brake master cylinder and brake system by having an assistant depress the brake pedal while loosening the fittings to allow air and fluid to escape. After completing the bleeding procedure, rinse the area under the brake master cylinder with clean water to prevent damage from brake fluid. Finally, the remainder of the installation follows the reverse order of removal, and it is crucial to test the operation of the brake system before returning the vehicle to normal service.

Related Acura TL Parts


Browse by Year
2014 Brake Master Cylinder 2013 Brake Master Cylinder 2012 Brake Master Cylinder 2011 Brake Master Cylinder 2010 Brake Master Cylinder 2009 Brake Master Cylinder 2008 Brake Master Cylinder 2007 Brake Master Cylinder 2006 Brake Master Cylinder 2005 Brake Master Cylinder 2004 Brake Master Cylinder 2003 Brake Master Cylinder 2002 Brake Master Cylinder 2001 Brake Master Cylinder 2000 Brake Master Cylinder 1999 Brake Master Cylinder 1998 Brake Master Cylinder 1997 Brake Master Cylinder 1996 Brake Master Cylinder 1995 Brake Master Cylinder