×
- Hello
- Login or Register
- Quick Links
- Live Chat
- Track Order
- Parts Availability
- RMA
- Help Center
- Contact Us
- Shop for
- Acura Parts
- Acura Accessories
My Garage
My Account
Cart
Genuine Acura TL Brake Pad Set
Disc Brake Pad Set- Select Vehicle by Model
- Select Vehicle by VIN
Select Vehicle by Model
orMake
Model
Year
Select Vehicle by VIN
For the most accurate results, select vehicle by your VIN (Vehicle Identification Number).
14 Brake Pad Sets found


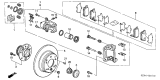
Acura TL Rear Disc Brake pad Set
Part Number: 43022-SEP-C01$65.53 MSRP: $91.40You Save: $25.87 (29%)Ships in 1-3 Business Days

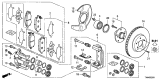
Acura TL Front Disc Brake pad Set (17In,28T)
Part Number: 45022-SJC-A02$79.75 MSRP: $111.88You Save: $32.13 (29%)Ships in 1-3 Business Days

Acura TL Front Disc Brake Pad Set
Part Number: 45022-SEP-A11$78.48 MSRP: $110.10You Save: $31.62 (29%)Ships in 1-3 Business Days
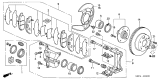
Acura TL Front Disc Brake pads
Part Number: 45022-SEP-A61$96.68 MSRP: $135.63You Save: $38.95 (29%)Ships in 1-2 Business Days

Acura TL Rear Acura Disc Brake pad Set
Part Number: 43022-SP0-030$65.53 MSRP: $91.40You Save: $25.87 (29%)Ships in 1-2 Business Days
Acura TL Front Disc Brake Pad Set
Part Number: 45022-SJC-A01$79.75 MSRP: $111.88You Save: $32.13 (29%)

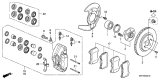
Acura TL Front Disc Brake pad Set(17Cl-1)
Part Number: 45022-S0K-A12$78.48 MSRP: $110.10You Save: $31.62 (29%)Ships in 1-2 Business Days

Acura TL Front Disc Brake Pad Set
Part Number: 45022-SEP-A10$78.48 MSRP: $110.10You Save: $31.62 (29%)Ships in 1 Business Day

Acura TL Front Disc Brake Pad Set
Part Number: 45022-SEP-A60$96.68 MSRP: $135.63You Save: $38.95 (29%)Ships in 1 Business Day

Acura TL Front Disc Brake Pad Set
Part Number: 45022-S47-020$71.87 MSRP: $100.83You Save: $28.96 (29%)Ships in 1-3 Business Days
Acura TL Rear Disc Brake pad Set
Part Number: 43022-TK4-A01$74.65 MSRP: $104.73You Save: $30.08 (29%)Ships in 1-3 Business DaysAcura TL Rear Disc Brake pad Set
Part Number: 43022-TK4-A00$74.65 MSRP: $104.73You Save: $30.08 (29%)
Acura TL Front Disc Brake pad Kit
Part Number: 45022-SM5-525$71.87 MSRP: $100.83You Save: $28.96 (29%)Ships in 1-3 Business Days
Acura TL Rear Disc Brake pad Set (9Clp-1)
Part Number: 43022-SV4-A23$71.52 MSRP: $99.75You Save: $28.23 (29%)Ships in 1-3 Business Days
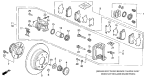
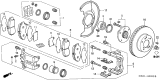
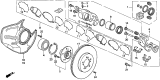
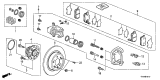
Acura TL Brake Pad Set
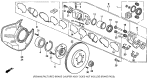
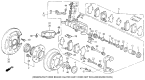
The Acura TL Brake Pad Set is responsible for reliably stopping your car, as it presses friction material against the rotors that convert motion into heat, enabling your sedan to slow down as expected. Each set of Brake Pad Set bonds a steel backing plate to a molded friction compound, with wear sensors or chirping tabs alerting TL operators when their thickness approaches the limit. This reliable design serves every Acura driver. Over time, the composition of Brake Pad Set has evolved from a predominantly semi-metallic blend to a highly advanced ceramic blend that can shrug off temperatures near 1,000 degrees Fahrenheit while cutting squeal. A factory-style Brake Pad Set performs optimally on smooth rotors because the full contact allows the pads to bite hard, resulting in heat build-up. The Brake Pad Set of drilled or combo rotors receives quicker grab due to cooling, but less metal may soften feel at low speed. Slotted rotors allow cooling to balance and dust-sweeping abilities with decent contact area. Certain 1999-2003 Acura TL models exhibit pedal vibration caused by uneven rotor thickness. If you install new pads and have the discs refinished, the shaking will cease. This will keep any Acura confident under braking.
We provide a broad range of OEM Acura TL Brake Pad Set at unbeatable prices on our website. For your OEM parts, You can count on the guaranteed quality, manufacturer's warranty, outstanding customer service, and prompt delivery. We look forward to your visit.
Acura TL Brake Pad Set Parts Questions & Experts Answers
- Q: How to replace the Brake Pad Set and ensure proper brake function on an Acura TL?A:Remove the cap from the brake fluid reservoir, loosen the wheel lug nuts, raise the vehicle, and support it securely on jack stands. Remove the front or rear wheels, working on one brake assembly at a time, using the assembled brake for reference if necessary. Inspect the Brake Disc carefully; if machining is necessary, remove the disc to access the calipers and pads. For floating calipers, push the piston back into the bore using a C-clamp to create room for new brake pads, ensuring the master cylinder fluid does not overflow. Follow the illustrations for the pad replacement procedure, installing the new pads in order. For fixed calipers, locate and remove the pad pins and cross-spring, noting their direction for reinstallation. Use needle-nose pliers to pull the inboard brake pad from the caliper, then push the caliper pistons into the bores while managing the brake fluid level. Prepare each new brake pad with a small amount of copper-based brake paste on the edges, position the new inboard pad, and repeat the process for the outboard pad, ensuring the wear indicator is correctly oriented. Install the pad pins and cross-spring, then install the wheel and lug nuts, lower the vehicle, and tighten the lug nuts to the specified torque. Before moving the vehicle, apply and release the brake pedal several times to ensure proper contact between the pads and brake discs, and check the brake fluid level, adding fluid if necessary, while testing the brakes in a safe area before driving in traffic.

Related Acura TL Parts
 Acura TL Brake Disc
 Acura TL Brake Caliper
 Acura TL Brake Dust Shields
 Acura TL Brake Shoe Set
 Acura TL Brake Backing Plate
 Acura TL Parking Brake Shoe
 Acura TL Brake Caliper Repair Kit
 Acura TL Brake Proportioning Valve
Browse by Year
2014 Brake Pad Set 2013 Brake Pad Set 2012 Brake Pad Set 2011 Brake Pad Set 2010 Brake Pad Set 2009 Brake Pad Set 2008 Brake Pad Set 2007 Brake Pad Set 2006 Brake Pad Set 2005 Brake Pad Set 2004 Brake Pad Set 2003 Brake Pad Set 2002 Brake Pad Set 2001 Brake Pad Set 2000 Brake Pad Set 1999 Brake Pad Set 1998 Brake Pad Set 1997 Brake Pad Set 1996 Brake Pad Set 1995 Brake Pad Set