×
- Hello
- Login or Register
- Quick Links
- Live Chat
- Track Order
- Parts Availability
- RMA
- Help Center
- Contact Us
- Shop for
- Acura Parts
- Acura Accessories
My Garage
My Account
Cart
Genuine Acura TL Clutch Slave Cylinder
- Select Vehicle by Model
- Select Vehicle by VIN
Select Vehicle by Model
orMake
Model
Year
Select Vehicle by VIN
For the most accurate results, select vehicle by your VIN (Vehicle Identification Number).
3 Clutch Slave Cylinders found


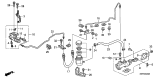
Acura TL Clutch Slave Cylinder Assembly
Part Number: 46930-SDP-A01$133.52 MSRP: $188.58You Save: $55.06 (30%)Ships in 1-3 Business Days

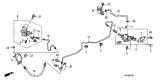
Acura TL Clutch Slave Cylinder Assembly
Part Number: 46930-TK5-A01$100.10 MSRP: $140.43You Save: $40.33 (29%)
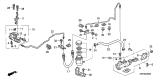
Acura TL Clutch Slave Cylinder Assembly
Part Number: 46930-S3M-A01$118.89 MSRP: $167.92You Save: $49.03 (30%)
Acura TL Clutch Slave Cylinder
The Acura TL Clutch Slave Cylinder is designed to enable smooth gear shifting by transforming the hydraulic pressure of the master cylinder into an application that pushes apart the clutch plates, preventing gears from grinding. In response to each application of the clutch pedal, the Clutch Slave Cylinder acts as the master cylinder's hydraulic partner. As a result of the fluid force, the rod extends and pushes against the release fork. The hydraulic layout installed in all TL manuals replaces the cable linkage applied in older cars. The Clutch Slave Cylinder minimizes the impact of bulky hardware on pedal actuation, pedal feel, and consistent engagement over thousands of shifts. Throughout the years, the mounting points and hose paths have changed slightly, but the single piston hydraulic Clutch Slave Cylinder design remains unchanged for TL models. Drivers should be on the lookout for soft pedals, any fluid leaking, or visible corrosion because the wear and tear of a Clutch Slave Cylinder can no longer hold pressure, leading to incomplete disengagement and hard gear selection. Having clean brake fluid in the Acura clutch circuit helps keep the TL system seals tight and extend component service life. Opting for a factory-spec unit when replacement is necessary will keep the Acura pedal travel and shift quality like new.
We provide a broad range of OEM Acura TL Clutch Slave Cylinder at unbeatable prices on our website. For your OEM parts, You can count on the guaranteed quality, manufacturer's warranty, outstanding customer service, and prompt delivery. We look forward to your visit.
Acura TL Clutch Slave Cylinder Parts Questions & Experts Answers
- Q: How to Remove and Install the Clutch Slave Cylinder on an Acura TL?A:To remove the components, start by taking off the left side engine compartment cover and the front bulkhead cover, followed by the air filter housing. Next, remove the battery and battery tray, then take out the two mounting bolts from the fuse/relay box and set the assembly aside. Disconnect the hydraulic line mounting bracket, then remove the roll pins securing the hydraulic line to the Clutch Slave Cylinder and disconnect the line, ensuring to have a small can and rags ready to catch any spilled fluid while plugging the line to prevent excessive loss. After that, remove the two Clutch Slave Cylinder mounting bolts and take out the Clutch Slave Cylinder. For installation, lightly lubricate the Clutch Slave Cylinder pushrod and the release fork pocket with high-temperature grease before installing the Clutch Slave Cylinder onto the clutch housing, ensuring the pushrod is seated properly in the release fork pocket, and then tighten the mounting bolts to the specified torque. Install a new O-ring on the hydraulic line, connect it to the Clutch Slave Cylinder, and install the roll pins. Finally, fill the Clutch Master Cylinder with brake fluid that meets DOT 3 specifications and bleed the system.


