×
- Hello
- Login or Register
- Quick Links
- Live Chat
- Track Order
- Parts Availability
- RMA
- Help Center
- Contact Us
- Shop for
- Acura Parts
- Acura Accessories
My Garage
My Account
Cart
Genuine Acura TL Trunk Lids
Deck Lids- Select Vehicle by Model
- Select Vehicle by VIN
Select Vehicle by Model
orMake
Model
Year
Select Vehicle by VIN
For the most accurate results, select vehicle by your VIN (Vehicle Identification Number).
8 Trunk Lids found

Acura TL Lid, Trunk (Dot)
Part Number: 68500-TK4-A80ZZ$845.30 MSRP: $1207.23You Save: $361.93 (30%)Ships in 1-3 Business Days
Acura TL Lid Trunk
Part Number: 68500-S0K-505ZZ$584.47 MSRP: $1206.60You Save: $622.13 (52%)Ships in 1-2 Business DaysAcura TL Lid, Trunk (Dot)
Part Number: 68500-TK4-A90ZZ$638.27 MSRP: $911.55You Save: $273.28 (30%)Ships in 1-3 Business Days
Acura TL Lid, Trunk (Dot)
Part Number: 68500-SEP-A70ZZ$936.60 MSRP: $1337.62You Save: $401.02 (30%)Ships in 1-3 Business Days
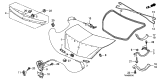
Acura TL Trunk Lids
Acura TL Trunk Lids provide buyers with a strong metal barrier that protects cargo from the weather, road debris, and theft. They allow quick loading thanks to their wider openings. The architecture of the Trunk Lids is such that the steel skin and internal bracing absorb any random bump or stone hit, while the rubber perimeter seal keeps any dust or rain from getting inside the luggage bay. Hinges fixed at the rear glass allow the lid of the trunk to pivot up, with gas struts or torsion bars assisting in keeping the weight counterbalanced so that the Trunk Lids remain open with ease yet close with a firm click in the latched position. Over four generations of the midsize TL sedan, the design retained a rear hinge, yet changes occurred like third-gen shells with taller crowns to allow more space and a sharper edge on the final TL to enhance airflow and light positioning. The mission of the Trunk Lids has remained the same: to protect the tools, groceries, and bikes from collision damage or corrosion damage due to salt or gravel. Dents, rust, or gap misalignment on your Acura necessitate a factory matched lid change out to return fit, finish, and security. Correctly cared for Trunk Lids, however, can certainly age gracefully like the car itself. By using genuine parts for your Acura TL metal, you get exact fitment and corrosion protection.
We provide a broad range of OEM Acura TL Trunk Lids at unbeatable prices on our website. For your OEM parts, You can count on the guaranteed quality, manufacturer's warranty, outstanding customer service, and prompt delivery. We look forward to your visit.
Acura TL Trunk Lids Parts Questions & Experts Answers
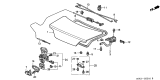
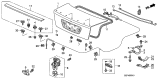
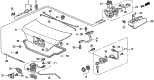
- Q: How Should Trunk Lids Be Removed and Installed Properly on Acura TL?A:The trunk lid is heavy and somewhat awkward to remove and install, so at least two people should do this procedure. So start by opening the trunk lid and removing the trim panel that is fastened with push fasteners and a screw at the handle, as well as the cushions. For correct routing during reinstallation, unplug the electrical connector for the trunk lid latch and disconnect the release cable, and tie string or wire to the harness and cable. Use an assistant to support the trunk lid while you remove the hinge to trunk lid bolts on both sides of the trunk hinges, marking the alignment around the trunk hinges. Remove the trunk lid, reverse the removal steps, but do not install the trim panel until the alignment has been verified, and reverse the remove steps along with lifing off the trunk lid. Close the lid after installation so that you can check its alignment with other body surfaces. Remove trim panel and rear shelf; loosen hinge bolts and reposition the lid as needed. To adjust the height of the closed trunk lid, set the striker up/down or left/right, making a reference mark around the striker before adjustments. Edge cushions on the lower edge of the trunk lid are also adjustable and can be turned in order to fine tune raise or lower it as needed.
")
Related Acura TL Parts
 Acura TL Tailgate Lock
 Acura TL Tailgate Latch
 Acura TL Trunk Latch
 Acura TL Fuel Door Release Cable
 Acura TL Brake Light
 Acura TL Door Hinge
 Acura TL License Plate
 Acura TL Lift Support
 Acura TL Spoiler
Browse by Year
2014 Trunk Lids 2013 Trunk Lids 2012 Trunk Lids 2011 Trunk Lids 2010 Trunk Lids 2009 Trunk Lids 2008 Trunk Lids 2007 Trunk Lids 2006 Trunk Lids 2005 Trunk Lids 2004 Trunk Lids 2003 Trunk Lids 2002 Trunk Lids 2001 Trunk Lids 2000 Trunk Lids 1999 Trunk Lids 1998 Trunk Lids 1997 Trunk Lids 1996 Trunk Lids 1995 Trunk Lids