×
- Hello
- Login or Register
- Quick Links
- Live Chat
- Track Order
- Parts Availability
- RMA
- Help Center
- Contact Us
- Shop for
- Acura Parts
- Acura Accessories
My Garage
My Account
Cart
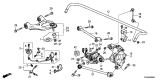
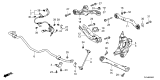
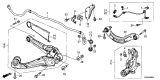
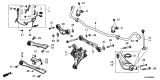
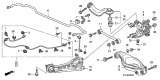
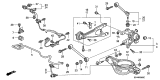
Genuine Acura Trailing Arm
Trailing Control Arm- Select Vehicle by Model
- Select Vehicle by VIN
Select Vehicle by Model
orMake
Model
Year
Select Vehicle by VIN
For the most accurate results, select vehicle by your VIN (Vehicle Identification Number).
96 Trailing Arms found


Acura Arm A, Rear (Lower)
Part Number: 52370-TZ3-A40$74.45 MSRP: $104.46You Save: $30.01 (29%)Ships in 1-3 Business DaysProduct Specifications- Other Name: Arm Complete ,Lower-A Rear ; Trailing Arm; Lower Arm, Trailing Arm
- Position: Rear Lower


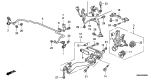
Acura Rear Passenger Right Rearward Control Arm
Part Number: 52350-TZ3-A00$74.45 MSRP: $104.46You Save: $30.01 (29%)Ships in 1-3 Business DaysProduct Specifications- Other Name: Arm Complete ,Lower-B Rear ; Lower Control Arm; Lower Control Arm, Rear Arm, Upper Arm
- Position: Rear Passenger Side


Acura Lower-A Left Rear Arm Complete
Part Number: 52375-TZ5-A91$56.14 MSRP: $78.29You Save: $22.15 (29%)Ships in 1-3 Business DaysProduct Specifications- Other Name: Arm Complete ,Lower-A Left Rear ; Trailing Link; Torque Arm, Trailing Link
- Position: Driver Side
- Replaces: 52375-TZ5-A90


Acura Right Rear Arm A (Lower)
Part Number: 52370-TL0-E00$136.82 MSRP: $193.25You Save: $56.43 (30%)Ships in 1-3 Business DaysProduct Specifications- Other Name: Arm A, Right Rear (Lower) ; Trailing Arm; Lower Arm, Trailing Arm
- Position: Passenger Side


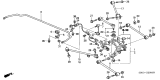
Acura Rear Right Trailing Arm
Part Number: 52371-STX-A02$160.83 MSRP: $227.17You Save: $66.34 (30%)Ships in 1-3 Business DaysProduct Specifications- Other Name: Arm, Right Rear Trailing; Trailing Arm
- Position: Passenger Side
- Replaces: 52371-STX-A01


Acura Suspension Control Arm
Part Number: 52372-STX-A02$160.83 MSRP: $227.17You Save: $66.34 (30%)Ships in 1-3 Business DaysProduct Specifications- Other Name: Arm, Left Rear Trailing; Trailing Arm
- Position: Driver Side
- Replaces: 52372-STX-A01


Acura Right Rear Trailing Arm
Part Number: 52370-TX6-A03$619.55 MSRP: $884.81You Save: $265.26 (30%)Ships in 1-3 Business DaysProduct Specifications- Other Name: Arm, Right Rear Trailing; Trailing Arm
- Position: Passenger Side


Acura Rear A Right Arm Component
Part Number: 52370-TYA-A01$78.18 MSRP: $109.68You Save: $31.50 (29%)Ships in 1-3 Business DaysProduct Specifications- Other Name: Arm Component, Rear A R; Torque Arm, Trailing Arm
- Position: Passenger Side

Acura Rear Right Trailing Control Arm
Part Number: 52370-TV9-A01$449.37 MSRP: $641.77You Save: $192.40 (30%)Ships in 1-3 Business DaysProduct Specifications- Other Name: Arm, Right Rear Trailing; Trailing Arm
- Position: Passenger Side


Acura Rear Left/Driver Side Trailing Control Arm
Part Number: 52371-TV9-A01$447.77 MSRP: $639.48You Save: $191.71 (30%)Ships in 1-3 Business DaysProduct Specifications- Other Name: Arm, Left Rear Trailing; Trailing Arm
- Position: Driver Side


Acura Rear A Right Arm Component
Part Number: 52370-TJB-A01$111.71 MSRP: $157.79You Save: $46.08 (30%)Ships in 1-2 Business DaysProduct Specifications- Other Name: Arm Component , Rear A R; Lower Arm, Lower Link
- Position: Passenger Side


Acura Right Rear Arm Assembly
Part Number: 52510-TGV-A01$118.46 MSRP: $167.31You Save: $48.85 (30%)Ships in 1-3 Business DaysProduct Specifications- Other Name: Arm Assembly , Right Rear; Front Arm, Upper Arm
- Position: Passenger Side
- Replaces: 52510-TGV-A00


Acura Right Rear Trailing Arm
Part Number: 52371-STK-A00$240.22 MSRP: $343.07You Save: $102.85 (30%)Ships in 1-3 Business DaysProduct Specifications- Other Name: Arm, Right Rear Trailing; Trailing Arm
- Position: Passenger Side


Acura Suspension Control Arm
Part Number: 52375-TL0-E00$136.82 MSRP: $193.25You Save: $56.43 (30%)Ships in 1-2 Business DaysProduct Specifications- Other Name: Arm A, Left Rear (Lower) ; Trailing Arm; Lower Arm, Trailing Arm
- Position: Driver Side


Acura Trailing Control Arm Rear Left/Drivers Side
Part Number: 52372-STK-A00$240.22 MSRP: $343.07You Save: $102.85 (30%)Ships in 1-3 Business DaysProduct Specifications- Other Name: Arm, Left Rear Trailing; Trailing Arm
- Position: Driver Side

Acura Lower-A Right Rear Arm Complete
Part Number: 52370-TZ5-A91$55.40 MSRP: $77.27You Save: $21.87 (29%)Ships in 1-3 Business DaysProduct Specifications- Other Name: Arm Complete ,Lower-A Right Rear ; Trailing Link; Torque Arm, Trailing Link
- Position: Passenger Side

Acura Right Rear Arm Assembly
Part Number: 52370-TGV-A00$139.33 MSRP: $196.80You Save: $57.47 (30%)Ships in 1-3 Business DaysProduct Specifications- Other Name: Arm Assembly , Right Rear; Lower Arm, Lower Link
- Position: Passenger Side

Acura Right Rear Trailing Arm Assembly
Part Number: 52371-S3V-A00$180.86 MSRP: $258.30You Save: $77.44 (30%)Ships in 1-3 Business DaysProduct Specifications- Other Name: Arm Assembly, Right Rear Trailing; Trailing Arm
- Position: Passenger Side


 Product Specifications
- Other Name: Arm, Left Rear Trailing; Trailing Arm
- Position: Driver Side
- Replaces: 52371-S6M-A00

 Product Specifications
- Other Name: Arm, Right Rear Trailing (Drum); Trailing Arm
- Position: Passenger Side
- Replaces: 52370-S4K-A30, 52370-S84-A30
| Page 1 of 5 |Next >
1-20 of 96 Results
Acura Trailing Arm Parts Questions & Experts Answers
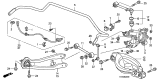
- Q: How to remove and inspect the Trailing Arm and lower arm in 1986 through 1988 Acura Legend sedans?A:Loosen the rear wheel lug nuts, raise the vehicle, place it securely on jackstands, and remove the wheel. Remove the through bolt that attaches the trailing link bracket to the hub carrier. Take off the cover plate that protects the nut for the forward end of the trailing link by removing the cover screws. Remove the bolt that connects the forward end of the trailing link to the chassis. Take out the trailing link and inspect the bushings at the forward end of the trailing link and at the bracket; lubricate them with silicone grease if dry, or replace them if cracked. If replacing either the trailing link or its bracket, remove the bolts and nuts that attach the bracket to the trailing link and reattach the new trailing link to the old bracket or the new bracket to the old trailing link, ensuring all bolts and nuts are tightened securely. For the lower arm, disconnect the stabilizer link from the lower arm, then disconnect the trailing link bracket from the hub carrier. Remove the bolt that attaches the outer end of the lower arm to the hub carrier by using a backup wrench on the nut located on the rear of the hub carrier. Remove the bolt that connects the inner end of the lower arm to the chassis and then take out the lower arm. Inspect the bushings at the inner and outer ends of the lower arm; lubricate them with silicone grease if dry, or have them replaced if cracked. Installation is the reverse of removal. Finally, install the wheel, hand tighten the wheel lug nuts, lower the vehicle, and tighten the wheel lug nuts to the specified torque.


