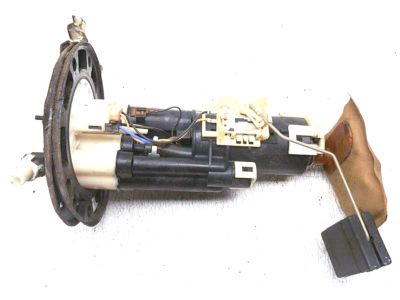
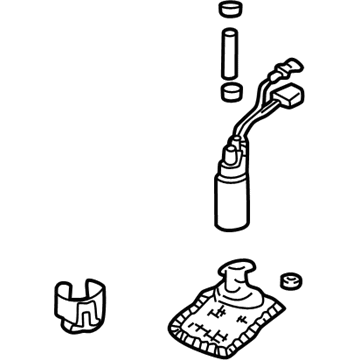
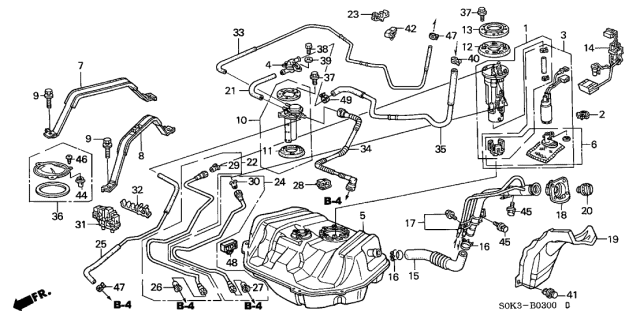
Make sure this part fits your vehicle

Acura 17040-S3M-A00 Fuel Pump Set

2001-2003 Acura 17040S3MA00

Acura 17040-S3M-A00 Fuel Pump Set
  • Part Description
    Pump Set, Fuel
  • Manufacturer
    Acura
Customer Questions & Answers
$306.08 MSRP: $437.13
You Save: $131.05 (30%)
1
ADD TO CART
Ships in 1-3 Business Days
  • Product Specifications

    BrandGenuine Acura
    Manufacturer Part Number17040-S3M-A00
    Part DescriptionPump Set, Fuel
    Other NamesFuel Pump
    Item Dimensions15.9 x 7.1 x 7.3 inches
    Item Weight6.10 Pounds
    ConditionNew
    Fitment TypeDirect Replacement
    ManufacturerAcura
    SKU17040-S3M-A00
    WarrantyThis genuine Acura part is guaranteed by Acura's factory warranty.
    Shipping & ReturnShipping Policy Return Policy
    Warning: California’s Proposition 65
  • Vehicle Fitment

    Year Make Model Body & Trim Emission & Transmission
    2003 Acura CL2 Door Premium, 2 Door SportKA 5AT, KA 6MT, KL 5AT
    2002 Acura CL2 Door SportKA 5AT
    2001 Acura CL2 Door SportKA 5AT
    2003 Acura TL4 Door TL, 4 Door Type-SKA 5AT, KL 5AT
    2002 Acura TL4 Door TL, 4 Door Type-SKA 5AT, KL 5AT

Customer Questions & Answers

Q:
Please Check fit Posted by AcuraPartsWarehouse Specialist
A:
You can Select Your Vehicle to check if 17040-S3M-A00 fits your vehicle.
Posted by AcuraPartsWarehouse Specialist
Q:
How to Remove a Fuel Pump/Fuel Gauge Sending Unit from a Acura TL? Posted by Customer
A:
Disconnect the cable from the negative battery terminal, relieve the fuel system pressure, remove the back seat cushion, remove the screws that retain the fuel pump access cover, unplug the electrical connector from the fuel pump and detach the fuel lines, remove the fuel pump assembly retaining screws, remove the fuel pump from the tank, remove the electrical connector from the fuel pump, squeeze the hose clamps with a pair of pliers - remove the upper clamp from the hose and slide the lower clamp half-way up the hose, off the fuel pump inlet, remove the sock (fuel inlet filter) from the end of the pump, separate the pump from the fuel pump bracket, disconnect the electrical connector from the fuel pump/fuel level sensor, disconnect the quick-connect fitting for the fuel supply line and set the supply line aside, remove the fuel pump/fuel level sensor locknut, remove the fuel pump/fuel level sensor from the tank, install a new gasket in the hole before installing the fuel pump/fuel level sensor, align the index mark on top of the module between the two marks on the edge of the hole, then tighten the fuel pump/fuel level sensor locknut securely and installation is the reverse of removal.
Posted by AcuraPartsWarehouse Specialist
Q:
How to Replace a Fuel Pump and Fuel Level Sending Unit? Posted by Customer
A:
Relieve the fuel system pressure, disconnect the cable from the negative battery terminal, remove the fuel pump/fuel level sensor from the fuel tank, disconnect the sensor electrical connector from the base of the fuel pump/fuel level sensor, separate the fuel level sensor from the fuel pump bracket, disconnect the electrical connector for the fuel level sensor, detach the fuel level sensor from the fuel filter housing, remove the case from the fuel pump/fuel filter housing, disconnect the fuel supply line fitting from the fuel pump/fuel filter housing, remove and discard the 0-ring for the fuel supply line fitting, disconnect the electrical connectors for the fuel pump wiring harness and detach the pump ground wire from the fuel pump/fuel filter housing, remove the fuel pressure regulator housing, disconnect the fuel pump ground wire from the regulator housing, remove the fuel pressure regulator retaining clip and pull the regulator out of the housing, remove and discard the fuel pressure regulator 0-rings, inspect the condition of the spacer and the mesh filter screen, remove the fuel pump, remove and discard the fuel pump 0-ring inside the upper end of the pump recess, remove the suction filter retainer clip and remove the suction filter from the fuel pump, wash the fuel strainer thoroughly in clean solvent, reassemble the fuel pump, fuel filter and fuel level sensor, use new 0-rings and a new retainer clip on the strainer during reassembly, before installing the fuel pump access cover, reconnect the cable to the negative battery terminal, start the engine and check for fuel leaks at the pump fuel line connections.
Posted by AcuraPartsWarehouse Specialist
Q:
How to verify fuel tank and fuel pump operation in Acura TL? Posted by Customer
A:
To verify that there is fuel in the fuel tank and that the fuel pump is operational, turn the ignition switch to ON and listen for a whirring noise for about two seconds as the pump pressurizes the system. If you can't hear the pump from inside the vehicle, open the fuel filler neck cap and have an assistant turn the ignition switch to ON while you listen at the filler neck. To test the fuel pressure on 2003 and earlier models, you'll need a fuel pressure gauge capable of reading pressures in excess of 48 psi (330 kPa) for 1999 and 2000 models, and in excess of 55 psi (380 kPa) for 2001 through 2003 models, along with some fuel hose and a suitable double flare fitting and adapter nut. Before disconnecting any fuel line fittings, relieve the fuel system pressure, then disconnect the cable from the negative terminal of the battery. Remove the fuel pulsation damper from the fuel rail, install the correct diameter banjo bolt from your fuel pressure testing kit, hook up the test hose with the Schrader valve, and connect the fuel pressure gauge to the other end of the test hose. Reconnect the battery, turn the ignition switch to ON with the air conditioning off, and note the pressure on the gauge. Start the engine, let it warm up, and then disconnect the vacuum hose from the fuel pressure regulator. Note the indicated fuel pressure reading on the gauge and compare it with the operating range. Reconnect the vacuum hose to the fuel pressure regulator and note the indicated fuel pressure. If the indicated fuel pressure doesn't go up when you disconnect the vacuum line from the regulator, apply vacuum to the pressure regulator with a hand-held vacuum pump and note what happens. If the fuel pressure drops, the regulator is okay, but there might be a crack or tear in the vacuum hose. Replace the hose and retest. If the indicated fuel pressure doesn't go down when you connect the vacuum hose to the regulator, inspect the hose. If it's torn or cracked, replace it and retest. If the pressure still doesn't go down with the new vacuum hose connected, replace the regulator. If the indicated fuel pressure is higher than the specified range with the vacuum hose connected, check for a good vacuum signal with a vacuum gauge. If vacuum is present, check for a kinked, pinched or clogged fuel return hose or line. If the return line is okay, replace the regulator. If the indicated fuel pressure is lower than the specified range, start the engine and pinch off the return line. If the pressure now rises above the specified operating range, the regulator is not closing fully. Replace it. If the indicated fuel pressure is still lower than the specified range, the fuel filter might be clogged. Replace the filter. If the indicated fuel pressure is still lower than the specified range after replacing the filter, one or more of the fuel injectors or injector O-rings might be leaking, or the fuel pump might be faulty. Replace the defective component(s) and retest. After the test is complete, relieve the system fuel pressure, then disconnect the cable from the negative battery terminal. Remove your fuel pressure testing rig, then reconnect the fuel supply line to the connection at the firewall. Reconnect the cable to the negative battery terminal, start the engine and check for fuel leaks. For 2004 and later models, you'll need a fuel pressure gauge capable of reading in excess of 64 psi (440 kPa) and an adapter setup that connects the gauge between the two halves of the quick-connect fitting between the fuel supply line and the fuel rail. Before disconnecting any fuel line fittings, relieve system fuel pressure, then disconnect the cable from the negative battery terminal. Remove the quick-connect fitting cover, open the clamp that secures the fuel supply line to its mounting bracket, and disconnect the fuel supply line quick-connect fitting at the fuel rail. Connect the fuel pressure gauge to the fuel system, reconnect the battery, turn the ignition switch to ON with the air conditioning off, and note the pressure on the gauge. Start the engine, let it warm up, and note the indicated fuel pressure reading on the gauge and compare it with the operating range. If the indicated pressure is within the specified range, the system is operating correctly. If the indicated pressure is lower than the specified range, the fuel filter might be clogged or the fuel pump or fuel pressure regulator might be defective. After the test is complete, relieve the system fuel pressure. Disconnect the cable from the negative battery terminal. Remove your fuel pressure testing rig, then reconnect the fuel supply line, using a new retainer. Reconnect the cable to the negative battery terminal, start the engine and check for fuel leaks.
Posted by AcuraPartsWarehouse Specialist
If you have any questions about this product, please don't hesitate to ask us. We will be happy to help you!

Genuine Acura Part 17040-S3M-A00, the Right Choice

Your vehicle deserves only genuine OEM Acura parts and accessories. To ensure reliability, purchase Acura part # 17040-S3M-A00 Fuel Pump Set. It is sometimes referred to as Acura Fuel Pump, Acura Fuel Sending Unit. Our Acura parts and accessories are expedited directly from authorized Acura dealers strategically located all across the U.S. and are backed by the manufacturer's 12 month, 12,000 mile warranty. OEM Acura parts are the best for restoring your vehicle to factory condition performance. This part fits 2001-2003 Acura CL, 2002-2003 Acura TL.

Affordable, reliable and built to last, Acura part # 17040S3MA00 Fuel Pump Set stands out as the smart option. AcuraPartsWarehouse.com is your prime online source with the biggest and best selection of genuine Acura parts and accessories at giant discounted prices. We have the OEM Acura parts and accessories you need at the wholesale prices. AcuraPartsWarehouse.com has you covered no matter what type of Acura vehicle you drive.

Why choose Acura Parts Warehouse

  • Dedicated Service

    Your complete satisfaction is our #1 goal

  • Lowest Prices

    Best deals on genuine OE parts from dealerships

  • Fast Delivery

    Orders are processed and delivered promptly