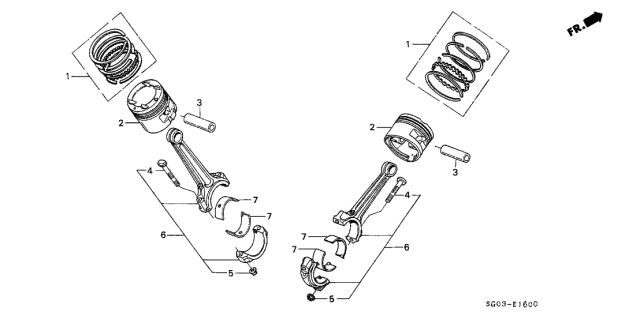
Pay attention to this order: Keep the engine cylinders clean, make all cylinders' tops straight-edge, and set the crankshaft first. Take off the cap from the #1 connecting rod, remembering where the marks are, and wipe clean the areas where the rod touches. Carefully put the new bearing insert in the connecting rod, ensuring its tab fits into the fixed slot from the back side. Make sure both oil holes are lined up correctly, without hitting against the bearing or adding any oil. Put on the second bearing insert at the back of the rod cap, making sure the tab slides right into the groove, without using any lubricant. Line up the hole gaps on the piston rings in distinctive patterns around the piston's surface. Place clean oil engine oil onto the piston and the rings. Slide hose sections over each connecting rod cap bolt. Attach a piston ring compressor, but leave 1/4-inch of the piston skirt sticking out. Put engine oil on the cylinder walls when you rotate the crankshaft to position the number one connecting rod journal directly below its lowest point. Push the piston/rod unit into the number one cylinder from the timing belt side of the engine, making sure the arrow on the piston points towards the timing belt. Then, lightly tap the top edge of the ring compressor against the block to create contact. Move the piston very slowly between hand and fork until the connecting rod drops into its place on the crankshaft journal. Stop right away if you feel any resistance. Before permanently putting on the rod cap, measure the connecting rod bearing oil clearance by unwrapping Plastigage from the number one connecting rod journal. Scrub and wipe clean the metal face where the connecting rod cap goes, take off protective dressings, and fit the cap, placing marks on their correct positions. Give the nuts a thin film of oil, tighten them gradually in three steps, and don't turn the crankshaft while doing this. Be gentle when removing the nuts and rod cap to keep from ruining the Plastigage, then check its broken size against the scale to find the oil gap, as long as it meets standards. Before trying again, clean any material you find trapped under the bearing inserts between the rod and its cap. Then confirm that the rod journal matches its factory-measured size. Use a clean tool to carefully lift up the Plastigage bits and be careful not to gouge the bearing surface. Smear a regular moly-based lubricant or engine shaft installation oil evenly onto the bearing contact areas. Press the connecting rod back into position, take off the tape coverings, tighten the rod cap nuts per recommendation, and perform these steps on the other connecting rods and pistons. During piston and rod reassembly, make sure you clean bearing components and connecting rods well. Also put each rod-piston pair back as intended, with its arrow facing the timing belt side, line up cap and rod marks on each rod, grease cylinder walls, and apply grease to bearing faces when checking oil gaps. When finished installing all assemblies, turn the crankshaft by hand and make sure there's no catching. Then, check the space between the connecting rod ends, comparing it to the manufacturer's measurements.