
My Garage
Cart
Make sure this part fits

Acura 20011-P80-A50 Transmission Assembly (Mt)

1994-1995 Acura Integra 20011P80A50

Customer Questions & Expert Answers (3)
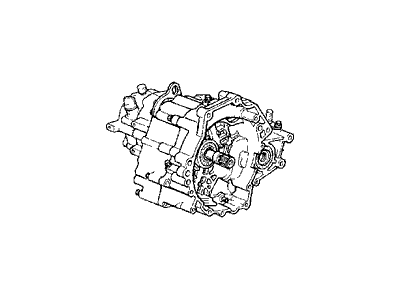
20011-P80-A50 Acura Transmission Assembly (Mt) Illustration 1 of 1
  • Part Description
    Transmission Assembly (Mt)
  • Replaced By
    20011-P80-A52
  • Manufacturer
    Acura
  • Manufacturer's Notes
    This part is discontinued.
Make sure this part fits
  • Related Parts
  • Specifications
  • Fitment
  • Q&A
  • Product Specifications

    BrandGenuine Acura
    Manufacturer Part Number20011-P80-A50
    Part DescriptionTransmission Assembly (Mt)
    Item Dimensions24.7 x 19.9 x 19.8 inches
    Item Weight95.70 Pounds
    ConditionNew
    Fitment TypeDirect Replacement
    ManufacturerAcura
    SKU20011-P80-A50
    WarrantyThis genuine Acura part is guaranteed by Acura's factory warranty.
    Shipping & ReturnShipping Policy Return Policy
    Warning: California's Proposition 65
  • Vehicle Fitment

    Year Make Model Body & Trim Emission & Transmission
    1995 Acura Integra3 Door LS, 3 Door RS, 4 Door LS, 4 Door RSKA 5MT
    1994 Acura Integra3 Door LS, 3 Door RS, 4 Door LS, 4 Door RSKA 5MT
  • Customer Questions & Expert Answers

    Q:
    Do you have this part to fit my car? Posted by AcuraPartsWarehouse Specialist
    A:
    You can Select Your Vehicle to check if 20011-P80-A50 fits your vehicle.
    Posted by AcuraPartsWarehouse Specialist
    Installation and Repair Tips
    Q:
    How to remove and install the Transmission Assembly on an Acura Integra? Posted by Customer
    A:
    Take the cable from the car's battery negative side. Also, pick up the security system locking code if your radio has it. Take off the air filter housing, intake air pipe, and exhaust muffler to work easier. Take both starter cables away from the starter, along with their mounting bracket. Remove the transaxle ground cable, and unplug the power connections from both the lock-up control solenoid and speed sensor. Take out the three bolts that hold the transaxle to the engine in the upper areas, and remove the engine's rear bolt. Place your car on jackstands, then release and back off the wheel hub and lug nuts to take off the wheels and raise the vehicle. Replace the drain plug when you put back the splash shield and take the old transmission fluid out. Put in a fresh sealing washer. Separate the lower arm from the steering knuckle, pull the damper rod out of the right suspension joint, extract the front drive shafts and something in the middle. Begin by taking off the elbow-shaped pipe under the engine, then remove the shift cable cover and disconnect the cable from its place on the transaxle. Pull out the right front mount bracket while also taking apart the throttle control cable connecting to the throttle control bar, just on Integra models. Disconnect and turn the transaxle fluid cooler hoses upward on their fittings, then plug the cooler lines to protect the cooler system from dirt and dust damage. Unscrew the bolts connecting the engine stiffeners and remove the plate covering the torque converter or flywheel. Disconnect any electric wires connected to the transmission along the way. Sign where the torque converter or flywheel connects to the drive plate for correct reassembly, then loosen and remove each bolt from the flywheel-to-torque converter or drive plate while turning the crankshaft pulley for space access. First, loosen the bolt that holds the distributor. Then carry the engine with a hoist device attached to its base. Use a transmission jack or floor jack to lift the transaxle at the bottom. Raise it just enough to take the weight off the transaxle mount. Unbolt and take off three engine parts: the lower transaxle side mount, the lower transaxle to engine mount bolt, and the lower engine to transaxle bolt. Also remove the engine mount bolts at the back of the engine block. When lowering the transaxle from the car, position the torque converter so it separates from the driveplate, then lock the converter to the transaxle. To avoid hitting the engine, slowly let the engine down when needed. Before reinstalling, always flush the transaxle's cooler and lines with solvent when the transaxle is taken out to make sure all the solvent is gone after cleaning. Place the starter motor, making sure the torque converter hub fits easily into the pump. Lift the transaxle up slowly, holding it level during the process. Gently guide the torque converter to match the driveplate marks, and push the transaxle forward until its pins find and connect with the converter. Attach and make tight the two bolts connecting the transaxle and engine, but do not push them down to bring the parts together. After reinstalling everything, you follow the same steps in reverse order to complete the installation. Fill the transaxle with exactly the amount of oil mentioned in the manual, taking care to add extra due to the heavier fluid and filter. Turn on the engine, brake the car from rolling, and drive the transmission through its full range of gears three times to make sure the gear shift system works well. Make sure your ignition is set correctly, and correct it if needed. Check the fluid level after the engine runs fully hot and neutralized with the gear selector. Check for any fluid dripping while driving.
    Posted by AcuraPartsWarehouse Specialist
    Q:
    Is a Transmission Assembly Overhaul a Challenging Task for a Do-It-Yourselfer on an Acura Integra? Posted by Customer
    A:
    Overhauling a manual transaxle is a challenging task for a do-it-yourselfer, requiring the disassembly and reassembly of numerous small parts, with precise measurements of clearances and potential adjustments using select fit spacers and snap-rings. While a competent individual can remove and install the transaxle, the overhaul process is best left to a repair shop, as the time and cost involved often surpass that of a rebuilt unit, which may be available through dealer parts departments or auto parts stores. An inexperienced mechanic can successfully rebuild a transaxle if equipped with the necessary special tools and approaches the job methodically to avoid overlooking any details. Essential tools for the overhaul include internal and external snap-ring pliers, a bearing puller, a slide hammer, a set of pin punches, a dial indicator, and possibly a hydraulic press, along with a sturdy workbench and a vise or transaxle stand. Careful documentation during disassembly is crucial, noting the arrangement and securing methods of each piece to facilitate reassembly. Additionally, having an understanding of the malfunctioning area of the transaxle can simplify the examination and replacement of components, as certain issues are often linked to specific regions within the unit.
    Posted by AcuraPartsWarehouse Specialist
    See Complete Installation and Repair Tips

Genuine Acura Part 20011-P80-A50, the Right Choice

For dependable performance, buy part # 20011-P80-A50 Transmission Assembly (Mt). Also known as Transmission Assembly. In terms of quality and durability, OEM components set the standard. They are produced at the Acura factory and subjected to a quality assurance routine. This part fits 1994-1995 Integra.

AcuraPartsWarehouse.com is a major online store of original Acura parts and accessories, including 20011P80A50 Transmission Assembly (Mt). At our site, we are offering you brand new OEM Acura equipment. We stock a broad selection of genuine parts at competitive prices. When you are in need of quality, reliability, and durability, and want something cost-effective in combination, this is the part you need. Our components are all warranted by the manufacturer for your peace of mind.

Why choose Acura Parts Warehouse

  • Dedicated Service

    Your complete satisfaction is our #1 goal

  • Lowest Prices

    Best deals on genuine OE parts from dealerships

  • Fast Delivery

    Orders are processed and delivered promptly