×
- Hello
- Login or Register
- Quick Links
- Live Chat
- Track Order
- Parts Availability
- RMA
- Help Center
- Contact Us
- Shop for
- Acura Parts
- Acura Accessories
My Garage
My Account
Cart
Genuine 1990 Acura Legend Crankshaft
Crank Shaft- Select Vehicle by Model
- Select Vehicle by VIN
Select Vehicle by Model
orMake
Model
Year
Select Vehicle by VIN
For the most accurate results, select vehicle by your VIN (Vehicle Identification Number).
1 Crankshaft found

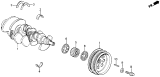
1990 Acura Legend Crankshaft
Part Number: 13310-PL2-010$1125.41 MSRP: $1607.27You Save: $481.86 (30%)Ships in 1-3 Business DaysProduct Specifications- Replaced by: 13310-PL2-505
- Item Weight: 19.70 Pounds
- Item Dimensions: 20.2 x 7.9 x 7.2 inches
- Condition: New
- Fitment Type: Direct Replacement
- SKU: 13310-PL2-010
- Warranty: This genuine part is guaranteed by Acura's factory warranty.
1990 Acura Legend Crankshaft
If you find yourself requiring new genuine 1990 Acura Legend Crankshaft, consider paying us a visit. We carry a vast inventory of OEM 1990 Acura Legend Crankshaft, offered at highly competitive prices and superior quality, all with a manufacturer's warranty. Additionally, we take pride in our first-class customer service and speedy delivery.
1990 Acura Legend Crankshaft Parts Questions & Experts Answers
- Q: How is a Crankshaft Installed During Engine Reassembly on an 1990 Acura Legend?A: Right after you restore a clean and sound crankshaft and engine block, it's time to build the engine by placing its main shaft into position. Take out the lacing at the bottom of the engine, then undo bolt connections of bearing caps and lift them off with a bridge piece behind them, setting all the pieces in their correct order. Carefully scrub the main bearing spots with a lint-free cloth before you take out any remaining old bearing pieces. Wipe clean the back sides of the new main bearing inserts. Position each half of the inserts in the pecked out grooves on each main bearing saddle in the engine block. Align the other half of the insert in the main bearing cap, keeping its oil holes lined up precisely with those in the block. In V6 engines, put thrust bearings in the number 3 position, while four-cylinder engines use the number 4 position, lubing all contacts. Wipe off both bearings and the main journal on the crankshaft, and make sure oil can flow through all five areas. Next, place the clean crankshaft in the main bearings, then measure how much oil passes between the bearing and crankshaft. Clean off the two pillars of Plastigage, apply them to every long crankshaft shaft where it fits into each main bearing cup, then clean both surfaces in the main bearing covers before putting everything back together with the bearing icons facing forward. Place the main bearing cap bridge gently into place, being careful not to move the Plastigage, lubricate the bolt threads and under six of the bolts, and put them in place in the correct order. Tighten the main bearing cap bolts in three steps to the proper torque setting without moving the crankshaft. Take out the bolts and raise up the main bearing caps one by one, saving everything in its original sequence. Be careful not to move the Plastigage markers on the caps. Match the crushed Plastigage measurement (using the envelope's scale) to check if your main bearing oil clearance meets factory specifications. Check for dirt or oil between the bearing inserts and caps or the block, then check for journal taper if the Plastigage width doesn't match specifications. Gently wipe off all Plastigage residue from both bearing spaces and crankshaft areas, take out the crankshaft carefully, clean the bearing surfaces in the block, and spread on a thin layer of fresh moly-base grease or engine assembly lubricant to all bearings, including the thrust plates. Before putting the crankshaft back, apply oil to both the crankshaft areas that touch the seals, and clean the crankshaft's rotating sections. Wipe clean the bearing surfaces in the caps and put lubrication on them. Install the caps and bridge with arrows pointing at the front of the engine, keeping thrust washers in place, once you've placed the engine block so the crankshaft sits at the top and added the rest of the assembly parts. After rubbing the end of each bolt with oil, start them by hand, run the crankshaft to line up the thrust washer, and then squeeze all main bearing cap and bridge bolts to their given tightness level. Before tightening, turn the crankshaft by hand and listen for any rubbing. Check the endplay using a measuring tool, making sure everything works as intended unless you replaced worn thrust surfaces with new washers. When complete, put in a fresh oil seal for the back of the engine, and attach the housing back to the block.
Related 1990 Acura Legend Parts
 1990 Acura Legend Rod Bearing
 1990 Acura Legend Oil Pan Gasket
 1990 Acura Legend Crankshaft Thrust Washer Set
 1990 Acura Legend Cam Gear
 1990 Acura Legend Camshaft
 1990 Acura Legend Crankshaft Pulley
 1990 Acura Legend Oil Pan
 1990 Acura Legend Oil Pump