My Garage
Cart
Make sure this part fits

Acura 13310-PL2-010 Crankshaft

1989-1990 Acura Legend 13310PL2010

Customer Questions & Expert Answers (4)
Acura 13310-PL2-010 Crankshaft
  • Part Description
    Crankshaft
  • Replaced By
    13310-PL2-505
  • Manufacturer
    Acura
Make sure this part fits
$1125.41 MSRP: $1607.27
You Save: $481.86 (30%)
Ships in 1-3 Business Days
1
ADD TO CART
  • Related Parts
  • Product Specifications
  • Vehicle Fitment
  • Customer Questions & Expert Answers
  • Product Specifications

    BrandGenuine Acura
    Manufacturer Part Number13310-PL2-010
    Part DescriptionCrankshaft
    Item Dimensions20.6 x 7.9 x 7.4 inches
    Item Weight20.90 Pounds
    ConditionNew
    Fitment TypeDirect Replacement
    ManufacturerAcura
    SKU13310-PL2-010
    WarrantyThis genuine Acura part is guaranteed by Acura's factory warranty.
    Shipping & ReturnShipping Policy Return Policy
    Warning: California's Proposition 65
  • Vehicle Fitment

    Year Make Model Body & Trim Emission & Transmission
    1990 Acura Legend2 Door L, 2 Door LS, 2 Door STD, 4 Door L, 4 Door LS, 4 Door ST, 4 Door STDKA 4AT, KA 5MT, KL 4AT, KL 5MT
    1989 Acura Legend2 Door L, 2 Door LS, 2 Door STD, 4 Door L, 4 Door LS, 4 Door ST, 4 Door STDKA 4AT, KA 5MT, KL 4AT, KL 5MT
  • Customer Questions & Expert Answers

    Q:
    Please Check fit Posted by AcuraPartsWarehouse Specialist
    A:
    You can Select Your Vehicle to check if 13310-PL2-010 fits your vehicle.
    Posted by AcuraPartsWarehouse Specialist
    Q:
    How to install a crankshaft during engine reassembly on Acura Legend? Posted by Customer
    A:
    Crankshaft installation is the first major task in engine reassembly, assuming the engine block and crankshaft have been cleaned, inspected, and repaired. Position the engine with the bottom lacing up, then remove the main bearing cap bolts and lift out the caps and bridge, laying them out in the correct order for installation. If old bearing inserts are still in place, remove them and clean the main bearing surfaces with a lint-free cloth. Clean the back sides of the new main bearing inserts and place one half with the oil groove in each main bearing saddle in the block, ensuring the tab fits into the recess and the oil holes align. For V6 engines, install thrust bearings in the number three position, while for four-cylinder engines, they go in the number four position, with oil applied to the contact surfaces. Clean the bearing faces and crankshaft main bearing journals, checking the oil holes for dirt. Once the crankshaft is clean, lay it in position in the main bearings and check the main bearing oil clearance using Plastigage, placing it on each crankshaft main bearing journal. Clean the bearing faces in the caps, install them in their respective positions with arrows pointing toward the front, and carefully lay the main bearing cap bridge in place without disturbing the Plastigage. Apply a light coat of oil to the bolt threads and under sides of the bolt heads before installing and tightening the main bearing cap bolts in three steps without rotating the crankshaft. After removing the bolts and lifting off the main bearing caps, compare the width of the crushed Plastigage to the scale on the envelope to determine the main bearing oil clearance. If the clearance is not as specified, check for dirt or oil between the bearing inserts and caps or block, and if the Plastigage is wider at one end, the journal may be tapered. Scrape off any traces of Plastigage material, then lift the crankshaft out, clean the bearing faces in the block, and apply a thin layer of moly-base grease or engine assembly lube to each bearing surface, including the thrust washers. Lubricate the crankshaft surfaces that contact the oil seals, ensuring the journals are clean before laying the crankshaft back in place. Install the pistons and connecting rods with the engine block positioned so the crankshaft is at the top, then install the caps and bridge with arrows pointing toward the front, ensuring the thrust washers are installed. Apply a light coat of oil to the bolt threads and under sides of the bolt heads, starting the bolts by hand, and tap the ends of the crankshaft to align the thrust washer and crankshaft surfaces before tightening all bolts to the specified torque. Rotate the crankshaft by hand to check for binding, then check the crankshaft endplay with a feeler gauge or dial indicator, ensuring it is correct if the thrust faces are not worn or damaged and new thrust washers are installed. Finally, install a new rear main oil seal and bolt the retainer to the block.
    Posted by AcuraPartsWarehouse Specialist
    Q:
    What options are available if the oil seal journal is damaged for the 1988 Acura Legend? Posted by Customer
    A:
    An automotive machine shop may repair the journal by pressing on a thin sleeve, but if repair isn't feasible, a new or different crankshaft should be installed.
    Posted by AcuraPartsWarehouse Specialist
    Q:
    How should the main bearing caps be prepared for removal for the 1987 Acura Legend? Posted by Customer
    A:
    Ensure the main bearing caps are marked for their locations, numbered consecutively from front to rear. If they are not marked, do so accordingly.
    Posted by AcuraPartsWarehouse Specialist
    If you have any questions about this product, please don't hesitate to ask us. We will be happy to help you!

Genuine Acura Part 13310-PL2-010, the Right Choice

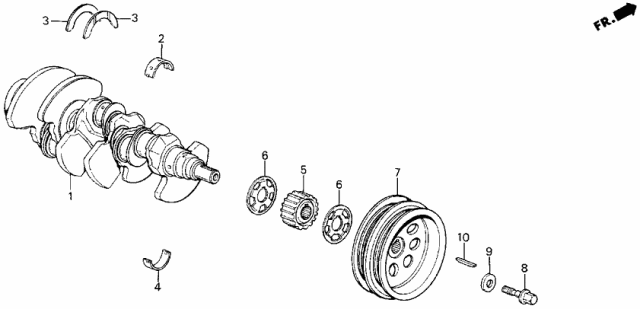
For dependable performance, buy part # 13310-PL2-010 Crankshaft. Also known as Crankshaft. In terms of quality and durability, OEM components set the standard. They are produced at the Acura factory and subjected to a quality assurance routine. This part fits 1989-1990 Legend.

AcuraPartsWarehouse.com is a major online store of original Acura parts and accessories, including 13310PL2010 Crankshaft. At our site, we are offering you brand new OEM Acura equipment. We stock a broad selection of genuine parts at competitive prices. When you are in need of quality, reliability, and durability, and want something cost-effective in combination, this is the part you need. Our components are all warranted by the manufacturer for your peace of mind.

Why choose Acura Parts Warehouse

  • Dedicated Service

    Your complete satisfaction is our #1 goal

  • Lowest Prices

    Best deals on genuine OE parts from dealerships

  • Fast Delivery

    Orders are processed and delivered promptly