×
- Hello
- Login or Register
- Quick Links
- Live Chat
- Track Order
- Parts Availability
- RMA
- Help Center
- Contact Us
- Shop for
- Acura Parts
- Acura Accessories
My Garage
My Account
Cart
Genuine 1995 Acura Integra Cylinder Head
Head- Select Vehicle by Model
- Select Vehicle by VIN
Select Vehicle by Model
orMake
Model
Year
Select Vehicle by VIN
For the most accurate results, select vehicle by your VIN (Vehicle Identification Number).
4 Cylinder Heads found

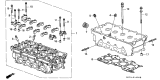 Product Specifications
- Other Name: Cylinder Head
- Item Weight: 15.30 Pounds
- Item Dimensions: 21.5 x 10.8 x 10.3 inches
- Condition: New
- Fitment Type: Direct Replacement
- SKU: 12100-PR4-000
- Warranty: This genuine part is guaranteed by Acura's factory warranty.

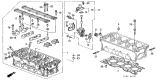 Product Specifications
- Other Name: Cylinder Head
- Item Weight: 22.50 Pounds
- Item Dimensions: 22.5 x 12.2 x 10.9 inches
- Condition: New
- Fitment Type: Direct Replacement
- SKU: 12100-P72-000
- Warranty: This genuine part is guaranteed by Acura's factory warranty.

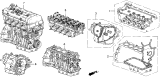 Product Specifications
- Other Name: General Assembly, Cylinder Head
- Item Weight: 69.60 Pounds
- Item Dimensions: 24.8 x 15.4 x 14.2 inches
- Condition: New
- Fitment Type: Direct Replacement
- SKU: 10003-P75-A00
- Warranty: This genuine part is guaranteed by Acura's factory warranty.
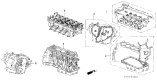 Product Specifications
- Other Name: General Assembly, Cylinder Head
- Item Weight: 66.30 Pounds
- Item Dimensions: 24.3 x 15.2 x 13.9 inches
- Condition: New
- Fitment Type: Direct Replacement
- SKU: 10003-P72-A00
- Warranty: This genuine part is guaranteed by Acura's factory warranty.
1995 Acura Integra Cylinder Head
If you find yourself requiring new genuine 1995 Acura Integra Cylinder Head, consider paying us a visit. We carry a vast inventory of OEM 1995 Acura Integra Cylinder Head, offered at highly competitive prices and superior quality, all with a manufacturer's warranty. Additionally, we take pride in our first-class customer service and speedy delivery.
1995 Acura Integra Cylinder Head Parts Questions & Experts Answers
- Q: How to Remove and Reinstall the Cylinder Head in a DOHC Engine on an 1995 Acura Integra?A: Put the number one piston on top of its highest point, disconnect the battery cable first from the negative terminal and then from the engine. Make sure you avoid locking your radio system by mistake if it's an anti-theft model. Take out the coolant, spark plugs, clean the engine air duct, then remove the belt system. Put the power steering pump to one side while still connected to all hoses, then undo the bracket holding the pump. After turning off the engine, unhook the throttle string and ease air pressure from the fuel system. Then disconnect three major fuel lines, a vapor emissions valve, a fume vent tube, a PCV tube, and brake booster vacuum tube. Take off all three coolant and heater hoses before disconnecting the upper radiator hose. If you're working on a VTEC car, take out the strut brace beneath the engine. Disconnect these six electrical wiring terminals: fuel injectors, engine temperature sensor, output for the temperature gauge, crankshaft/TPS/camshaft sensor, crank fluctuations, ignition coil, and air pressure at the intake. Before you work, take off the cruise control actuator and splash shield that's hidden under the engine bay. Take the engine's weight off by supporting it with a floor jack, put a wood plank between the jack's platform and oil pan, then unscrew the engine's left side mount that's up high. Loosen the bolts that hold the intake and exhaust manifolds, taking the manifolds off if it helps you move them more easily. Take off the valve cover, the distributor plus its cover and connecting wires, the timing belt, and give the cams some space to work. Crank the head bolts slowly in the opposite order you tightened them, removing them in 1/4-turn steps until they become easy to turn by hand. This prevents the head from warping while you take it off. Carry the cylinder head slowly and safely from the engine. If it takes effort to move, use a pry bar to push between the power steering pump bracket and engine block. Placing blocks under it helps position the head during work. Take out the rocker arms and shafts when you remove the cylinder head. Make sure the joining areas on the cylinder head and block are completely free of debris by cleaning them perfectly before install. Use a gasket scraper to get rid of all carbon residue, then clean again with lacquer thinner or acetone. Inspect the block and cylinder head attachment points for flaws, fix slight damages with a file, clean the oil-control holes in the cylinder head completely, then install the cylinder head again with a fresh O-ring. Run a tap down each bolt hole in the head, then brush clean the threads of all head bolts. Put back the rocker arms in place, put a fresh gasket with identifying marks facing up on the engine block, and make sure the dowels match their right spots before setting the cylinder head onto the block. First, apply engine oil to clean both the bolts and their matching threads, then put everything in place the right order, and round up to the required torque. Turn the crankshaft by hand 2 full turns counterclockwise, making sure the camshafts stay timed correctly, while slowly letting it pass through. Reinstall everything backwards from how you took it off, replenish the cooling system, monitor all fluid levels, crank the engine, measure ignition timing, and run the engine till the normal temperature shows, watching for leakage and proper function.
Related 1995 Acura Integra Parts
 1995 Acura Integra Cylinder Head Gasket
 1995 Acura Integra Timing Cover
 1995 Acura Integra Rocker Arm
 1995 Acura Integra Camshaft
 1995 Acura Integra Spool Valve