×
- Hello
- Login or Register
- Quick Links
- Live Chat
- Track Order
- Parts Availability
- RMA
- Help Center
- Contact Us
- Shop for
- Acura Parts
- Acura Accessories
My Garage
My Account
Cart
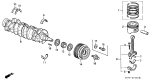
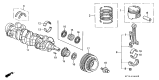
Genuine 2000 Acura Integra Crankshaft
Crank Shaft- Select Vehicle by Model
- Select Vehicle by VIN
Select Vehicle by Model
orMake
Model
Year
Select Vehicle by VIN
For the most accurate results, select vehicle by your VIN (Vehicle Identification Number).
3 Crankshafts found

 Product Specifications
- Item Weight: 26.40 Pounds
- Item Dimensions: 19.6 x 7.8 x 7.4 inches
- Condition: New
- Fitment Type: Direct Replacement
- SKU: 13310-PR4-A00
- Warranty: This genuine part is guaranteed by Acura's factory warranty.

 Product Specifications
- Replaces: 13310-P73-J00
- Item Weight: 42.00 Pounds
- Item Dimensions: 20.5 x 19.9 x 7.3 inches
- Condition: New
- Fitment Type: Direct Replacement
- SKU: 13310-P73-J01
- Warranty: This genuine part is guaranteed by Acura's factory warranty.
 Product Specifications
- Item Weight: 17.20 Pounds
- Item Dimensions: 20.0 x 7.8 x 7.2 inches
- Condition: New
- Fitment Type: Direct Replacement
- SKU: 13310-P72-000
- Warranty: This genuine part is guaranteed by Acura's factory warranty.
2000 Acura Integra Crankshaft
If you find yourself requiring new genuine 2000 Acura Integra Crankshaft, consider paying us a visit. We carry a vast inventory of OEM 2000 Acura Integra Crankshaft, offered at highly competitive prices and superior quality, all with a manufacturer's warranty. Additionally, we take pride in our first-class customer service and speedy delivery.
2000 Acura Integra Crankshaft Parts Questions & Experts Answers
- Q: Has the Crankshaft and engine block been cleaned, inspected, and repaired or reconditioned on 2000 Acura Integra?A: We assume the engine block and crank shaft have been cleaned, inspected and repaired as needed or reconditioned. Then position the engine with the bottom facing up, remove the main bearings caps or the bridge assembly and the original bearing inserts from the block and caps. Make certain that the bearing surfaces are spotless by wiping with a clean, lint free type cloth. Clean the back sides of the new main bearing inserts, and line one up in each main bearing saddle in the block, making sure the grooved insert goes in the correct place. Then take the corresponding bearing from each set, lay them in the main bearing cap with the tab sitting in the recess. Clean the bearing faces in the block and crankshaft main bearing journals, install the flanged thrust washers in the number four cap and saddle. Clean or check the oil holes in the crankshaft to keep the dirt from getting into the new bearings. Now, after making sure the crankshaft is clean, carefully lay it in position inside the main bearings. Pieces of Plastigage are placed on each crankshaft main bearing journal prior to permanent installation to check the main bearing oil clearance. Clean the faces of the bearings in the main bearing caps, and install the caps or bridge assembly without disturbing the Plastigage. Main bearing caps or bridge assembly tightened in recommended sequence to specified torque, DO NOT rotate crankshaft. Unbolt main bearing caps or bridge assembly and carefully lift off, with regard for the main bearing caps or bridge assembly in order and avoid disturbing the Plastigage. Determine the main bearing oil clearance by comparing the width of the crushed Plastigage to the scale on the envelope and looking at the specifications. If different inserts are needed, and the clearance is incorrect, be certain that there is no dirt or oil between the bearing inserts and caps or block. Remove and carefully scrape off all traces of Plastigage material from the bearing faces (if necessary, when removing the first) and the main bearing journals without nicking or scratching them. If the engine has main bearing cap bridge, install the piston/connecting rod assemblies first, so all pistons are at Top Dead Center and do not foul crankshaft installation. Lift crankshaft out of engine, clean bearing faces in block and apply a very thin, uniform layer of moly base engine assembly lubricant to each bearing surface, including thrust faces. Keep the crankshaft journals clean before setting the crankshaft back in the block. Clean the faces of the bearings in the caps, apply lubricant, install the main bearing caps or bridge assembly and bolts. Once the bolt on each main bearing cap has been tightened to the specified torque in the recommended sequence, turn the crankshaft several revolutions by hand to ensure that it does not bind. Be sure to check the crankshaft endplay with feeler gauges or a dial indicator, correct if the thrust faces are not worn or damaged and new bearings are installed. Last but not least you need to install the new rear main oil seal.
Related 2000 Acura Integra Parts
 2000 Acura Integra Rod Bearing
 2000 Acura Integra Oil Pan
 2000 Acura Integra Oil Pump
 2000 Acura Integra Oil Pan Gasket
 2000 Acura Integra Camshaft
 2000 Acura Integra Crankshaft Pulley
 2000 Acura Integra Crankshaft Thrust Washer Set