×
- Hello
- Login or Register
- Quick Links
- Live Chat
- Track Order
- Parts Availability
- RMA
- Help Center
- Contact Us
- Shop for
- Acura Parts
- Acura Accessories
My Garage
My Account
Cart
Genuine Acura Integra Crankshaft
Crank Shaft- Select Vehicle by Model
- Select Vehicle by VIN
Select Vehicle by Model
orMake
Model
Year
Select Vehicle by VIN
For the most accurate results, select vehicle by your VIN (Vehicle Identification Number).
10 Crankshafts found

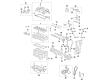
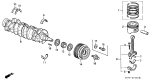
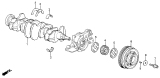
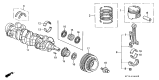
Acura Integra Crankshaft Component
Part Number: 13310-RPY-G10$294.01 MSRP: $387.60You Save: $93.59 (25%)Ships in 1-3 Business Days
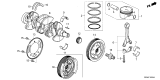
Acura Integra Crankshaft
Part Number: 13310-64A-A00$265.27 MSRP: $349.70You Save: $84.43 (25%)Ships in 1-3 Business Days


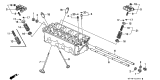
Acura Integra Crankshaft
The Acura Integra Crankshaft converts the straight up and down movements of the pistons into the smooth spinning force that eventually turns the gears and wheels. It is the engine power delivery heart. The Crankshaft is mounted deep in the engine block and has offset crank throws, on which the connecting rods are connected. The offsets permit the conversion of reciprocating to rotational motion without energy waste. The Integra line had earlier and less powerful versions that usually applied tough cast iron. Those with high horsepower Acura versions had forged steel Crankshaft units to add higher resistance to larger combustion loads. The material sequence is evident, and a radical shift in design is absent. Every Crankshaft is designed to last as long as the vehicle exists when clean oil gets on its journals. However, improper upkeep may result in surfaces being scratched by debris or low flow, increased clearance, and noisy knock or vibration indicating potential replacement. Home replacement requires complete engine removal, close bearing numbering, specific torque, and comprehensive lubrication to allow the new Crankshaft to rotate freely and have your Acura Integra running smoothly.
We provide a broad range of OEM Acura Integra Crankshaft at unbeatable prices on our website. For your OEM parts, You can count on the guaranteed quality, manufacturer's warranty, outstanding customer service, and prompt delivery. We look forward to your visit.
Acura Integra Crankshaft Parts Questions & Experts Answers
- Q: How to Inspect and Evaluate the Condition of a Crankshaft on an Acura Integra?A:Remove all burrs from the crankshaft oil holes with a stone, file, or scraper to ensure sharp edges do not gouge or scratch the new bearings. Clean the crankshaft with solvent and dry it with compressed air if available. Check the main and connecting Rod Bearing journals for uneven wear, scoring, pits, and cracks, and inspect the rest of the crankshaft for cracks and other damage, which should be revealed through magnafluxing at an automotive machine shop. Measure the diameter of the main and connecting rod journals using a micrometer, comparing results at several points to detect taper and out-of-round conditions, including measurements at each end of the journal near the crank throws. If the journals are damaged, tapered, out-of-round, or worn beyond specified limits, replacement of the crankshaft is necessary as it cannot be reground. Inspect the oil seal journals at each end of the crankshaft for wear and damage; if grooves, nicks, or scratches are present, new seals may leak upon reassembly, and an automotive machine shop may be able to repair the journal with a thin sleeve, otherwise a new or different crankshaft should be installed. Place the crankshaft in V-blocks or a lathe, setting up a dial indicator to contact each main bearing journal in turn, rotating the crankshaft through two complete revolutions at each position and comparing the readings to the runout limit, replacing the crankshaft if it exceeds the limit. Finally, examine the main and rod bearing inserts.

Related Acura Integra Parts
 Acura Integra Rod Bearing
 Acura Integra Oil Pan
 Acura Integra Oil Pump
 Acura Integra Oil Pan Gasket
 Acura Integra Camshaft
 Acura Integra Crankshaft Pulley
 Acura Integra Crankshaft Gear
 Acura Integra Crankshaft Thrust Washer Set
Browse by Year
2026 Crankshaft 2025 Crankshaft 2024 Crankshaft 2023 Crankshaft 2001 Crankshaft 2000 Crankshaft 1999 Crankshaft 1998 Crankshaft 1997 Crankshaft 1996 Crankshaft 1995 Crankshaft 1994 Crankshaft 1993 Crankshaft 1992 Crankshaft 1991 Crankshaft 1990 Crankshaft 1989 Crankshaft 1988 Crankshaft 1987 Crankshaft 1986 Crankshaft