×
- Hello
- Login or Register
- Quick Links
- Live Chat
- Track Order
- Parts Availability
- RMA
- Help Center
- Contact Us
- Shop for
- Acura Parts
- Acura Accessories
My Garage
My Account
Cart
Genuine 2000 Acura Integra Transmission Assembly
Trans Assembly- Select Vehicle by Model
- Select Vehicle by VIN
Select Vehicle by Model
orMake
Model
Year
Select Vehicle by VIN
For the most accurate results, select vehicle by your VIN (Vehicle Identification Number).
4 Transmission Assemblies found

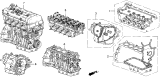 Product Specifications
- Other Name: Transaxle
- Item Weight: 187.50 Pounds
- Item Dimensions: 24.3 x 21.8 x 19.9 inches
- Condition: New
- Fitment Type: Direct Replacement
- SKU: 20021-PGA-A10
- Warranty: This genuine part is guaranteed by Acura's factory warranty.
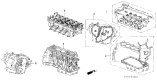
- Product Specifications
- Other Name: Transaxle
- Replaces: 20011-P80-V41, 20011-P80-V40
- Item Weight: 98.90 Pounds
- Item Dimensions: 26.0 x 19.8 x 19.5 inches
- Condition: New
- Fitment Type: Direct Replacement
- SKU: 20011-P80-V42
- Warranty: This genuine part is guaranteed by Acura's factory warranty.

 Product Specifications
- Other Name: Transaxle
- Replaces: 20011-P80-J40
- Item Weight: 38.40 Pounds
- Item Dimensions: 25.7 x 19.6 x 20.0 inches
- Condition: New
- Fitment Type: Direct Replacement
- SKU: 20011-P80-J41
- Warranty: This genuine part is guaranteed by Acura's factory warranty.
- Product Specifications
- Other Name: Transaxle
- Replaces: 20011-P80-A50, 20011-P80-A51
- Item Weight: 93.90 Pounds
- Item Dimensions: 26.0 x 19.9 x 19.2 inches
- Condition: New
- Fitment Type: Direct Replacement
- SKU: 20011-P80-A52
- Warranty: This genuine part is guaranteed by Acura's factory warranty.
2000 Acura Integra Transmission Assembly
If you find yourself requiring new genuine 2000 Acura Integra Transmission Assembly, consider paying us a visit. We carry a vast inventory of OEM 2000 Acura Integra Transmission Assembly, offered at highly competitive prices and superior quality, all with a manufacturer's warranty. Additionally, we take pride in our first-class customer service and speedy delivery.
2000 Acura Integra Transmission Assembly Parts Questions & Experts Answers
- Q: How to remove and install a Transmission Assembly on an 2000 Acura Integra?A: Detach the negative connection first, followed by the positive one from your fuel tank battery, and pop out the fuel tank. Confirm that the radio retention code matches the serial number written in the car before the removal begins. Remove three main components from your engine: the resonator, intake air tube, and air filter housing. Remove two cables connecting the starter motor, then unscrew the bolt that holds the top starter motor mount. To begin work, separate the transaxle ground wire, remove the back-up light switch connector, and free the wire clamp that connects to the transaxle. Then, disconnect the vehicle speed sensor electrical connector in the process. To start, free up the driveaxle/hub nut, loosen front wheel lug nuts, lift your car up, put it on jackstands, then take the front wheels off. Take off the splash shield if there is one, then remove the curved exhaust pipe directly below the transaxle to drain off the transaxle oil. To work on Integra drive trains, detach the change mechanism and extending lever from the transmission. When replacing the clutch, slide off the two joint parts that connect the clutch fluid hose to clutch fluid pressure line, unbolt the clutch pressure line, release cylinder, and cylinder pushrod. To prevent kinks in the fluid pressure line, handle everything carefully while making sure not to press the clutch pedal before taking out the release cylinder. Loosen the driveaxles, take out the engine stiffener when present, undo the clutch access cover bolts, and detach the cover. Before starting, remove the distributor bolt then lift the engine with a cylinder hoist to reduce pressure on the engine and transaxle mounts. Lift the car, take the pressure off engine and transmission support bolts, and keep the transmission balanced with a jack and chain. First raise the engine just enough to take weight off the supports. Then unscrew and remove the right bracket bolts, upper engine attachment screws, the clutch hose retaining prop, the rear engine link above the left drive axle, and finally the bolts in the back of the transaxle. Before moving anything, make sure you disconnect all transaxle wires and hoses. Then pull the transaxle and jack away from the engine slowly. Before pulling out the transaxle, take the input shaft from trapped underneath the vehicle. Taking off the transaxle lets you spot any worn-out clutch parts and adds a fresh clutch kit during the replacement. When taking off the clutch parts, put them back in and double-check for the dowel pins. Use the chain to hold the transaxle onto the jack, lift it behind the engine, slide it into place, and push it forward. Make sure you align the transaxle dowel pins with the engine's matching holes, and fit the input shaft with the splines of the clutch plate hub without excessive force. Fasten the transaxle bolts that join the housing to the engine, and the transaxle lower bracket bolts appropriate to this torque. Rephrase: Screw in the bolts that hold the transaxle to the engine - three upper ones and one lower one - making sure to tighten to factory recommended force. Lift the transaxle up a little, attach the right mounting bracket securely, and fasten both bracket bolts. Neutralize brake caliper, then join it with bracket and bolt with appropriate torque level. Take out the chain hoist, put the distributor bolt back in. Put the clutch cover on and, when needed, the engine support bars, then tighten their bolts to their correct force. Afterwards, setting everything up happens in the opposite order. New lubricant goes in the transmission at the right amount. Next, bleed the clutch system to remove any air. Finally, drive the car, checking for fluid leaks.
Related 2000 Acura Integra Parts
 2000 Acura Integra Torque Converter
 2000 Acura Integra Valve Body
 2000 Acura Integra Transmission Gasket
 2000 Acura Integra Side Cover Gasket