×
- Hello
- Login or Register
- Quick Links
- Live Chat
- Track Order
- Parts Availability
- RMA
- Help Center
- Contact Us
- Shop for
- Acura Parts
- Acura Accessories
My Garage
My Account
Cart
Genuine Acura Integra Transmission Assembly
Trans Assembly- Select Vehicle by Model
- Select Vehicle by VIN
Select Vehicle by Model
orMake
Model
Year
Select Vehicle by VIN
For the most accurate results, select vehicle by your VIN (Vehicle Identification Number).
23 Transmission Assemblies found

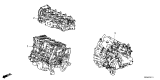
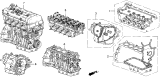
Acura Integra Transmission Assembly
Part Number: 20011-65W-R80$4646.54 MSRP: $6125.56You Save: $1479.02 (25%)Ships in 1-2 Business Days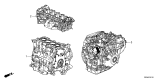
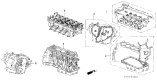
Acura Integra Transmission Assembly
Part Number: 20011-65P-J41$5256.37 MSRP: $6929.49You Save: $1673.12 (25%)Ships in 1-3 Business DaysAcura Integra ATR KIT
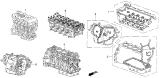
Part Number: 06200-6LP-A10RM$2887.26 MSRP: $3806.29You Save: $919.03 (25%)Ships in 1-2 Business DaysAcura Integra Automatic Transmission Kit
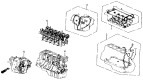
Part Number: 06200-6LP-010RM$3162.23 MSRP: $4168.79You Save: $1006.56 (25%)Ships in 1-3 Business Days


| Page 1 of 2 |Next >
1-20 of 23 Results
Acura Integra Transmission Assembly
Acura Integra Transmission Assembly delivers the crucial job of channeling engine torque to the wheels while letting the driver tap the right amount of power for hills cruising or quick starts. Across generations the Transmission Assembly in the Acura Integra hatch and sedan came in driver-controlled manuals with synchronized gears and computer-managed automatics that use planetary gearsets hydraulic pressure and clutches to shift smoothly. Both versions share the same aim, they multiply or reduce engine speed through selected ratios so the engine can rev higher for climbing or accelerate from rest then settle into lower revs at highway pace to save fuel and cut emissions. Recent Acura models also offer a continuously variable setup that moves belts along pulleys for infinite ratios and a dual-clutch design that preselects gears for ultra-fast shifts yet every Transmission Assembly still performs the twin tasks of torque transfer and speed management. Typical warning signs that an Integra Transmission Assembly needs attention include leaking fluid unusual grinding or whining harsh shifting or a glowing check engine light, ignoring these cues can leave the vehicle unable to move because a failed Transmission Assembly removes the essential link between motor and wheels.
We provide a broad range of OEM Acura Integra Transmission Assembly at unbeatable prices on our website. For your OEM parts, You can count on the guaranteed quality, manufacturer's warranty, outstanding customer service, and prompt delivery. We look forward to your visit.
Acura Integra Transmission Assembly Parts Questions & Experts Answers
- Q: How to remove and install the Transmission Assembly on an Acura Integra?A:Take the cable from the car's battery negative side. Also, pick up the security system locking code if your radio has it. Take off the air filter housing, intake air pipe, and exhaust muffler to work easier. Take both starter cables away from the starter, along with their mounting bracket. Remove the transaxle ground cable, and unplug the power connections from both the lock-up control solenoid and speed sensor. Take out the three bolts that hold the transaxle to the engine in the upper areas, and remove the engine's rear bolt. Place your car on jackstands, then release and back off the wheel hub and lug nuts to take off the wheels and raise the vehicle. Replace the drain plug when you put back the splash shield and take the old transmission fluid out. Put in a fresh sealing washer. Separate the lower arm from the steering knuckle, pull the damper rod out of the right suspension joint, extract the front drive shafts and something in the middle. Begin by taking off the elbow-shaped pipe under the engine, then remove the Shift Cable cover and disconnect the cable from its place on the transaxle. Pull out the right front mount bracket while also taking apart the throttle control cable connecting to the throttle control bar, just on Integra models. Disconnect and turn the transaxle fluid cooler hoses upward on their fittings, then plug the cooler lines to protect the cooler system from dirt and dust damage. Unscrew the bolts connecting the engine stiffeners and remove the plate covering the torque converter or flywheel. Disconnect any electric wires connected to the transmission along the way. Sign where the torque converter or flywheel connects to the drive plate for correct reassembly, then loosen and remove each bolt from the flywheel-to-torque converter or drive plate while turning the crankshaft pulley for space access. First, loosen the bolt that holds the distributor. Then carry the engine with a hoist device attached to its base. Use a transmission jack or floor jack to lift the transaxle at the bottom. Raise it just enough to take the weight off the transaxle mount. Unbolt and take off three engine parts: the lower transaxle side mount, the lower transaxle to engine mount bolt, and the lower engine to transaxle bolt. Also remove the engine mount bolts at the back of the engine block. When lowering the transaxle from the car, position the torque converter so it separates from the driveplate, then lock the converter to the transaxle. To avoid hitting the engine, slowly let the engine down when needed. Before reinstalling, always flush the transaxle's cooler and lines with solvent when the transaxle is taken out to make sure all the solvent is gone after cleaning. Place the starter motor, making sure the torque converter hub fits easily into the pump. Lift the transaxle up slowly, holding it level during the process. Gently guide the torque converter to match the driveplate marks, and push the transaxle forward until its pins find and connect with the converter. Attach and make tight the two bolts connecting the transaxle and engine, but do not push them down to bring the parts together. After reinstalling everything, you follow the same steps in reverse order to complete the installation. Fill the transaxle with exactly the amount of oil mentioned in the manual, taking care to add extra due to the heavier fluid and filter. Turn on the engine, brake the car from rolling, and drive the transmission through its full range of gears three times to make sure the gear shift system works well. Make sure your ignition is set correctly, and correct it if needed. Check the fluid level after the engine runs fully hot and neutralized with the gear selector. Check for any fluid dripping while driving.
")
Related Acura Integra Parts
 Acura Integra Torque Converter
 Acura Integra Valve Body
 Acura Integra Transmission Gasket
 Acura Integra Side Cover Gasket
Browse by Year
2026 Transmission Assembly 2025 Transmission Assembly 2024 Transmission Assembly 2023 Transmission Assembly 2001 Transmission Assembly 2000 Transmission Assembly 1999 Transmission Assembly 1998 Transmission Assembly 1997 Transmission Assembly 1996 Transmission Assembly 1995 Transmission Assembly 1994 Transmission Assembly 1993 Transmission Assembly 1992 Transmission Assembly 1991 Transmission Assembly 1990 Transmission Assembly 1989 Transmission Assembly 1988 Transmission Assembly 1987 Transmission Assembly 1986 Transmission Assembly