×
- Hello
- Login or Register
- Quick Links
- Live Chat
- Track Order
- Parts Availability
- RMA
- Help Center
- Contact Us
- Shop for
- Acura Parts
- Acura Accessories
My Garage
My Account
Cart
Genuine Acura Legend Brake Disc
Disc Rotor- Select Vehicle by Model
- Select Vehicle by VIN
Select Vehicle by Model
orMake
Model
Year
Select Vehicle by VIN
For the most accurate results, select vehicle by your VIN (Vehicle Identification Number).
7 Brake Discs found


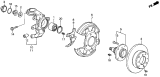
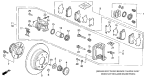
Acura Legend Disc Brake, Front
Part Number: 45251-S2H-N00$106.22 MSRP: $150.03You Save: $43.81 (30%)Ships in 1-3 Business Days


Acura Legend Brake Disc
Acura Legend Brake Disc is one of the notable parts well known for its dependency and execrating function which guarantee the durability and intension of the Acura Legend cars. Mainly meant to deliver the slippage surface for efficient slowing down process, the Brake Disc is affixed to the axle or the hub, thus creating perfect contact with the hydraulic caliper. This interaction is a critical component in improving the car's efficiency and safety; thus, the is a reliable luxury car brand. The Brake Disc fits into different Legend models; the Legend 2-door coupe, and the Legend 4-door sedan to portray its flexibility to fit different forms. Notably, Acura Legend Brake Disc comes with new styles including the vonet rotor that enhances the expansion of heat thus very essential for the high recommendation for use in performance oriented cars. This leads to elimination of such problems as warping and scoring to enable consistent braking action. Moreover, some of the constructions of the Brake Disc uses composite materials that increases durability and performance of the Acura Legend from other automobiles in the market. It should be noted that the Brake Disc is utilized to directly control the braking system of the vehicle; therefore, it is critical to maintain the component by replacing the indicated Brake Disc whenever possible. The exhibit of the product known as the Brake Disc clearly manifests the brand's quality in engineering and safety, making the automobile brand's products reliable and competitive to other auto brands available today.
We provide a broad range of OEM Acura Legend Brake Disc at unbeatable prices on our website. For your OEM parts, You can count on the guaranteed quality, manufacturer's warranty, outstanding customer service, and prompt delivery. We look forward to your visit.
Acura Legend Brake Disc Parts Questions & Experts Answers
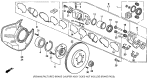
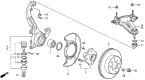
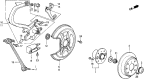
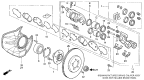
- Q: How to remove and install Brake Discs on an Acura Legend?A:This procedure applies to both the front and rear brake discs on vehicles equipped with them. Begin by loosening the wheel nuts, raising the vehicle, and securely supporting it on jack stands. Remove the wheel and install two lug nuts with 3 mm thick washers under them to hold the disc in place, unless the two disc retaining screws are still in place. For rear disc removal, release the parking brake. Next, remove the front or rear Brake Caliper without disconnecting the brake hose, and suspend it out of the way with a piece of wire. Remove the caliper mounting bracket-to-steering knuckle bolts for the front or the bracket-to-spindle bolts for the rear, then take off the mounting bracket. Visually inspect the disc surface for scoring or damage; light scratches and shallow grooves are normal, but deep scoring over 0.015 inch requires refinishing. If pulsation during braking is noted, check for disc runout using a dial indicator placed about 1/2-inch from the outer edge of the disc, ensuring the reading does not exceed the allowable limit. Regardless of the reading, resurfacing the discs is recommended for a smooth finish. Ensure the disc is not machined to a thickness less than the minimum allowable thickness, which is stamped on the disc and can be checked with a micrometer. To remove the disc, take off the two lug nuts or the two disc retaining screws, using an impact screwdriver if necessary. If the disc is stuck, thread two bolts into the holes provided and alternate tightening them until the disc is free, being careful not to damage the threads on the studs. For installation, place the disc over the threaded studs, then install the caliper mounting bracket, brake pads, and caliper over the disc, tightening the bolts to the specified torque. Finally, install the wheel, lower the vehicle, and depress the brake pedal a few times to bring the brake pads into contact with the disc, checking the operation of the brakes before returning the vehicle to normal service.


