×
- Hello
- Login or Register
- Quick Links
- Live Chat
- Track Order
- Parts Availability
- RMA
- Help Center
- Contact Us
- Shop for
- Acura Parts
- Acura Accessories
My Garage
My Account
Cart
Genuine Acura Legend Brake Light Switch
Brake Lamp Switch- Select Vehicle by Model
- Select Vehicle by VIN
Select Vehicle by Model
orMake
Model
Year
Select Vehicle by VIN
For the most accurate results, select vehicle by your VIN (Vehicle Identification Number).
1 Brake Light Switch found

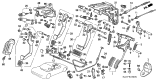
Acura Legend Stop & Cruise Switch Assembly
Part Number: 36750-SE0-013$107.91 MSRP: $152.42You Save: $44.51 (30%)Ships in 1 Business Day
Acura Legend Brake Light Switch
The Acura Legend Brake Light Switch is a small electrical trigger that lights the rear stop lamps the instant the brake pedal is pressed, alerting drivers behind you that the car is slowing. Fixed to a bracket under the dash, the Brake Light Switch touches the pedal arm and when the pedal moves forward the internal contacts close and feed current to the bulbs. During the model's lifespan, Acura applied two main Brake Light Switch designs, an early screw-in plunger switch on first-generation Legend cars and a later compact micro style on the second generation. The plunger relies on a spring-loaded pin pushed straight into the housing, while the micro version employs a tiny lever for quicker actuation and longer life, helping each Legend stay visible. A worn Brake Light Switch can leave the lamps dark or stuck on, so every Acura Legend driver should check pedal engagement and lamp response. Swapping the Brake Light Switch involves unplugging a two-wire connector, removing the old part, setting proper clearance, and confirming the Acura lights work.
We provide a broad range of OEM Acura Legend Brake Light Switch at unbeatable prices on our website. For your OEM parts, You can count on the guaranteed quality, manufacturer's warranty, outstanding customer service, and prompt delivery. We look forward to your visit.
Acura Legend Brake Light Switch Parts Questions & Experts Answers
- Q: How to check and adjust the Brake Light Switch on an Acura Legend?A:To check the brake light switch, push on the brake pedal and verify that the brake lights come on. If they don't, check the brake light fuse in the under-hood fusebox on most models and also check the brake light bulbs in both taillight assemblies, including the high-mount brake light. Locate the brake light switch at the top of the brake pedal, unplug the switch connector, and check for continuity across switch terminals A and B with an ohmmeter; there should be continuity when the brake pedal is depressed and none when it's released. If the switch doesn't operate as described, replace it by disconnecting the electrical connector from the switch, removing the locknut on the pedal side, and unscrewing the switch from the bracket, with installation being the reverse of removal. For adjustment, loosen the brake light switch locknut and back off the switch until it's not touching the brake pedal, then adjust the pushrod with pliers until the pedal height from the floor is correct, tightening the locknut securely. Screw in the brake light switch until its plunger is fully depressed, back off the switch half a turn, and tighten the locknut securely. Finally, depress the pedal with your hand and measure the pedal freeplay, ensuring it is within the specified dimensions and that the brake lights operate correctly.

Related Acura Legend Parts
 Acura Legend Oil Pressure Switch
 Acura Legend Headlight Switch
 Acura Legend Door Jamb Switch
 Acura Legend Seat Switch
 Acura Legend Turn Signal Switch
 Acura Legend Back Up Light Switch
 Acura Legend Mirror Switch
 Acura Legend Neutral Safety Switch
 Acura Legend Power Steering Pressure Switch
 Acura Legend Seat Heater Switch
 Acura Legend Wiper Switch