×
- Hello
- Login or Register
- Quick Links
- Live Chat
- Track Order
- Parts Availability
- RMA
- Help Center
- Contact Us
- Shop for
- Acura Parts
- Acura Accessories
My Garage
My Account
Cart
Genuine Acura Integra A/C Expansion Valve
Air Conditioning Expansion Valve- Select Vehicle by Model
- Select Vehicle by VIN
Select Vehicle by Model
orMake
Model
Year
Select Vehicle by VIN
For the most accurate results, select vehicle by your VIN (Vehicle Identification Number).
7 A/C Expansion Valves found

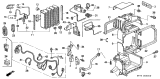
Acura Integra Expansion Valve Assembly (10N)
Part Number: 80220-ST7-A12$78.38 MSRP: $110.22You Save: $31.84 (29%)Ships in 1-2 Business Days
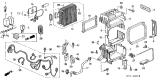
Acura Integra Valve Assembly, Expansion (10N) (Fuji Koki America)
Part Number: 80220-S84-A02$82.55 MSRP: $115.82You Save: $33.27 (29%)Ships in 1-3 Business Days
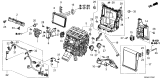
Acura Integra Valve, Expansion
Part Number: 80220-T21-A41$51.33 MSRP: $71.58You Save: $20.25 (29%)Ships in 1-3 Business Days
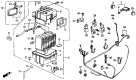

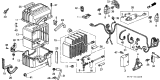
Acura Integra A/C Expansion Valve
Acura Integra A/C Expansion Valve is applied in controlling the flow of refrigerant between the high and low pressure sides of the system. This provides the car with consistent cooling equivalent to the car dashboard setting. The A/C Expansion Valve balances pressure by using a temperature sensing element and adjustable internal passages to ensure evenly distributed liquid refrigerant flow through the evaporator. An alternative fixed orifice tube balances flow by constriction alone, resulting in more frequent cycling of the compressor. Over decades, the owners of Acura cars have proved that both devices are reliable under the conditions of keeping them clean. A properly maintained A/C Expansion Valve reacts immediately to changes in temperature. Earlier and later Integra models have swapped between these two styles. The adjustable A/C Expansion Valve allows smoother performance during stop and go traffic, whereas the basic orifice tube is simpler but can create bigger temperature swings at idle. Both designs typically feature a small screen that traps debris, and flushing of the lines when changing filters keeps that filter in good condition. Routine checks on Acura vehicles ensure the valve stays calibrated, and the third generation Integra is lauded by its owners as delivering consistent vent temperature. Neglecting to fix a sticky A/C Expansion Valve may cause evaporator freeze up, pressure surges, and expensive compressor failure that can be avoided by getting proactive service to keep Acura comfortable in every Integra.
We provide a broad range of OEM Acura Integra A/C Expansion Valve at unbeatable prices on our website. For your OEM parts, You can count on the guaranteed quality, manufacturer's warranty, outstanding customer service, and prompt delivery. We look forward to your visit.
Acura Integra A/C Expansion Valve Parts Questions & Experts Answers
- Q: How to remove and install an evaporator and A/C Expansion Valve on Acura Integra?A:Have the air conditioning system discharged by a dealer service department or automotive air conditioning repair facility. Disconnect the cable from the negative terminal of the battery. Disable the airbag, if equipped. Caution: If the radio in your vehicle is equipped with an antitheft system, make sure you have the correct activation code before disconnecting the battery. Disconnect the two lines from the evaporator. Plug both lines to prevent the entry of contaminants and moisture into the air conditioning system. Remove the glovebox and the glovebox frame. Disconnect the electrical connector from the air conditioning thermostat and remove the wiring harness clips from the evaporator housing. Remove the evaporator unit retaining screws and nuts, pull the evaporator unit out far enough to disconnect the drain hose and remove the unit from the vehicle. Remove the screws and clips retaining the evaporator case halves together, remove the air conditioning thermostat and separate the housing. Remove the evaporator core from the housing and remove the expansion valve, if necessary. Installation is the reverse of removal. Have the system evacuated, charged and leak tested by a dealer service department or automotive air conditioning repair facility. If a new evaporator was installed, add 1-1/3 ounces of refrigerant oil.
")
Related Acura Integra Parts
 Acura Integra Blower Motor
 Acura Integra Blower Motor Resistor
 Acura Integra A/C Clutch
 Acura Integra A/C Accumulator
 Acura Integra A/C Compressor
 Acura Integra A/C Hose
 Acura Integra A/C Idler Pulley
 Acura Integra A/C Switch
 Acura Integra Blend Door Actuator
 Acura Integra Evaporator
Browse by Year
2026 A/C Expansion Valve 2025 A/C Expansion Valve 2024 A/C Expansion Valve 2023 A/C Expansion Valve 2001 A/C Expansion Valve 2000 A/C Expansion Valve 1999 A/C Expansion Valve 1998 A/C Expansion Valve 1997 A/C Expansion Valve 1996 A/C Expansion Valve 1995 A/C Expansion Valve 1994 A/C Expansion Valve 1993 A/C Expansion Valve 1992 A/C Expansion Valve 1991 A/C Expansion Valve 1990 A/C Expansion Valve 1989 A/C Expansion Valve 1988 A/C Expansion Valve 1987 A/C Expansion Valve 1986 A/C Expansion Valve