×
- Hello
- Login or Register
- Quick Links
- Live Chat
- Track Order
- Parts Availability
- RMA
- Help Center
- Contact Us
- Shop for
- Acura Parts
- Acura Accessories
My Garage
My Account
Cart
Genuine Acura Integra Alternator
Generator- Select Vehicle by Model
- Select Vehicle by VIN
Select Vehicle by Model
orMake
Model
Year
Select Vehicle by VIN
For the most accurate results, select vehicle by your VIN (Vehicle Identification Number).
13 Alternators found

Acura Integra Alternator (Reman)
Part Number: 31100-PG7-013RMD$156.70 MSRP: $220.44You Save: $63.74 (29%)Ships in 1-3 Business Days

Acura Integra Alternator (Csc1)
Part Number: 31100-6PV-305$455.97 MSRP: $651.20You Save: $195.23 (30%)Ships in 1-2 Business Days
Acura Integra Alternator (Csp71)
Part Number: 31100-5PA-A02$600.20 MSRP: $857.18You Save: $256.98 (30%)Ships in 1-3 Business Days


Acura Integra Alternator
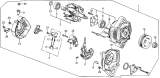
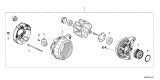
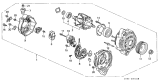
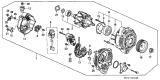
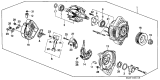
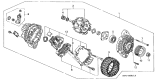
The Acura Integra Alternator turns engine motion into electric current to keep the battery charged and the cabin illuminated. Enclosed in two cast aluminum halves, the unit spins a rotor located inside fixed stator windings. Moreover, the magnetic field which a belt driven pulley generates produces an AC power flow that diodes convert to direct current. This drives the lights, ignition, and charging. Therefore, the battery feeds as Alternator output. The early versions of Integra utilized an Alternator working of which was controlled by either an external voltage regulator or an integral voltage regulator, but in newer cars, regulation is done by the Powertrain Control Module. This allows for a quicker response and better sophistication in avoiding overcharging. While all Alternators share a common rotor-stator core, later models pair the pulley with a dedicated fan for better cooling, while the rectifier, brushes, and regulator are thoughtfully packed in the rear housing. Owners of the Acura benefit because the device sits up front where the crankshaft belt can drive it whenever the engine runs, and every Integra generation enjoys stable current. This compact Acura component is dependable with a steady Alternator output across the full Acura Integra lineup, ensuring optimal performance from the Alternator.
We provide a broad range of OEM Acura Integra Alternator at unbeatable prices on our website. For your OEM parts, You can count on the guaranteed quality, manufacturer's warranty, outstanding customer service, and prompt delivery. We look forward to your visit.
Acura Integra Alternator Parts Questions & Experts Answers
- Q: How to remove and install the alternator on an Acura Integra?A:Untouch the cable connected to the Battery's negative terminal. During this process, keep your radio activation code ready if anti-theft security is installed. Cut and take off each electrical wire and connection point from the alternator. Taking it easy, undo the adjusting bolt for the alternator, the pivot bolt, pull the drivebelt off. Before you take the alternator out of the engine bay in any lntegra models, first loosen the driveaxle below by removing the bottom control arm from both the shock absorber fork and the steering knuckle, then separate the outer end of the left driveaxle from the wheel hub. Free the engine block support bearing for the intermediate shaft, remove the adjustment and pivot bolts, and lower the alternator from its place. Take your old alternator with you to buy a replacement, making sure the new one looks precisely the same with the same number of terminals in the same spots, with identical size and identification numbers. When buying a fresh or reconditioned alternator, check with the workshop first to see if they'll give you a free pulley along with it. To make sure your new alternator works fine, install it the same way you took it off. After that, adjust drivebelts and check charging power levels.
 (Denso)")
Related Acura Integra Parts
 Acura Integra Starter Motor
 Acura Integra Voltage Regulator
 Acura Integra Alternator Pulley
 Acura Integra Alternator Bearing
 Acura Integra Alternator Brush
 Acura Integra Alternator Case Kit
 Acura Integra Armature
 Acura Integra Starter Brush
 Acura Integra Starter Drive
 Acura Integra Starter Solenoid
Browse by Year
2026 Alternator 2025 Alternator 2024 Alternator 2023 Alternator 2001 Alternator 2000 Alternator 1999 Alternator 1998 Alternator 1997 Alternator 1996 Alternator 1995 Alternator 1994 Alternator 1993 Alternator 1992 Alternator 1991 Alternator 1990 Alternator 1989 Alternator 1988 Alternator 1987 Alternator 1986 Alternator