×
- Hello
- Login or Register
- Quick Links
- Live Chat
- Track Order
- Parts Availability
- RMA
- Help Center
- Contact Us
- Shop for
- Acura Parts
- Acura Accessories
My Garage
My Account
Cart
Genuine Acura Integra Clutch Master Cylinder
- Select Vehicle by Model
- Select Vehicle by VIN
Select Vehicle by Model
orMake
Model
Year
Select Vehicle by VIN
For the most accurate results, select vehicle by your VIN (Vehicle Identification Number).
2 Clutch Master Cylinders found

Acura Integra M/Cyl Assembly , Clutch
Part Number: 46920-3K0-H02$67.54 MSRP: $94.20You Save: $26.66 (29%)Ships in 1-3 Business Days

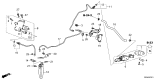
Acura Integra Clutch Master Cylinder
The Acura Integra Clutch Master Cylinder lets drivers disconnect the engine from the gearbox to allow a smooth gear change simply by applying pedal pressure. The clutch pedal and the slave cylinder are now separated by the Clutch Master Cylinder. As you press the clutch pedal, a line of brake fluid is pushed through. The pressure of the movement of the fluid drives the slave piston that maintains the separation of the clutch disc from the flywheel, preventing a gear grind to allow easy shifting. The sporty Integra model of all Acuras employs a single hydraulic operation rather than cable actuation. Hence, the same Clutch Master Cylinder principle has served every generation. The materials and shapes of reservoirs applied in brake systems have evolved over time, but the differences in the braking system of Acura and Integra are just small improvements that enhance the seal and pedal feel. Thus, Acura and Integra share the same operating steps because they are the same in essence. Due to the direct effect of the Clutch Master Cylinder on hydraulic pressure, wear or leaks will quickly manifest as a spongy pedal, sticking pedal, fluid near the firewall, or hard gear engagement. Routine fluid checks keep Acura performance crisp and help any Integra maintain confident manual control. The Clutch Master Cylinder is essential for optimal performance.
We provide a broad range of OEM Acura Integra Clutch Master Cylinder at unbeatable prices on our website. For your OEM parts, You can count on the guaranteed quality, manufacturer's warranty, outstanding customer service, and prompt delivery. We look forward to your visit.
Acura Integra Clutch Master Cylinder Parts Questions & Experts Answers
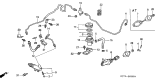
- Q: How to remove and install the Clutch Master Cylinder on an Acura Integra?A:To remove the clutch master cylinder, first disconnect the cable from the negative battery terminal, ensuring you have the correct activation code for the radio if it has an anti-theft system. Next, work under the dashboard to remove the cotter pin or spring clip from the master cylinder pushrod clevis and pull out the clevis pin to disconnect the pushrod from the pedal. Detach the clutch master cylinder reservoir, which is located in the left rear corner of the engine compartment, by removing the two bolts and lifting it out of the way. Use locking pliers to clamp the clutch fluid feed hose a couple of inches downstream of the reservoir to prevent fluid from leaking when disconnecting it from the clutch master cylinder. Disconnect the hydraulic lines at the cylinder by loosening the hose clamp on the feed line and using a flare-nut wrench to loosen the pressure line fitting, then remove the two mounting bolts from under the dash. Loosen the fluid feed hose clamp and detach the hose from the cylinder, having rags ready to catch any fluid that may spill. Cap or plug the ends of the lines to prevent leakage and contamination, taking care to avoid brake fluid contact with paint. Finally, unscrew the two retaining nuts for the clutch master cylinder, remove the cotter pin and clevis pin to detach it from the pedal, and take the cylinder out. For installation, position the master cylinder and install the mounting nuts finger tight. Connect the hydraulic lines to the master cylinder, adjusting the cylinder as needed to thread the fitting, and attach the fluid feed hose, tightening the hose clamp. Securely tighten the mounting nuts and the hydraulic line fitting, then connect the pushrod to the clutch pedal, using a new cotter pin if necessary. Remove the locking pliers from the feed hose, fill the clutch master cylinder reservoir with brake fluid that meets DOT 3 specifications, and bleed the clutch system.

Related Acura Integra Parts
 Acura Integra Clutch Disc
 Acura Integra Clutch Slave Cylinder
 Acura Integra Release Bearing
 Acura Integra Pressure Plate
 Acura Integra Clutch Fork
 Acura Integra Pilot Bearing
 Acura Integra Clutch Cable
Browse by Year
2026 Clutch Master Cylinder 2025 Clutch Master Cylinder 2024 Clutch Master Cylinder 2023 Clutch Master Cylinder 2001 Clutch Master Cylinder 2000 Clutch Master Cylinder 1999 Clutch Master Cylinder 1998 Clutch Master Cylinder 1997 Clutch Master Cylinder 1996 Clutch Master Cylinder 1995 Clutch Master Cylinder 1994 Clutch Master Cylinder