×
- Hello
- Login or Register
- Quick Links
- Live Chat
- Track Order
- Parts Availability
- RMA
- Help Center
- Contact Us
- Shop for
- Acura Parts
- Acura Accessories
My Garage
My Account
Cart
Genuine Acura Integra Coil Springs
Strut Spring- Select Vehicle by Model
- Select Vehicle by VIN
Select Vehicle by Model
orMake
Model
Year
Select Vehicle by VIN
For the most accurate results, select vehicle by your VIN (Vehicle Identification Number).
31 Coil Springs found

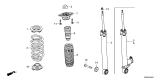
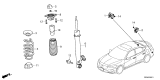
Acura Integra Spring, Rear
Part Number: 52441-3S5-A51$52.50 MSRP: $73.22You Save: $20.72 (29%)Ships in 1-3 Business DaysAcura Integra Spring, Rear
Part Number: 52441-3S5-A01$52.50 MSRP: $73.22You Save: $20.72 (29%)Ships in 1-3 Business Days
Acura Integra Spring, Rear
Part Number: 52441-31M-A01$104.95 MSRP: $147.24You Save: $42.29 (29%)Ships in 1-2 Business Days
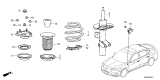
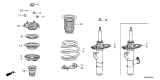
Acura Integra Spring, Left Front
Part Number: 51406-TGH-A02$102.85 MSRP: $144.28You Save: $41.43 (29%)Ships in 1-2 Business Days
Acura Integra Spring, Left Front
Part Number: 51406-3S5-A21$36.14 MSRP: $50.40You Save: $14.26 (29%)Ships in 1-3 Business DaysAcura Integra Spring, Left Front
Part Number: 51406-3S5-A11$36.14 MSRP: $50.40You Save: $14.26 (29%)Ships in 1-3 Business DaysAcura Integra Spring, Left Front
Part Number: 51406-3S5-A01$36.14 MSRP: $50.40You Save: $14.26 (29%)Ships in 1-3 Business Days
Acura Integra Spring, Right Front
Part Number: 51401-TGH-A02$102.56 MSRP: $143.88You Save: $41.32 (29%)Ships in 1-2 Business DaysAcura Integra Spring, Right Front
Part Number: 51401-3S5-A21$35.97 MSRP: $50.17You Save: $14.20 (29%)Ships in 1-3 Business DaysAcura Integra Spring, Right Front
Part Number: 51401-3S5-A11$36.15 MSRP: $50.42You Save: $14.27 (29%)Ships in 1-3 Business DaysAcura Integra Spring, Right Front
Part Number: 51401-3S5-A01$36.14 MSRP: $50.40You Save: $14.26 (29%)Ships in 1-3 Business Days


| Page 1 of 2 |Next >
1-20 of 31 Results
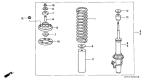
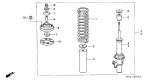
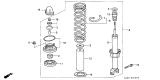
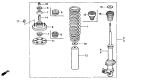
Acura Integra Coil Springs
Integra Coil Springs part of the car are of Acura and are vital specifically in regulating suspension, ride comfort, handling of the vehicle and accurate pressure of the tires. These are elastic that are spirals of wire shaped like a helix and they assist in damping of shock forces and retention of force between surface contacts. It has often been said that they contribute to maintaining of the vehicle stability on the road particularly during spirited traffic or racing. Therefore, OEM coil springs for the Integra are produced by computer-aided design and computer-aided manufacturing and steel alloy to increase the load-carrying capability and reduce body roll. There are also performance coils or custom height w/ full manufacturer warranty and new improved models of most standard widths, dependencies and arches that exceed superior standards for high performance applications.
We provide a broad range of OEM Acura Integra Coil Springs at unbeatable prices on our website. For your OEM parts, You can count on the guaranteed quality, manufacturer's warranty, outstanding customer service, and prompt delivery. We look forward to your visit.
Acura Integra Coil Springs Parts Questions & Experts Answers
- Q: How to Replace Coil Springs and Shock Absorber on Acura Integra?A:Inspect the shock absorber for damage and the coil spring for chips or cracks. Mount the assembly in a vise, marking the damper base's relationship to the spring. Install the spring compressor and relieve pressure from the damper base. Remove the damper cap, unscrew the self-locking nut, and lift the compressed spring. Slide the parts off the damper shaft, install the bump stop, dust cover, and plate onto the new damper unit. Extend the damper shaft and slide the components down. Place the coil spring onto the shock absorber body, install the mounting rubber, collar, base, seal, washer, and a new self-locking nut. Align the marks on the base and spring, tighten the nut, remove the spring compressor, install the damper cap and the assembly.
")
Related Acura Integra Parts
 Acura Integra Coil Spring Insulator
 Acura Integra Shock And Strut Mount
 Acura Integra Bump Stop
 Acura Integra Rear Crossmember
 Acura Integra Shock Absorber
 Acura Integra Strut Bearing
Browse by Year
2026 Coil Springs 2025 Coil Springs 2024 Coil Springs 2023 Coil Springs 2001 Coil Springs 2000 Coil Springs 1999 Coil Springs 1998 Coil Springs 1997 Coil Springs 1996 Coil Springs 1995 Coil Springs 1994 Coil Springs 1993 Coil Springs 1992 Coil Springs 1991 Coil Springs 1990 Coil Springs 1989 Coil Springs 1988 Coil Springs 1987 Coil Springs 1986 Coil Springs