×
- Hello
- Login or Register
- Quick Links
- Live Chat
- Track Order
- Parts Availability
- RMA
- Help Center
- Contact Us
- Shop for
- Acura Parts
- Acura Accessories
My Garage
My Account
Cart
Genuine Acura Integra Flywheel
Clutch Flywheel- Select Vehicle by Model
- Select Vehicle by VIN
Select Vehicle by Model
orMake
Model
Year
Select Vehicle by VIN
For the most accurate results, select vehicle by your VIN (Vehicle Identification Number).
14 Flywheels found

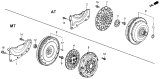
Acura Integra Plate,Drive
Part Number: 26251-50P-000$32.01 MSRP: $44.64You Save: $12.63 (29%)Ships in 1-3 Business Days

Acura Integra Drive Plate
Part Number: 26251-PE1-913$72.03 MSRP: $101.05You Save: $29.02 (29%)Ships in 1-3 Business Days
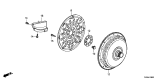
Acura Integra Flywheel
Part Number: 22100-65W-003$672.89 MSRP: $960.99You Save: $288.10 (30%)Ships in 1-2 Business Days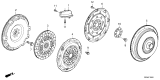
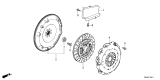
Acura Integra Flywheel
Part Number: 22100-65P-003$371.35 MSRP: $530.35You Save: $159.00 (30%)Ships in 1-3 Business Days


Acura Integra Flywheel
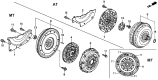
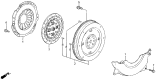
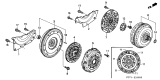
The Acura Integra Flywheel stabilizes engine operation by storing rotational energy and linking starter, crankshaft, and clutch in one compact disc. Bolted to the crankshaft, the Flywheel's mass evens out the pulsing power strokes so the four-cylinder feels steady at every rpm, while its outer ring gear meshes with the starter drive to spin the engine during ignition and its friction face anchors the clutch pack for gear changes. Two styles have appeared in Integra history, the solid single-piece design and the more complex Dual Mass version. A solid unit is one steel disc that can sometimes be resurfaced when scoring or warpage occur, provided only minimal material is removed, making it a reusable Flywheel in many Acura drivetrains. The Dual Mass option adds a spring-loaded secondary plate separated by a damping hub to absorb vibration and ease shifting, yet this complexity means resurfacing is not advised and internal spring failure or excessive runout usually demands full replacement of the Flywheel. Excessive heat, clutch wear, or broken ring gear teeth signal that an Acura Integra requires a new Flywheel to restore smooth performance.
We provide a broad range of OEM Acura Integra Flywheel at unbeatable prices on our website. For your OEM parts, You can count on the guaranteed quality, manufacturer's warranty, outstanding customer service, and prompt delivery. We look forward to your visit.
Acura Integra Flywheel Parts Questions & Experts Answers
- Q: How to remove and reinstall the Flywheel on an Acura Integra?A:To remove the transaxle, first raise the vehicle and support it securely on jackstands, then proceed to remove the transaxle. If equipped with a manual transaxle, take off the pressure plate and clutch disc, which is also a good time to check or replace the clutch components and pilot bearing. Next, remove the bolts securing the flywheel/driveplate to the crankshaft; if the crankshaft turns, wedge a screwdriver in the ring gear teeth for manual transaxle models or insert a long punch through one of the holes in the driveplate for automatic transaxle models. Carefully remove the flywheel/driveplate from the crankshaft, supporting it while removing the last bolt due to its weight. Clean the flywheel to eliminate grease and oil, inspecting the surface for cracks, rivet grooves, burned areas, and score marks, with light scoring removable using emery cloth. Check for cracked and broken ring gear teeth, laying the flywheel on a flat surface to check for warpage with a straightedge. Clean and inspect the mating surfaces of the flywheel/driveplate and crankshaft, replacing the rear main oil seal if it is leaking before reinstalling the flywheel/driveplate. For installation, position the flywheel/driveplate against the crankshaft, ensuring correct alignment with any dowels or staggered bolt holes, and apply thread-locking compound to the bolt threads before tightening them in a crossing pattern to the specified torque. The remainder of the installation follows the reverse order of removal.

Related Acura Integra Parts
 Acura Integra Axle Shaft
 Acura Integra Wheel Bearing
 Acura Integra Shift Cable
 Acura Integra Torque Converter
 Acura Integra Transmission Assembly
 Acura Integra Lug Nuts
 Acura Integra Transfer Case
 Acura Integra Wheel Hub
 Acura Integra Wheel Stud
 Acura Integra Shift Indicator
 Acura Integra Speedometer Cable