×
- Hello
- Login or Register
- Quick Links
- Live Chat
- Track Order
- Parts Availability
- RMA
- Help Center
- Contact Us
- Shop for
- Acura Parts
- Acura Accessories
My Garage
My Account
Cart
Genuine Acura Integra Hood
Engine Hood- Select Vehicle by Model
- Select Vehicle by VIN
Select Vehicle by Model
orMake
Model
Year
Select Vehicle by VIN
For the most accurate results, select vehicle by your VIN (Vehicle Identification Number).
8 Hoods found

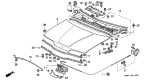
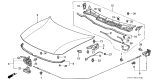
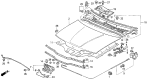
Acura Integra Hood, Engine
Part Number: 60100-31M-A00ZZ$670.79 MSRP: $958.00You Save: $287.21 (30%)Ships in 1-2 Business Days


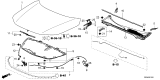


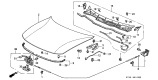

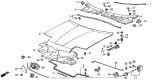


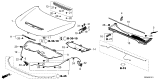
Acura Integra Hood
The engine bay of the Acura Integra is protected by the Hood of the vehicle. However, drivers have quicker hinged access to it for routine checks and repairs. The Acura engineers applied steel for the first Hood panels, but they switched to lighter aluminum and later still, fiberglass sheets to drop mass and sharpen handling. Therefore, an Integra owner receives a quicker steering feel without compromising strength. No matter the material, the Hood is included in the car's frontal crumple structure, so in case of a collision, it folds progressively and absorbs energy before it gets to the cabin. The underside of this Hood helps channel airflow towards the four-cylinder power plant. Weather stripping around the Hood keeps rain and debris out of the Integra drivetrain. The Acura design team sculpted every Integra Hood to have a low profile and subtle contoured shapes that blend into the fenders and headlights to help keep the sporty-looking coupe looking sleek. In this way, styling helped to give the Acura a more sporty touch. The routine opening is accomplished through an interior latch, which has a secondary safety catch to stop accidental lift at speed.
We provide a broad range of OEM Acura Integra Hood at unbeatable prices on our website. For your OEM parts, You can count on the guaranteed quality, manufacturer's warranty, outstanding customer service, and prompt delivery. We look forward to your visit.
Acura Integra Hood Parts Questions & Experts Answers
- Q: How to remove and install a hood on an Acura Integra?A:The removal and installation of the hood requires at least two people due to its weight and awkwardness. Begin by covering the Fenders and cowl areas with blankets or pads to protect the body and paint during the process. Scribe or draw alignment marks around the bolt heads for proper alignment upon installation. Disconnect any cables or wire harnesses that may interfere with the removal. With an assistant supporting the hood's weight, remove the hinge-to-hood bolts and any shims, keeping them organized by side. Lift off the hood, and for installation, reverse the removal steps, ensuring the hinges fit within the scribe marks and reinstalling shims in their original locations for alignment. Adjust the hood's position using the elongated holes in the hinges, scribing a line around the hinge plate to gauge movement. Loosen the bolts, make small adjustments, and retighten them while checking alignment. The Hood Latch assembly can also be adjusted up-and-down and side-to-side on the upper radiator support for a secure and flush closure with the fenders, using a scribed reference line for repositioning. Adjust the vertical height of the leading edge of the hood by modifying the edge cushions, ensuring it is flush with the fenders, and use shims to align the rear edge. Periodically lubricate the hood latch assembly and hinges with white lithium-base grease to prevent sticking and wear.
")


