×
- Hello
- Login or Register
- Quick Links
- Live Chat
- Track Order
- Parts Availability
- RMA
- Help Center
- Contact Us
- Shop for
- Acura Parts
- Acura Accessories
My Garage
My Account
Cart
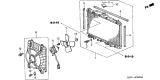
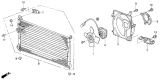
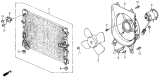
Genuine Acura Legend Cooling Fan Assembly
Engine Cooling Fan- Select Vehicle by Model
- Select Vehicle by VIN
Select Vehicle by Model
orMake
Model
Year
Select Vehicle by VIN
For the most accurate results, select vehicle by your VIN (Vehicle Identification Number).
4 Cooling Fan Assemblys found


Acura Legend Cooling Fan Assembly
The Acura Legend Cooling Fan Assembly provides the crucial airflow that keeps engine temperatures in check when the car is idling or moving slowly, mounted right behind the radiator, the Cooling Fan Assembly pulls ambient air through the core so hot coolant sheds heat before circulating back to the engine. Early Legend models applied a belt driven mechanical fan that spun with engine speed, while later Acura versions adopted an electric Cooling Fan Assembly powered by a compact motor that switches on only when sensors detect rising coolant temperature. Both styles share basic parts, a shrouded blade that focuses flow and sturdy mounts that limit vibration, yet the electric type reacts faster in stop and go traffic, cuts drag at highway, and runs quieter than the mechanical setup. The modern electric Cooling Fan Assembly therefore offers better efficiency and more consistent cooling, but regardless of era every Legend benefits from this assembly's ability to prevent overheating and extend engine life. Regular inspection of the Cooling Fan Assembly ensures that your Acura Legend stays within its safe temperature range on scorching days or long climbs. Owners of any Acura generation of the Legend can trust this proven design.
We provide a broad range of OEM Acura Legend Cooling Fan Assembly at unbeatable prices on our website. For your OEM parts, You can count on the guaranteed quality, manufacturer's warranty, outstanding customer service, and prompt delivery. We look forward to your visit.
Acura Legend Cooling Fan Assembly Parts Questions & Experts Answers
- Q: How Is the Cooling Fan Assembly Tested, Removed, and Reinstalled on an Acura Legend?A:To test the fan motor works, disconnect it from its electrical cable and power it directly from your car battery with short wires. If the fan still doesn't work, replace the motor. The bad part is either damaged fuses, the coolant temperature switch, the resistor, the relay, or the connectors between them. To see if the switch works, separate the plug and join its two terminals together. Turn the key on and leave the engine off for protection - the fan must turn on during this test. Double-check fuses, wiring, and connection points to see if anything is wrong. When there are no clear problems, take your car to a car service shop for further testing and repair. Unplug the battery with the negative terminal wire first. Pull on the parking brake then wedge something behind the back wheels to keep the car from moving during work. After lifting the front of your car, place it safely on jackstands before starting work. Remove the lower splash pan under the Radiator. Push a small screwdriver behind a thin metal tab on the fan cable connecter, lift the tab with the screwdriver, then remove the cables. Remove the fan lower mounting bolts. Take off both fan upper brackets and condenser mounting hardware. Remove the upper radiator support bar. After lowering the radiator, move it just ahead and remove the engine fan from its place above. Before taking apart the fan from the motor, free it by removing either the shaft nut or screws. Screwing out the fan motor's mounting screws is needed to take out the bracket. Installation is the reverse of removal.
")
Related Acura Legend Parts
 Acura Legend Fan Motor
 Acura Legend Coolant Temperature Sensor
 Acura Legend Fan Shroud
 Acura Legend A/C Accumulator
 Acura Legend A/C Compressor Cut-Out Switches
 Acura Legend Cooling Fan Module
 Acura Legend Radiator Cap
 Acura Legend Relay
 Acura Legend A/C Condenser
 Acura Legend Fan Blade
 Acura Legend Radiator