×
- Hello
- Login or Register
- Quick Links
- Live Chat
- Track Order
- Parts Availability
- RMA
- Help Center
- Contact Us
- Shop for
- Acura Parts
- Acura Accessories
My Garage
My Account
Cart
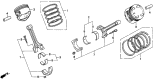
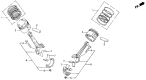
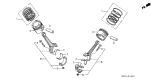
Genuine Acura Legend Pistons
Engine Pistons- Select Vehicle by Model
- Select Vehicle by VIN
Select Vehicle by Model
orMake
Model
Year
Select Vehicle by VIN
For the most accurate results, select vehicle by your VIN (Vehicle Identification Number).
19 Pistons found

Acura Legend Piston B (STD)
Part Number: 13102-PY3-A01$58.66 MSRP: $81.82You Save: $23.16 (29%)Ships in 1-3 Business Days
Acura Legend Piston B (STD)
Part Number: 13102-PY3-A00$58.66 MSRP: $81.82You Save: $23.16 (29%)Ships in 1-3 Business DaysAcura Legend Piston A (STD)
Part Number: 13101-PY3-A02$58.66 MSRP: $81.82You Save: $23.16 (29%)Ships in 1-3 Business DaysAcura Legend Piston A (STD)
Part Number: 13101-PY3-A01$58.66 MSRP: $81.82You Save: $23.16 (29%)Ships in 1-3 Business DaysAcura Legend Piston A (STD)
Part Number: 13101-PY3-A00$58.66 MSRP: $81.82You Save: $23.16 (29%)Ships in 1-3 Business Days


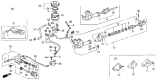
Acura Legend Pistons
Acura Legend Pistons convert the heat of combustion into crankshaft action. This is the engine's muscle that propels the car forward. Inside each of these cylinders, their lightweight aluminum bodies seal hot gases using precision rings. They rush downward to drive the rod and then rise to clear exhaust in a heartbeat. Early generations came with sturdy trunk Pistons that provided good support for side loads to drive daily; later models were slimmer slipper Pistons to reduce reciprocating weight and allow the smooth Legend V6 to rev higher. Both versions share oil-fed cooling cavities that tame extreme temperatures, but the slipper style cuts down on skirt area so friction is reduced and throttle response is made more acute. Track-oriented variants rely on forged racing Pistons to withstand elevated pressure during sustained high RPM bursts. No matter the style, all the Acura V6 in the Legend lineup have tight clearances with low tension rings that protect against blow-by and power loss. Thanks to all these refinements, modern Acura owners enjoy brisk acceleration, refined noise levels, and long service life, all thanks to the Pistons beating at the heart of it all.
We provide a broad range of OEM Acura Legend Pistons at unbeatable prices on our website. For your OEM parts, You can count on the guaranteed quality, manufacturer's warranty, outstanding customer service, and prompt delivery. We look forward to your visit.
Acura Legend Pistons Parts Questions & Experts Answers
- Q: What Steps Are Necessary Before Removing the Connecting Rod and Pistons on an Acura Legend?A:Prior to removing the piston and connecting rod assemblies, the cylinder head(s), oil pan, oil pump pick-up tube, and bearing cap bridge must be taken off. Use your fingernail to check for any ridge at the upper limit of ring travel, approximately 1/4-inch down from the top of each cylinder. If ridges are present due to carbon deposits or cylinder wear, they must be completely removed with a ridge reamer before the pistons are taken out to avoid breakage. Once the ridges are cleared, turn the engine upside-down with the Crankshaft facing up. Before removing the connecting rods, check the side clearance with feeler gauges, ensuring the play is eliminated. If the endplay exceeds the service limit, new connecting rods may be necessary, and if new rods or a new crankshaft are installed, the endplay might need to be adjusted. Mark the connecting rods and caps with a center punch to indicate their associated cylinders, as the existing numbers indicate rod bore size. Loosen the connecting rod cap nuts gradually until they can be removed by hand, then take off the number one connecting rod cap and bearing insert without dropping the insert. To protect the crankshaft journal and cylinder wall during piston removal, slip a short length of plastic or rubber hose over each connecting rod cap bolt. Remove the bearing insert and push the connecting rod/piston assembly out through the top of the engine, using a wooden hammer handle to apply pressure on the upper bearing surface. If resistance is encountered, ensure all ridges have been removed. Repeat this process for the remaining cylinders. After removal, reassemble the connecting rod caps and bearing inserts in their respective rods and install the cap nuts finger tight to prevent accidental damage to the bearing surfaces. Avoid separating the pistons from the connecting rods.
")
Related Acura Legend Parts
 Acura Legend Rod Bearing
 Acura Legend Oil Pan Gasket
 Acura Legend Crankshaft
 Acura Legend Connecting Rod
 Acura Legend Crankshaft Thrust Washer Set
 Acura Legend Piston Rings
 Acura Legend Crankshaft Pulley
 Acura Legend Harmonic Balancer
 Acura Legend Oil Pan
 Acura Legend Oil Pump
 Acura Legend Timing Chain Guide