×
- Hello
- Login or Register
- Quick Links
- Live Chat
- Track Order
- Parts Availability
- RMA
- Help Center
- Contact Us
- Shop for
- Acura Parts
- Acura Accessories
My Garage
My Account
Cart
Genuine Acura Legend Piston Rings
Piston Ring Set- Select Vehicle by Model
- Select Vehicle by VIN
Select Vehicle by Model
orMake
Model
Year
Select Vehicle by VIN
For the most accurate results, select vehicle by your VIN (Vehicle Identification Number).
20 Piston Rings found


Acura Legend Piston Rings
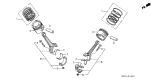
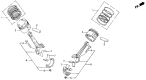
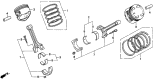
Piston Rings in an Acura Legend offer a tight seal that retains combustion pressure, transfers heat from the piston to the cylinder walls, and scrapes off excess oil for smooth, efficient power. Lightweight aluminum pistons have precision-cut grooves that allow the Piston Rings to spring outward to fit against the bore. The end gap is set to prevent blow-by. The three components of Piston Rings work in coordination. A top compression ring made of steel or ductile iron is plasma-moly or chrome coated to withstand extreme heat. A secondary cast iron compression ring provides extra sealing. An oil control assembly meters oil and returns excess oil to the sump. The early Legend engines had rings of standard width, but more modern Legend updates in Acura powertrains adopted ultra-thin 1 mm top and second rings with 2 mm oil controls to reduce friction, improve bore conformity, and allow for lighter pistons. Choosing the right material is still crucial. Chrome-faced Piston Rings work well in dusty conditions while moly-faced ones allow for rapid bedding. It is essential to have the correct cylinder finish and exact ring gap because even the highly advanced Acura engine relies on Piston Rings that fit perfectly for performance, longevity, and low oil consumption.
We provide a broad range of OEM Acura Legend Piston Rings at unbeatable prices on our website. For your OEM parts, You can count on the guaranteed quality, manufacturer's warranty, outstanding customer service, and prompt delivery. We look forward to your visit.
Acura Legend Piston Rings Parts Questions & Experts Answers
- Q: How to Check and Install Piston Rings on an Acura Legend?A:Check the ring end gaps, before installing the rings, to make sure the side clearance of the piston ring has been verified. During end gap measurement and engine assembly, match the piston and the cylinder with the corresponding piston and Connecting Rod assemblies and new ring sets laid out on the workbench. Seal the top ring to the first cylinder, so it's square with the cylinder walls, and push the top of the piston in to square it with the cylinder wall and get it in near the bottom of the cylinder. Use feeler gauges between the ends of the ring and find the correct gauge that will slide with slight drag. Check the rings and verify if the gap is within the specifications, otherwise run again. If the gap is too small file the ends and replace rings. As long as there is no excess end gap beyond 0.040 inch on the rings, it's not critical, but make sure rings are not obsolescent. Repeat this for each cylinder in the first cylinder and all remaining cylinders; match and keep rings, Pistons, and cylinders in place. Once you've checked and correctly corrected the end gaps, install the rings on the pistons, beginning with the oil control ring made of three pieces. Put the spacer/expander into the groove, ensuring the anti rotation tang is in the correct position (no scratch on the ring) then install the lower side rail but without a ring installation tool. Do the same on the upper side rail, only that both should turn in the groove smoothly. The thing was then to install the middle ring next, facing so the identification mark is on the top, and did so with a piston ring installation tool to slide it into the middle groove without overexpansion. Now, finally, install the press ring into this same way, the mark must be standing up and repeat the procedure for the other pistons and rings.
 (0.25) (Teikoku)")
Related Acura Legend Parts
 Acura Legend Rod Bearing
 Acura Legend Crankshaft
 Acura Legend Pistons
 Acura Legend Connecting Rod
 Acura Legend Crankshaft Thrust Washer Set
 Acura Legend Engine Block
 Acura Legend Crankshaft Pulley
 Acura Legend Engine
 Acura Legend Harmonic Balancer
 Acura Legend Oil Pan
 Acura Legend Oil Pump
 Acura Legend Timing Chain Guide