×
- Hello
- Login or Register
- Quick Links
- Live Chat
- Track Order
- Parts Availability
- RMA
- Help Center
- Contact Us
- Shop for
- Acura Parts
- Acura Accessories
My Garage
My Account
Cart
Genuine Acura TL Flywheel
Clutch Flywheel- Select Vehicle by Model
- Select Vehicle by VIN
Select Vehicle by Model
orMake
Model
Year
Select Vehicle by VIN
For the most accurate results, select vehicle by your VIN (Vehicle Identification Number).
9 Flywheels found


Acura TL Clutch Flywheel
Part Number: 22100-RK2-023$3123.66 MSRP: $4461.10You Save: $1337.44 (30%)Ships in 1-3 Business Days

Acura TL Transmission Flywheel
Part Number: 22100-RCA-006$1280.40 MSRP: $1828.63You Save: $548.23 (30%)Ships in 1-3 Business Days
Acura TL Flywheel
Part Number: 22100-R72-006$1497.48 MSRP: $2138.65You Save: $641.17 (30%)Ships in 1-3 Business Days
Acura TL Plate,Drive
Part Number: 26250-RKG-L00$140.92 MSRP: $199.04You Save: $58.12 (30%)Ships in 1-3 Business Days
Acura TL Drive Plate
Part Number: 26251-P8F-000$66.26 MSRP: $92.41You Save: $26.15 (29%)Ships in 1-3 Business Days


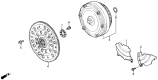
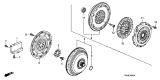
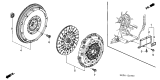
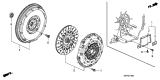
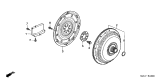
Acura TL Flywheel
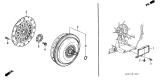
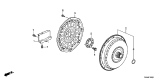
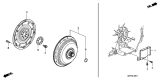
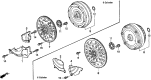
Acura TL Flywheel functions as the rotating hub for storing energy to smooth power from the engine. It cranks the motor when the engine starts and provides the friction face for the clutch grip. Bolted to the crankshaft, the Flywheel's inertia bridges the gap between combustion pulses. The Flywheel has a ring gear that meets the starter drive when the key turns. As the clutch pedal is raised, the disc pushes against the Flywheel surface and torque is transmitted to the transmission. In the day-to-day driving experience, TL owners notice more steady takeoffs and less vibration from this unseen part. Through the years, Acura has applied two styles, a solid and a dual mass Flywheel. Both had the same goals in mind, yet both have very distinct differences. The solid Flywheel is one piece that sometimes can be machined to get rid of heat spots but transmits more vibration. The dual mass type connects the primary and secondary plates and has spring dampers to absorb the chatter and make the shifts more silky. However, internal wear or broken springs require outright replacement since resurfacing is not recommended. Scoring, warpage, or chipped ring gear teeth are a warning that a fresh one is needed, keeping the Acura TL smooth and quiet.
We provide a broad range of OEM Acura TL Flywheel at unbeatable prices on our website. For your OEM parts, You can count on the guaranteed quality, manufacturer's warranty, outstanding customer service, and prompt delivery. We look forward to your visit.
Acura TL Flywheel Parts Questions & Experts Answers
- Q: How to remove and reinstall the Flywheel from the transaxle on an Acura TL?A:Remove the engine and transaxle, then separate the transaxle from the engine. If the vehicle has a manual transmission, remove the pressure plate and clutch disc, taking this opportunity to check or replace the clutch components and pilot bearing if necessary. For an automatic transmission, check and replace the front pump seal or O-ring. Use paint or a center-punch to make alignment marks on the flywheel/driveplate and crankshaft to ensure correct alignment during reinstallation. Remove the bolts securing the flywheel/driveplate to the crankshaft, holding the flywheel with a prybar or wedging a screwdriver into the ring gear teeth if the crankshaft turns. Carefully remove the flywheel/driveplate from the crankshaft, supporting it while removing the last bolt, and retrieve the washer on models with an automatic transaxle. Clean the flywheel to remove grease and oil, inspecting the surface for cracks, rivet grooves, burned areas, and score marks, with light scoring removable using emery cloth. Check for cracked and broken ring gear teeth or a loose ring gear, laying the flywheel on a flat surface to check for warpage with a straightedge. Clean and inspect the mating surfaces of the flywheel/driveplate and crankshaft, replacing the crankshaft rear seal if it is leaking before reinstalling the flywheel/driveplate. Position the flywheel/driveplate against the crankshaft, aligning the marks made during removal, and note that some engines have an alignment dowel or staggered bolt holes for correct installation. Apply thread locking compound to the bolt threads before installation, wedging a screwdriver into the ring gear teeth to prevent the flywheel/driveplate from turning while tightening the bolts to the specified torque. The remainder of the installation follows the reverse order of removal.


