×
- Hello
- Login or Register
- Quick Links
- Live Chat
- Track Order
- Parts Availability
- RMA
- Help Center
- Contact Us
- Shop for
- Acura Parts
- Acura Accessories
My Garage
My Account
Cart
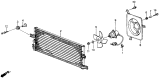
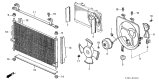
Genuine Acura Integra A/C Condenser
Air Conditioning Condenser- Select Vehicle by Model
- Select Vehicle by VIN
Select Vehicle by Model
orMake
Model
Year
Select Vehicle by VIN
For the most accurate results, select vehicle by your VIN (Vehicle Identification Number).
8 A/C Condensers found

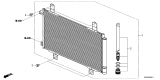
Acura Integra CONDENSER ASSY.
Part Number: 80100-T56-A01$155.55 MSRP: $219.70You Save: $64.15 (30%)Ships in 1-2 Business Days

Acura Integra Condenser Assembly
Part Number: 80100-T21-A02$155.55 MSRP: $219.70You Save: $64.15 (30%)Ships in 1-3 Business Days


Acura Integra A/C Condenser
The Acura Integra A/C Condenser plays a crucial role in the ejection of cabin heat to keep occupants cool. This is done by converting hot gaseous refrigerant into a cool liquid and then pumping it back in the system. The A/C Condenser, which is at the very front of the radiator, operates on the principle of sweeping heat into the oncoming air by a tight array of aluminum tubes and thin fins. The newly liquefied refrigerant moves on to the accumulator. All generations of the Acura Integra are based on the same principle of the aluminum heat exchanger. Thus, regardless of whether the coupe or the hatch was produced at the beginning of the nineties or with the updated revival, the A/C Condenser continues to combine lightweight construction with extensive surface area, making the optimal out of it. Since the compression within the compressor increases the temperature of the refrigerant, the A/C Condenser must quickly dissipate the additional energy. The fin-and-tube design provides the fluid and airflow with a lot of contact, allowing the liquid to cool down and return to the evaporator to undergo further temperature regulation. No other plate or serpentine models are available, demonstrating the proven design as complying with Acura performance requirements without the need to have numerous styles in Integra years. The owners benefit from stable cold air. The Acura Integra A/C Condenser is efficient because of a clean airflow.
We provide a broad range of OEM Acura Integra A/C Condenser at unbeatable prices on our website. For your OEM parts, You can count on the guaranteed quality, manufacturer's warranty, outstanding customer service, and prompt delivery. We look forward to your visit.
Acura Integra A/C Condenser Parts Questions & Experts Answers
- Q: How to remove and install an A/C Condenser on an Acura Integra?A:Leave the refrigerant discharging to professionals at a dealer's service center or auto air conditioner shop, before take out the cable attached to your car battery's negative terminal - but only if needed, as radio anti-theft systems require specific activation codes. To start work on an Integra model, take these steps: remove the Coolant Reservoir, set it aside, and then set aside the radiator upper mounting brackets and the refrigerant line support bracket attached to the radiator support. First detach the condenser hose and pee for wind, lines from the condenser. Then unfasten and take down the brackets and bolts attached to the condenser from above, with two top bolts holding the condenser to the radiator support in Integras. Lower the engine and take out the condenser, tilting the top of the radiator back when you need a bit of space. Reinstalling works just like undismantling, except the parts need fresh O-rings that are coated in refrigerant oil before getting put back together. After finishing work, bring the system to a dealer service department or air conditioning expert for checking, charging, and testing for leaks. Have them add one ounce of refrigerant oil if you've recently installed a new condenser.

Related Acura Integra Parts
 Acura Integra Blower Motor
 Acura Integra Fan Motor
 Acura Integra Blower Motor Resistor
 Acura Integra A/C Clutch
 Acura Integra Fan Shroud
 Acura Integra A/C Expansion Valve
 Acura Integra A/C Accumulator
 Acura Integra A/C Hose
 Acura Integra A/C Switch
 Acura Integra Blend Door Actuator
 Acura Integra Fan Blade
 Acura Integra HVAC Pressure Switch
Browse by Year
2026 A/C Condenser 2025 A/C Condenser 2024 A/C Condenser 2023 A/C Condenser 2001 A/C Condenser 2000 A/C Condenser 1999 A/C Condenser 1998 A/C Condenser 1997 A/C Condenser 1996 A/C Condenser 1995 A/C Condenser 1994 A/C Condenser 1993 A/C Condenser 1992 A/C Condenser 1991 A/C Condenser 1990 A/C Condenser 1989 A/C Condenser 1988 A/C Condenser 1987 A/C Condenser 1986 A/C Condenser