×
- Hello
- Login or Register
- Quick Links
- Live Chat
- Track Order
- Parts Availability
- RMA
- Help Center
- Contact Us
- Shop for
- Acura Parts
- Acura Accessories
My Garage
My Account
Cart
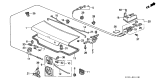
Genuine Acura Integra Trunk Lids
Deck Lids- Select Vehicle by Model
- Select Vehicle by VIN
Select Vehicle by Model
orMake
Model
Year
Select Vehicle by VIN
For the most accurate results, select vehicle by your VIN (Vehicle Identification Number).
5 Trunk Lids found


Acura Integra Trunk Lids
Acura Integra Trunk Lids close off the rear cargo space to protect cargo from the weather, road grime, and thieves while permitting cargo to be loaded quickly via a strong hinged lid. Constructed out of contoured sheet metal, these Trunk Lids pivot on rear hinges and secure with a center latch so valuables such as tools or bikes remain secure even at highway speeds. Over the generations, the Integra maintained a traditional rear-mounted storage door instead of the addition of front frunks, but periodic styling changes have made the opening bigger and the aerodynamics smoother. Each new version of the Trunk Lids blends into new body lines. Daily use subjects the panel to stones, salt, and careless bumpers, and once the dents and corrosion go beyond repair, owners replace the Trunk Lids as a complete assembly, a part that alone can cost anywhere low depending on finish and material. Keeping paint intact and cleaning drain channels help the Acura body panel to outlive the vehicle, although serious impacts do force the fitment of fresh Trunk Lids to restore full weather seal and cargo security for any loyal Acura Integra driver.
We provide a broad range of OEM Acura Integra Trunk Lids at unbeatable prices on our website. For your OEM parts, You can count on the guaranteed quality, manufacturer's warranty, outstanding customer service, and prompt delivery. We look forward to your visit.
Acura Integra Trunk Lids Parts Questions & Experts Answers
- Q: How Can Trunk Lids Be Safely and Correctly Removed and Installed on an Acura Integra?A:The trunk lid is heavy and somewhat awkward to remove and install, so at least two people should perform this procedure. Begin by opening the trunk lid and covering the edges of the trunk compartment with pads or cloths to protect the painted surfaces during removal. Disconnect any cables or wire harness connectors attached to the trunk lid that would interfere with removal, then make alignment marks around the hinge. While an assistant supports the trunk lid, remove the lid-to-hinge bolts on both sides and lift it off. For installation, reverse the removal steps, ensuring to align the lid-to-hinge bolts with the marks made earlier. To adjust the trunk lid, move it in relation to the hinge after loosening the bolts or nuts, and scribe a line around the hinge plate to track movement. Loosen the bolts or nuts, adjust the trunk lid into the correct alignment, and tighten the hinge bolts or nuts before checking the alignment by carefully lowering the trunk lid. If necessary, the entire trunk lid striker assembly can be adjusted up and down as well as from side to side to ensure the lid closes securely and is flush with the rear quarter panels; scribe a line around the striker assembly for reference, loosen the bolts, reposition as needed, and retighten the mounting bolts. Periodically lubricate the trunk lid latch assembly and hinges with white lithium-base grease to prevent sticking and wear. Finally, adjust the height of the trunk lid in relation to the body by screwing the rubber bumpers in or out.
")


