×
- Hello
- Login or Register
- Quick Links
- Live Chat
- Track Order
- Parts Availability
- RMA
- Help Center
- Contact Us
- Shop for
- Acura Parts
- Acura Accessories
My Garage
My Account
Cart
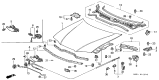
Genuine Acura TL Hood
Engine Hood- Select Vehicle by Model
- Select Vehicle by VIN
Select Vehicle by Model
orMake
Model
Year
Select Vehicle by VIN
For the most accurate results, select vehicle by your VIN (Vehicle Identification Number).
6 Hoods found


Acura TL Engine Hood Gray
Part Number: 60100-SEP-A90ZZ$699.99 MSRP: $999.70You Save: $299.71 (30%)Ships in 1-3 Business Days
Acura TL Engine Hood (Dot) White
Part Number: 60100-TK4-A90ZZ$906.43 MSRP: $1294.53You Save: $388.10 (30%)Ships in 1-3 Business Days


Acura TL Hood
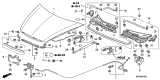
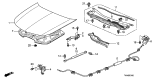
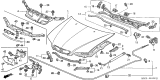
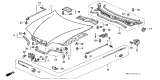
The Acura TL Hood shields the powerful engine bay of the sedan while allowing the owners to access what it needs for service easily. The Hood, with strong hinges at its leading edge, lifts upwards to allow easy access for checks of the powerplant and other systems which produce 305 horsepower. It then drops into place to lock securely while keeping out rain, debris, and heat from the road. Over the years of the Acura TL, the Hood has been made of steel (decent impact resistance), aluminum (to cut weight), and fiberglass (to manage corrosion). During a frontal crash, each of these materials will crumple to absorb energy before it gets to the cabin. While the outward appearance changed with each TL refresh, the major difference lurked beneath the paint, where later panels were lighter to improve acceleration and fuel economy without compromising protection. The precision design of the Hood also channels air around the vehicle efficiently, reducing noise at high speed. Furthermore, the Hood ensures that this Acura sedan has the luxurious feel you would expect from a premium brand.
We provide a broad range of OEM Acura TL Hood at unbeatable prices on our website. For your OEM parts, You can count on the guaranteed quality, manufacturer's warranty, outstanding customer service, and prompt delivery. We look forward to your visit.
Acura TL Hood Parts Questions & Experts Answers
- Q: How can the Hood be removed and installed to ensure proper alignment and protection of the body and paint on an Acura TL?A:The hood is heavy and somewhat awkward to remove and install, so at least two people should perform this procedure. Use blankets or pads to cover the Fenders and cowl areas to protect the body and paint during removal. Scribe or draw alignment marks around the bolt heads and hood hinges to ensure proper alignment during installation. Disconnect any cables or wire harnesses that may interfere with removal, then unbolt the hood support strut from the hood. With assistance, support the weight of the hood, remove the hinge-to-hood bolts, and lift off the hood while supporting it with your shoulder. Installation is the reverse of removal; position the hood so that the hinges fit within the scribe marks made earlier for proper alignment. If installing a new hood or if the hinge positions were not scribed, readjust the hood position. Adjust the hood's fore-and-aft and right-and-left alignment using the elongated holes in the hinges, scribing a line around the hinge plate to judge movement. Loosen the bolts, make small adjustments, and tighten them while checking alignment. If necessary, adjust the entire Hood Latch assembly up-and-down and side-to-side on the upper radiator support, scribing a line around the latch mounting bolts for reference before repositioning and retightening. Adjust the vertical height of the leading edge of the hood by turning the edge cushions in or out to ensure it is flush with the fenders when closed. Periodically lubricate the hood latch assembly and hinges with white lithium-base grease to prevent sticking and wear.


