×
- Hello
- Login or Register
- Quick Links
- Live Chat
- Track Order
- Parts Availability
- RMA
- Help Center
- Contact Us
- Shop for
- Acura Parts
- Acura Accessories
My Garage
My Account
Cart
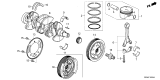
Genuine Acura Integra Connecting Rod
- Select Vehicle by Model
- Select Vehicle by VIN
Select Vehicle by Model
orMake
Model
Year
Select Vehicle by VIN
For the most accurate results, select vehicle by your VIN (Vehicle Identification Number).
9 Connecting Rods found

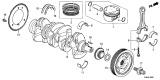
Acura Integra Connecting Rod
Part Number: 13210-6B2-A00$69.82 MSRP: $97.38You Save: $27.56 (29%)Ships in 1-3 Business Days
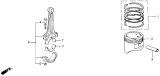
Acura Integra Connecting Rod
Part Number: 13210-PM6-000$197.18 MSRP: $281.60You Save: $84.42 (30%)Ships in 1-3 Business Days


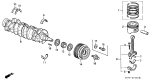


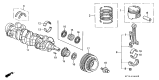

Acura Integra Connecting Rod
The Acura Integra Connecting Rod alters the piston's straight-up-and-down push into smooth crankshaft rotation, so every burst of fuel fire pushes that car forward. A Connecting Rod connects the small end of the piston to the big end of the crankshaft by means of a wrist pin and split big end. All compression and tension forces are transmitted without flex. The early factory rods in the Acura range were of cast iron or powdered metal composition. While these are fine for daily driving, they do not help a particular Integra owner who wants more power. Choices of forged or billet steel Connecting Rods are available for performance builds, with specialized aluminum options appearing in drag racing where weight beats ultimate longevity. Forged I-beam rods provide balanced durability. H-beam Connecting Rod parts, with their broader flanges, are stronger but lighter. Every Connecting Rod is produced with a specific center-to-center length and concentric big end bores and usually features bronze bushings for floating wrist pins. Sturdier bolts are fitted to ensure that the crank throw remains clamped at redline. The refinements allow an Acura Integra engine to rev higher with confidence and unleash additional horsepower without losing street reliability. Additionally, the Connecting Rod plays a crucial role in the overall performance of the engine.
We provide a broad range of OEM Acura Integra Connecting Rod at unbeatable prices on our website. For your OEM parts, You can count on the guaranteed quality, manufacturer's warranty, outstanding customer service, and prompt delivery. We look forward to your visit.
Acura Integra Connecting Rod Parts Questions & Experts Answers
- Q: What are the procedures and precautions for installing connecting rod and pistons assemblies on an Acura Integra?A:Caution is advised when working on B1BC5 DOHC VTEC engines, as the manufacturer recommends using a connecting rod bolt stretch gauge to measure the stretch of the rod bolt during tightening, which is essential to avoid severe engine damage. Before installing piston/connecting rod assemblies, ensure the cylinder walls are clean, the top edges of each cylinder are chamfered, and the Crankshaft is in place. Remove the cap from the number one connecting rod, clean the bearing surfaces, and avoid touching new bearing inserts with fingers. Clean the back side of the new upper bearing insert and install it in the connecting rod, ensuring the tab fits into the recess without using lubricant. Repeat this for the lower bearing insert in the rod cap. Position piston ring gaps correctly, lubricate the piston and rings, and use a piston ring compressor to guide the piston into the cylinder. Rotate the crankshaft to BDC and apply engine oil to the cylinder walls before gently inserting the piston/connecting rod assembly. Tap the ring compressor to ensure contact with the block and gently drive the piston into the cylinder while guiding the connecting rod into place. After installation, check the connecting Rod Bearing oil clearance using Plastigage, ensuring the bearing faces are clean and applying assembly lube before reinstalling the rod cap and tightening the nuts to the specified torque. Repeat the process for remaining pistons/connecting rods, keeping all components clean and ensuring the correct orientation of the piston. After all assemblies are installed, rotate the crankshaft to check for binding and measure the connecting rod endplay, ensuring it meets specifications to avoid the need for resizing at a machine shop.

Related Acura Integra Parts
 Acura Integra Rod Bearing
 Acura Integra Crankshaft Pulley
 Acura Integra Crankshaft
 Acura Integra Timing Chain Guide
 Acura Integra Pistons
 Acura Integra Crankshaft Gear
 Acura Integra Crankshaft Thrust Washer Set
 Acura Integra Engine
 Acura Integra Engine Block
 Acura Integra Harmonic Balancer
 Acura Integra Piston Rings
Browse by Year
2026 Connecting Rod 2025 Connecting Rod 2024 Connecting Rod 2023 Connecting Rod 2001 Connecting Rod 2000 Connecting Rod 1999 Connecting Rod 1998 Connecting Rod 1997 Connecting Rod 1996 Connecting Rod 1995 Connecting Rod 1994 Connecting Rod 1993 Connecting Rod 1992 Connecting Rod 1991 Connecting Rod 1990 Connecting Rod 1989 Connecting Rod 1988 Connecting Rod 1987 Connecting Rod 1986 Connecting Rod