×
- Hello
- Login or Register
- Quick Links
- Live Chat
- Track Order
- Parts Availability
- RMA
- Help Center
- Contact Us
- Shop for
- Acura Parts
- Acura Accessories
My Garage
My Account
Cart
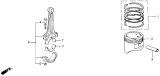
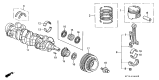
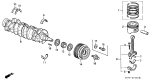
Genuine Acura Integra Pistons
Engine Pistons- Select Vehicle by Model
- Select Vehicle by VIN
Select Vehicle by Model
orMake
Model
Year
Select Vehicle by VIN
For the most accurate results, select vehicle by your VIN (Vehicle Identification Number).
23 Pistons found

Acura Integra Piston (Over Size) (0.25)
Part Number: 13102-P29-000$46.89 MSRP: $65.40You Save: $18.51 (29%)Ships in 1-2 Business Days

Acura Integra Piston Set
Part Number: 13020-66V-A00$248.64 MSRP: $355.10You Save: $106.46 (30%)Ships in 1-2 Business DaysAcura Integra Piston Set
Part Number: 13010-66V-A00$83.78 MSRP: $117.52You Save: $33.74 (29%)Ships in 1-2 Business Days
Acura Integra Piston Set (Std)
Part Number: 13010-5PA-A00$62.46 MSRP: $89.20You Save: $26.74 (30%)Ships in 1-3 Business Days


| Page 1 of 2 |Next >
1-20 of 23 Results
Acura Integra Pistons
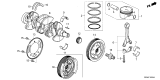
The burning fuel's rapid expansion gets converted into mechanical movement by the Acura Integra Pistons, spinning the crankshaft and moving the car. Metal rings seal the gap between the Pistons and the cylinders to ensure that the pressure of combustion does not leak past the moving head and back into the sump. The materials applied to make a piston include aluminum (aluminum-silicon alloy) that is light in weight and also strong. Pistons use an integrated oil passage to bring cooling lubricant to the interior cavities of the Pistons, allowing it to shed heat. In the four-cylinder layout applied in the Acura Integra, the force of each piston is directed straight down onto the crankshaft through a rod. It is the crankshaft that changes that force from a straight line to rotation. The rotating crankshaft drives the drivetrain, which drives the wheels. The Integra platform relies on this mechanism in the Acura assembly. With their trustworthy operation, the Pistons ensure smooth and efficient power delivery, a durable engine, and peace of mind for Acura drivers every time they start an Integra.
We provide a broad range of OEM Acura Integra Pistons at unbeatable prices on our website. For your OEM parts, You can count on the guaranteed quality, manufacturer's warranty, outstanding customer service, and prompt delivery. We look forward to your visit.
Acura Integra Pistons Parts Questions & Experts Answers
- Q: What Steps Are Necessary Before Removing the Connecting Rod and Pistons on an Acura Integra?A:Prior to removing the piston and connecting rod assemblies, the cylinder head, oil pan, oil pump pick-up tube, pump, and baffle plate must be taken off. Use your fingernail to check for any ridges at the upper limit of ring travel, approximately 1/4-inch down from the top of each cylinder. If ridges are present due to carbon deposits or cylinder wear, they must be completely removed with a special tool, as failure to do so may result in piston breakage. After addressing any cylinder ridges, turn the engine upside-down with the Crankshaft facing up. The bearing cap bridge should be removed first to access the connecting rods, except for specific DOHC non-VTEC engines. Before removing the connecting rods, check the side clearance with feeler gauges, ensuring that the endplay does not exceed the service limit; if it does, new connecting rods may be necessary. The existing numbers on the connecting rods indicate the rod bore size, not their position in the engine, so mark each rod and cap with indentations corresponding to their associated cylinder numbers. Loosen the connecting rod cap nuts gradually until they can be removed by hand, then take off the number one connecting rod cap and bearing insert without dropping the insert. To protect the crankshaft journal and cylinder wall during piston removal, slip a short length of plastic or rubber hose over each connecting rod cap bolt. Remove the bearing insert and push the connecting rod/piston assembly out through the top of the engine, using a wooden hammer handle to apply pressure on the upper bearing surface. If resistance is encountered, ensure that all ridges have been removed from the cylinder. Repeat this process for the remaining cylinders. After removal, reassemble the connecting rod caps and bearing inserts in their respective rods and install the cap nuts finger tight to prevent accidental damage to the bearing surfaces. Avoid separating the pistons from the connecting rods.

Related Acura Integra Parts
 Acura Integra Rod Bearing
 Acura Integra Oil Pan
 Acura Integra Oil Pump
 Acura Integra Oil Pan Gasket
 Acura Integra Crankshaft Pulley
 Acura Integra Crankshaft
 Acura Integra Timing Chain Guide
 Acura Integra Connecting Rod
 Acura Integra Crankshaft Gear
 Acura Integra Crankshaft Thrust Washer Set
 Acura Integra Harmonic Balancer
 Acura Integra Piston Rings